CS 43 — Lab 6: Fast Reliable Transport
Due: Wednesday, May 4 @ 11:59 PM
|
As you begin this lab, please clone your lab 6 directory and copy in just
your I don’t care whether you rename the structs (e.g., |
1. Overview
For this lab, you’ll be continuing your development of a reliable data transfer protocol over an unreliable (simulated) link, only this time, your transfer rate should improve significantly! Your submission will still be in the form of a library that mimics the type of functionality that you would expect to get from an OS’s transport-layer implementation.
You may implement either a go-back-N or selective repeat style of protocol.
1.1. Goals
-
Apply the principles and tools of reliable transport (e.g., acknowledgements and timeouts).
-
Design and implement the accounting for a dynamic window in a transport protocol.
-
Simulate network characteristics with Mininet.
-
Gotta go fast.
1.2. Handy References:
-
selectmanual (for timeouts) -
The protocol you implement will be simpler than TCP, but you may find the course TCP slides or TCP’s header information to be useful for inspiration.
-
The congestion control slides will probably be helpful too, this time.
2. Requirements
For this lab, we’ll be building a stop-and-wait
pipelined protocol with ACKs, timeouts, retransmissions, and RTT estimation
on top of an unreliable channel. Your code will take the form of a library
that applications and call into for reliable transport. The library will use
UDP socket calls to get an unreliable channel, and we’ll use the network
emulator mininet simulate link delay and packet losses in a controlled
manner.
-
Protocol Library API: You are responsible for writing/editing only the following library functions:
-
in
lab6.c:my_socket,my_send,my_rtt,my_recvandmy_close. -
in
lab6.h: add header fields tostruct lab6_hdr. -
to send and receive data across the wire, we’ll be using UDP’s unreliable
sendandrecvfromin your implementation of astop-and-waitpipelined version ofmy_sendandmy_recv. Your code in these functions is responsible for implementing reliability on top of UDP.
-
-
Application layer:
lab6_sender.candlab6_receiver.cimplement the application layer that calls your library functions. Note thatlab6_senderandlab6_receiverrun as separate processes, so they each get their own independent copies of your library (i.e., they don’t share any memory or state).-
You may edit
lab6_sender.candlab6_receiver.cfor testing purposes, but when grading, I will use the starter versions, so do not rely on changes to the application layer for correct operation.
-
2.1. Workflow of Your Program
Your code submission should only modify lab6.c and lab6.h. These two files
are transport layer functions and you can think of them as a reliable transport
library that is independently being imported by lab6_sender.c and
lab6_receiver.c. This means that lab6_sender and lab6_receiver will each
get their own instance of (independent copy of the state from) the lab6.c and
lab6.h files.
-
Set up initial state in
my_socket. You should initialize state that any reliable transport protocol implementation (either sender or receiver) would need to get started.-
Lab 6: You will need to keep additional state at the sender to track the status of multiple in-flight segments. It should take the form of a circular queue of segments. That is, you’ll fill position 0, then 1, then 2, …, up to some max. After reaching the max, it should "roll over" and continue from position 0 again. You should set the max size to the value of
WINDOW_SIZE_CAP, which will be#definedto a large value like 2000.The amount of additional state you need at the receiver depends on whether you implement go-back-N (GBN) or selective repeat. For GBN (which most of you will choose), you don’t need much more state, but you should send back cumulative acknowledgements.
-
-
Define your transport layer segment header format in
lab6.h. -
Write a helper function that helps you maintain an RTT estimate based on sample RTT measurements.
-
Implement reliable sending in
my_send. To reliably send data, you will need to implement the following:-
Copy and send the application layer payload + transport header into your send buffer.
-
Maintain data structures to estimate RTT.
-
Keep track of segments sent and acknowledgements received.
-
Attempt to receive acknowledgements, and resend data segments if you timeout on a segment.
-
Lab 6: With multiple segments in flight, you can no longer always block the user inside a
whileloop inmy_send. When the user callsmy_send, you should create a new segment, send it, and add it to your circular queue of segments. Whether or not you return immediately or enter awhileloop to wait for ACKs / timeouts depends on the number of segments in your queue and size of the current window.If the window is full, then you need to wait for ACKs / timeouts before proceeding, so it’s fine to block. If the window isn’t full though, you need to return back to the application so that it can call
my_sendagain, giving you more data, so that you will eventually fill the window.When checking for timeouts, you’ll need to look through the current window and find the segment with the earliest (soonest) timeout.
-
-
Implement reliable receive in
my_recv. To reliably receive data, you will need to implement the following:-
Receive a segment over the network, you are not required to check for data corruption (e.g., with a checksum).
-
Make sure you received the expected segment, and if so, send an appropriate acknowledgement to the sender.
-
As segments are received in order, remove the transport layer header and copy the application layer payload to the application’s buffer.
-
Return the number of bytes received to the application.
-
Lab 6: For a go-back-N protocol, your receiver code probably won’t need major changes. The most important things to ensure are that 1) you always verify that the segment you’re receiving has the expected sequence number, and 2) you always send an ACK, even if you didn’t get the segment you were expecting. In that case, you should acknowledge the last segment you received correctly / in-order. For example, if you’re expecting to get segment #5, and you get anything other than #5, you want to acknowledge #4, as that will trigger the sender to send #5.
-
-
Implement reliable closing in
my_close. Your implementation should cleanly shut down connections on both ends, even if segments get lost.-
You are not required to implement the TCP behavior that allows each side to shutdown independently. Like TCP though, in
my_close, you may want to wait for some time to ensure that the last ACK doesn’t get lost (leaving one end hanging). -
TIP: since you are closing reliably, you may find it helpful to call
my_sendfrommy_close. -
Lab 6: Closing also won’t change much for lab 6, but you do need to ensure that all in-flight application data gets properly acknowledged prior to initiating the closing sequence. After all the application data has been acknowledged, the only thing left to do is close, and for that, you don’t need more than one segment in flight (much like stop-and-wait).
-
2.2. Behavior Expectations
For full credit:
-
Lab 6: Your protocol should attempt to keep many segments "in flight" simultaneously. Your protocol’s transfer rate should increase as the length of the switch buffers increases (mininet’s
max_queue_sizeparameter), particularly from sizes in the range 5-100 (you’ll get diminishing returns as buffer sizes continue to grow).You should set the size of your window using the additive increase, multiplicative decrease behavior of TCP Reno as described in class.
-
Your protocol should reliably transfer, in order, data across lossy links.
-
Your protocol should cleanly shut down connections on both ends, even if segments get lost. You should NOT rely on ICMP error messages to help your closing procedure. To be safe, it’s best to disable ICMP from both hosts before starting the sender and receiver with:
iptables -I OUTPUT -p icmp -j DROP
-
While you may make changes to
lab6_sender.candlab6_receiver.cfor debugging purposes, you must not rely on any changes to those files for correctness. Don’t change the interface for the library, and don’t do work in the application-layer sender or receiver that needs to be done by the library! When grading, I will use the default version, so you must not rely on changes to these files for correct operation. -
Your library should estimate the RTT similarly to TCP to determine how to set timeout values. Your
my_rttfunction should always return your library’s current estimate of the RTT. (Normally the transport layer wouldn’t export such information up to the application/user, but I’ll use this to check your RTT calculation.) -
You must use C to implement your library code, and the underlying transport that it uses to transfer messages must be UDP. Using TCP would give you reliability, which would defeat the purpose of the lab.
-
Your library should allow any application that’s built on top of it to achieve reliable communication. When transferring files with your library, you should get byte-for-byte identical copies using tools like
difformd5sum. -
You should not generate any warnings or memory leaks when running with
valgrind.
2.3. Assumptions / Simplifications
-
Lab 6: You may assume that the size of your congestion window will always remain smaller than the constant
WINDOW_SIZE_CAPvalue. -
You may assume that the application will not pass more than
MAX_SEGMENTbytes tomy_send. That is, thelenparameter passed tomy_sendwill be less than or equal toMAX_SEGMENT. -
You do not have to deal with checksums or error detection and corruption.
-
Your protocol does not need to be bi-directional. You can assume that application data will only flow in one direction (from "sender" to "receiver").
2.4. Checkpoint
By the end of the first week, you should be able to:
-
Add state at the sender to keep track of a window of segments.
-
Transmit multiple segments, keeping more than one "in flight" at a time.
-
Convince me that you started working on this > 1 day before the checkpoint.
3. Examples and Testing
For this lab, we’ll run Mininet in a virtual machine (VM) to emulate a network with delays and losses.
First, start the VM and ssh to it:
ssh -Y localhost -p 22222 -l mininet
Next, move into the directory with your lab code:
cd Lab6-usernames/
From there, start mininet with appropriate delay, loss, and queue size parameters.
# Fill in the queue size with a number.  Transfer rate should increase with
# larger queue sizes, with diminishing returns.
sudo -E mn --link tc,delay='10ms',loss=2,max_queue_size=... -x
|
The above command sets the delay to 10 ms and loss rate to 2% for each link that a segment traverses, and there are two links to traverse in each direction. So, with these parameters, every time you send a segment, it will have a RTT of around 40 ms and an overall round trip loss rate of ~7.8%. You may want to experiment with different parameters depending on what you’re trying to test. For example, when testing your RTT estimate, it makes sense to use 0% loss. |
Running the mininet command above will open four terminal windows. You only
care about h1 and h2, which represent two hosts. You can safely close the
other two. Host 1 will be 10.0.0.1, and host 2 will be 10.0.0.2.
From the h2 window, run the receiver.
To see output on the terminal, run:
./lab6_receiver 9000 > output.txt
To capture output to a file to analyze later, run:
./lab6_receiver 9000 > output.txt 2> output.err
This command will redirect standard out to the file named output.txt
(containing the data you’re transferring), and it will redirect standard
error to the file named output.err (containing your debugging output).
From the h1 window, run the sender:
./lab6_sender 10.0.0.2 9000 < 100000lines
That should start the file transfer. After it completes, you can verify that the files are byte-for-byte identical:
md5sum 100000lines output.txt
4. Tips & FAQ
-
Test your code in small increments. It’s much easier to localize a bug when you’ve only changed a few lines.
-
If you want to add a print statement to your library, use
fprintfto print to thestderrstream rather than the usualstdout. There are examples of this in the library already. The benefit of using this method is that it won’t interfere with the results that the receiver outputs, since it captures onlystdout. -
You should experiment with a range of loss rates in
mininet. You can go from 1% to 10% (effective overall loss rate of 35%) at most. If you set higher loss rates, you will need larger files to allow your RTT estimate to converge to the network RTT. -
You can test with larger files by generating them with the
generate_test_files.pyscript. -
You may find the textbook to be more useful for this lab than it has been previously. It has good descriptions of the various reliability mechanisms that you might want to adopt.
4.1. Lab 5 Tips
All the same tips from lab 5 also apply here.
4.2. Loss Rate
For this lab, losses will trigger your sender to reduce the window size, so you can only expect to get decent performance on links that aren’t too lossy. Anything more than a mininet loss rate parameter of 2% (~7.8% effective overall loss rate) is excessive.
4.3. Go-Back-N Protocol
Since all of you are likely working on a GBN protocol, this section adds more details.
4.3.1. Pipelined transmission
-
Your
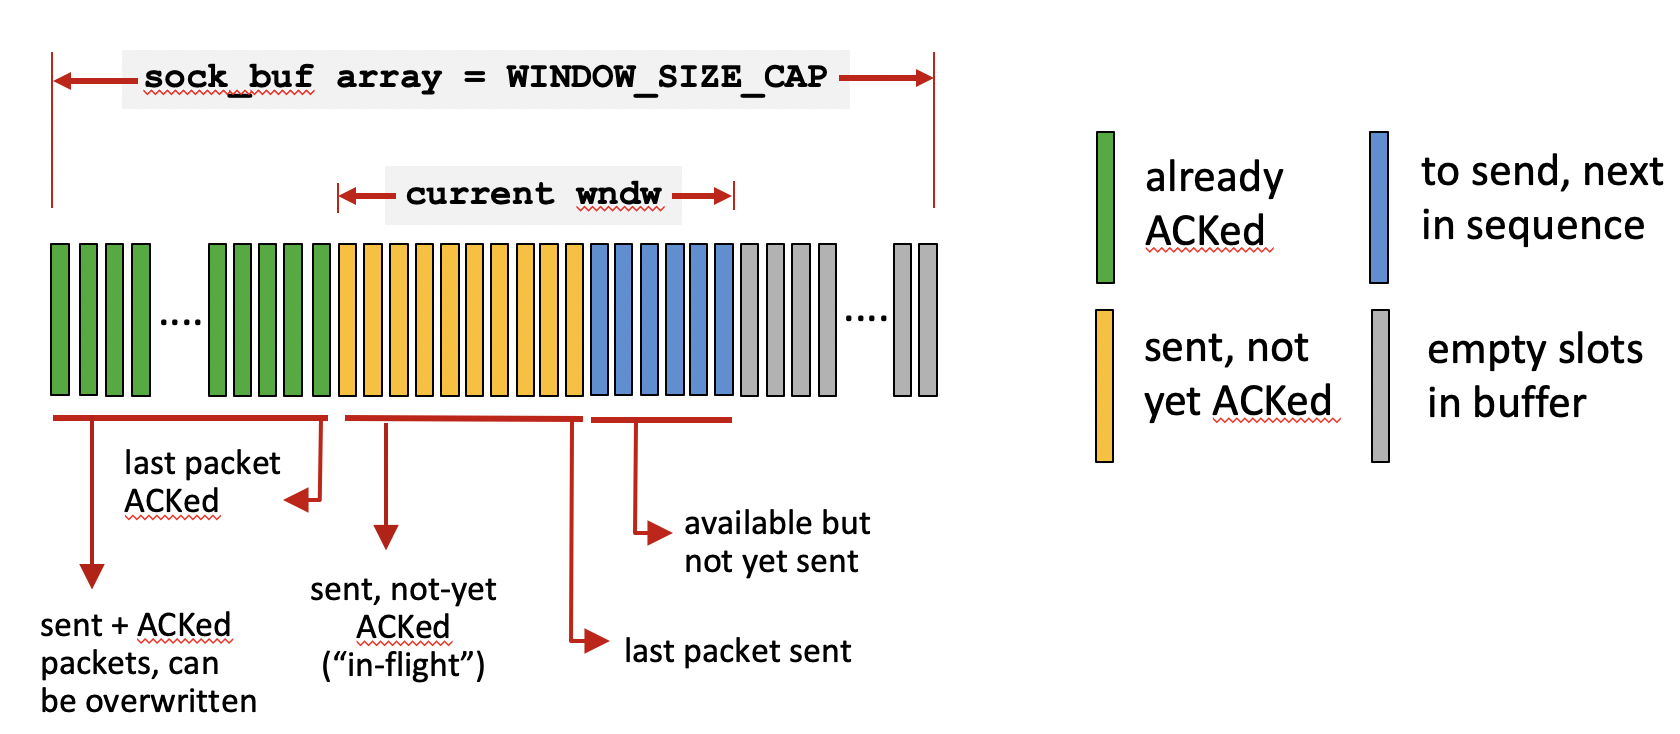
my_sendfunction is now responsible for keeping track of more than one segment at a time. -
To implement this functionality, maintain a socket buffer data structure that will hold segments passed down from the application layer. In the figure above, this corresponds to the
sock_bufarray. For thesock_bufarray, you can allocate a static array of sizeWINDOW_SIZE_CAP. Just asMAX_PACKETis predefined inlab5.h, you can define a macro withWINDOW_SIZE_CAP = 2000inlab6.h.// In lab6.h # define WINDOW_SIZE_CAP (2000)
-
You will also need to maintain variables that point to the start and end of the current congestion window (
cwnd). The window should grow and shrink based on network conditions. You can assume thatcwndwill never reach the size ofsock_bufarray. -
As you send segments and receive ACKs back for them, advance your congestion window. If you reach the end of the
sock_bufarray, you want to circle back to the beginning (i.e., implement the array as a circular queue). -
For each segment in your
sock_bufarray you should keep track of the status of that segment. This might include its full data contents, whether or not segment is in flight, if you’ve receive an ACK for it, when it times out, etc. -
To keep track of the information per segment, each element of your socket buffer array can be a
structwith everything you need to know about a segment. Essentially yoursock_bufarray, is an array ofstruct segmententries.
This struct is not to be confused with struct lab6_hdr which you’ll
keep the same as struct lab5_hdr. struct lab6_hdr is the header information
associated with each segment being sent from the sender to the receiver, whereas
struct segment maintains bookkeeping information for each in-flight segment
within the sender’s socket buffer.
|
4.3.2. Implementing Congestion Control: Additive Increase Multiplicative Decrease (AIMD)
To implement AIMD, you might want to create helper functions to my_send that
are responsible for: (a) receiving acknowledgements and (b) scheduling
timeouts.
Your AIMD implementation should:
-
Start in slow start, with
cwnddoubling each time an entire window’s worth of segments is acknowledged. -
Transition to congestion avoidance where, if you lose a segment, reduce
cwndby half and start increasingcwndlinearly (increasecwndby one segment each time you successfully receive an acknowledgement for all segments in a window).
Once you enter congestion avoidance you can remain in this phase, and don’t have to go back to slow start.
In contrast to lab 5, after sending one segment, you do not (always) want to
immediately wait to receive an ACK before returning to the sender! Instead,
keep sending segments (and adding them to your socket buffer) up to the size of
cwnd. You should return to the sender immediately if you have at least one
free spot available in the current window. After the window is full, you can
wait for acknowledgements in my_send (effectively blocking the application
until more space becomes available in your window).
4.3.3. Scheduling Timeouts
With multiple segments in flight, prior to calling select, you need to check
the timeout values for every segment, choosing the one with the earliest
scheduled timeout to set the struct timeval for select.
Recall that for select, the struct timeval must be reinitialized
prior to every call to select.
|
4.3.4. Implementing Closing
Most of your functionality can stay the same as Lab 5. The key difference here
is that before my_close calls my_send with a FIN, you should first ensure
that you have reliably sent (and received ACKs for) all outstanding segments in
the window.
You do not want to immediately close the connection, and drop application layer data!
5. Mininet VM
For this lab, we’ll be using network emulation software called Mininet to
create virtual links that allow us to vary their performance characteristics
(latency, loss rate, etc.). Because it requires special permissions to execute,
we’ll be running it inside of a virtual machine. The VM image will NOT fit in
your home directory, so you’ll need to work in /local, which is the local
hard disk of the machine you’re using.
Storing things in /local has two major implications that you need to account
for:
-
The data in
/localis stored on a single disk (unlike your home directory, which is split across multiple disks for redundancy). When you’re done working, you should save your important lab files elsewhere (e.g., push them to GitHub) to avoid data loss in the event of a disk failure. When you’re done working on your VM, you should shut it down nicely:sudo shutdown -h now. -
The
/localpartition on each machine is only available on that machine. This means that if you want to move and work on a different machine, you’ll need to set up a new VM at the new location or copy your VM image from/localon one machine to/localon another with something likescp.
5.1. VM Setup
|
Please follow these steps carefully. You don’t want to accidentally fill your home directory’s quota! |
To get started, you’ll need to import a copy of the starter VM image:
-
Run
virtualboxin a terminal or open it from your favorite graphical menu. -
Go to File→Preferences, set your "Default Machine Folder" to
"/local", and then close the preferences window. -
Go to File→Import Appliance. Choose:
/local/CS43-MininetVM-S22.ovaand push next once. -
You should now be seeing "Appliance settings". Edit the name to include your username at the end. For example,
CS43-MininetVM-S22-kwebb. -
Click import and wait a minute for it to complete.
After you’ve completed these steps, you should see the your VM in the list of VMs available to start. Go ahead and turn it on.
While you could work from within the new VM window that just came up, doing so is a huge pain if you enjoy nice things like graphical interfaces. Instead, it’s much easier to connect to the VM via ssh with X11 forwarding turned on. The VM is already configured such that you can connect to it by sshing to your local machine on port 22222. (Port 22222 on your machine gets forwarded to port 22 on the VM):
ssh -Y localhost -p 22222 -l mininet
(The password is: mininet)
Before going any further, you should use the passwd command to set a new
password to protect your VM. After that, you’ll need to configure an SSH key so
that you can access GitHub. You have two options:
-
Create a new key for the VM and add it to your GitHub account. (Instructions)
-
Copy your existing ssh key from your CS account to the VM.
5.2. Working with Mininet
Once you’ve connected to the VM, you can run Mininet. From your terminal that’s
sshed to the VM, run Mininet, and tell it to create a minimal network
topology with two hosts connected to a switch with 10ms latency on each link,
2% packet loss on each link, and a buffer of size 10. Note that there are no
spaces between link parameters:
sudo -E mn --link tc,delay='10ms',loss=2,max_queue_size=10 -x
This will pop up four terminal windows: one for each of the two hosts (h1 and
h2), one for the switch (s1), and one for a controller (c0). Close the
controller and switch terminals, you won’t be using those for this lab. All the
operations you perform within these windows act as if you were sshed to two
lab machines. They work independently like different machines but share the
same files. If you run ifconfig on each of them, you’ll see that h1 has an IP
address of 10.0.0.1 and h2 has 10.0.0.2. You should be able to transmit data
between the two. Test that by running the ping command at h1:
ping 10.0.0.2
You should see a (round trip time) delay of about 40 ms with approximately a 19% loss rate (each link has an independent 5% chance of dropping a packet).
5.3. Editing Files on the VM
The VM is set up just to run Mininet, so it doesn’t have much other software
installed, and that makes it annoying to edit files directly on the VM. As an
alternative, I’d suggest using sshfs to mount the VM’s files on the host
machine so that you can edit them with the same editor you normally use.
First, you need to create a directory to mount the files in. This needs to be
in /local (/home is a NFS mount, and sshfs doesn’t support NFS):
# Replace the username with your actual username...
mkdir -p /local/sshfs-username
Then, you can use sshfs to mount the files:
sshfs -p 22222 mininet@localhost:/home/mininet /local/sshfs-username/
After that, you can cd /local/sshfs-username and you’ll see the files of the
VM there. Edit them however you with.
|
Use |
5.4. Cleaning Up
When you’re done working, before you shut down the VM:
-
Use
gitto add/commit/push your files to GitHub. -
Close any files from the VM that you have open locally and
cdout of the sshfs-mounted directory. -
Unmount your
sshfsfile system:fusermount -u /local/sshfs-username
-
Shut down the VM gracefully:
sudo shutdown -h now
5.5. Copying Files Between Machines
If you need to move files between machines, you can use scp, the secure copy
utility. It works like the normal cp command, where you do:
cp [source file location] [destination file location]
With scp though, one of the locations is allowed to be a remote machine that
you can ssh to. Formatting the remote side is:
username@host:/path/to/file
If you want to copy an entire directory instead of just one file, you can pass the -r flag to do a recursive copy.
For example, if you want to copy your VM files from one machine to another, you have two options:
-
From the machine that has the VM, you could do:
# "desthost" is the host name of the machine you'd like to move the VM files to.
scp -r /local/CS43-MininetVM-S22-username username@desthost:/local/
-
From the destination machine, you could do:
# "srchost" is the host name of the machine you'd like to move the VM files from.
scp -r username@srchost:/local/CS43-MininetVM-S22-username /local/
If you’d like to work on a laptop, you can install virtualbox on your laptop and copy the VM image to that.
6. Submitting
Please remove any excessive debugging output prior to submitting.
To submit your code, commit your changes locally using git add and git
commit. Then run git push while in your lab directory.