Lab 4: 3D Modeling and Planet Animation
Due Sunday, 05 October 2025
This is part one of a two week lab. You will work with a partner on both parts of this lab. Lab 5 will extend this lab next week, but this lab has a well defined checkpoint and due date.
1. Lab Goals
Through this lab you will learn to
-
Use an Orthographic projection transform to convert from a 3D world coordinate system suitable for a 3D solar system model to webGL2 clip coordinates.
-
Compose model matrices to transform Drawable primitives in a 3D environment.
-
Animate a 3D scene.
-
Implement rough 3D navigation tools.
-
Use event listeners to interact with the user.
2. References
3. Cloning Files
First, we will make directory for all our labs and clone lab4 from Github CS40-F25 org
cd ~/cs40
pwd             #should list /home/you/cs40/
git clone git@github.swarthmore.edu:CS40-F25/lab2-you-partner.git
See CS Git Help if you need a refresher on using git and github, or post a question on Edstem.
3.1. Building and Running your lab
Before building your source, add a symlink to the folder containing the planet textures in your source folder (before making your build folder):
cd ~/cs40/lab4-you-partner
ln -s /usr/local/doc/textures/ data
Consult the README file in the w01-triangle repo for details on building a Qt6/OpenGL project using cmake and make. The steps are similar for this lab.
cd ~/cs40/lab4-you-partner
ln -s ~/cs40/lab4-you-partner/textures ./textures
Consult the README file in the w01-triangle repo for details on building a Qt6/OpenGL project using cmake and make. The steps are similar for this lab.
cd ~/cs40/lab4-you-partner
mkdir build
cd build
cmake ..
make -j8
./lab4
The ./lab4 executable pops up a window a scene containing two Earth textured spheres.
If you change the source code, you only need to re-run make -j8 and then ./lab4 again to see your changes. The -j8 flag tells make to use up to 8 threads to speed up the build. make without the -j flag will work, but may be slower.
4. Overview
Your goal is to create a full animation of the solar system by applying suitable 4x4 matrix model transforms to each planet. You will additionally add at least one moon to one of your planets. You must also add some rough controls to move around the scene. We will improve these controls next week.
You will edit/write a small Planet class to store the state of a planetary object (the Sun and a Moon can also be Planet objects for the purpose of this lab, just don’t tell the Astronomers.)
Your drawScene function really only needs to have each planet update its location and then draw itself in its appropriate location. The update and draw steps could be methods of your planet class.
5. Getting Started
The file solarData.txt contains some planetary information in rows of space separated variables. For each planetary object, we have the following information:
-
Name: The only non-numeric field, this contains the name of the solar system object, usually a planet, with the notable exception of the sun.
-
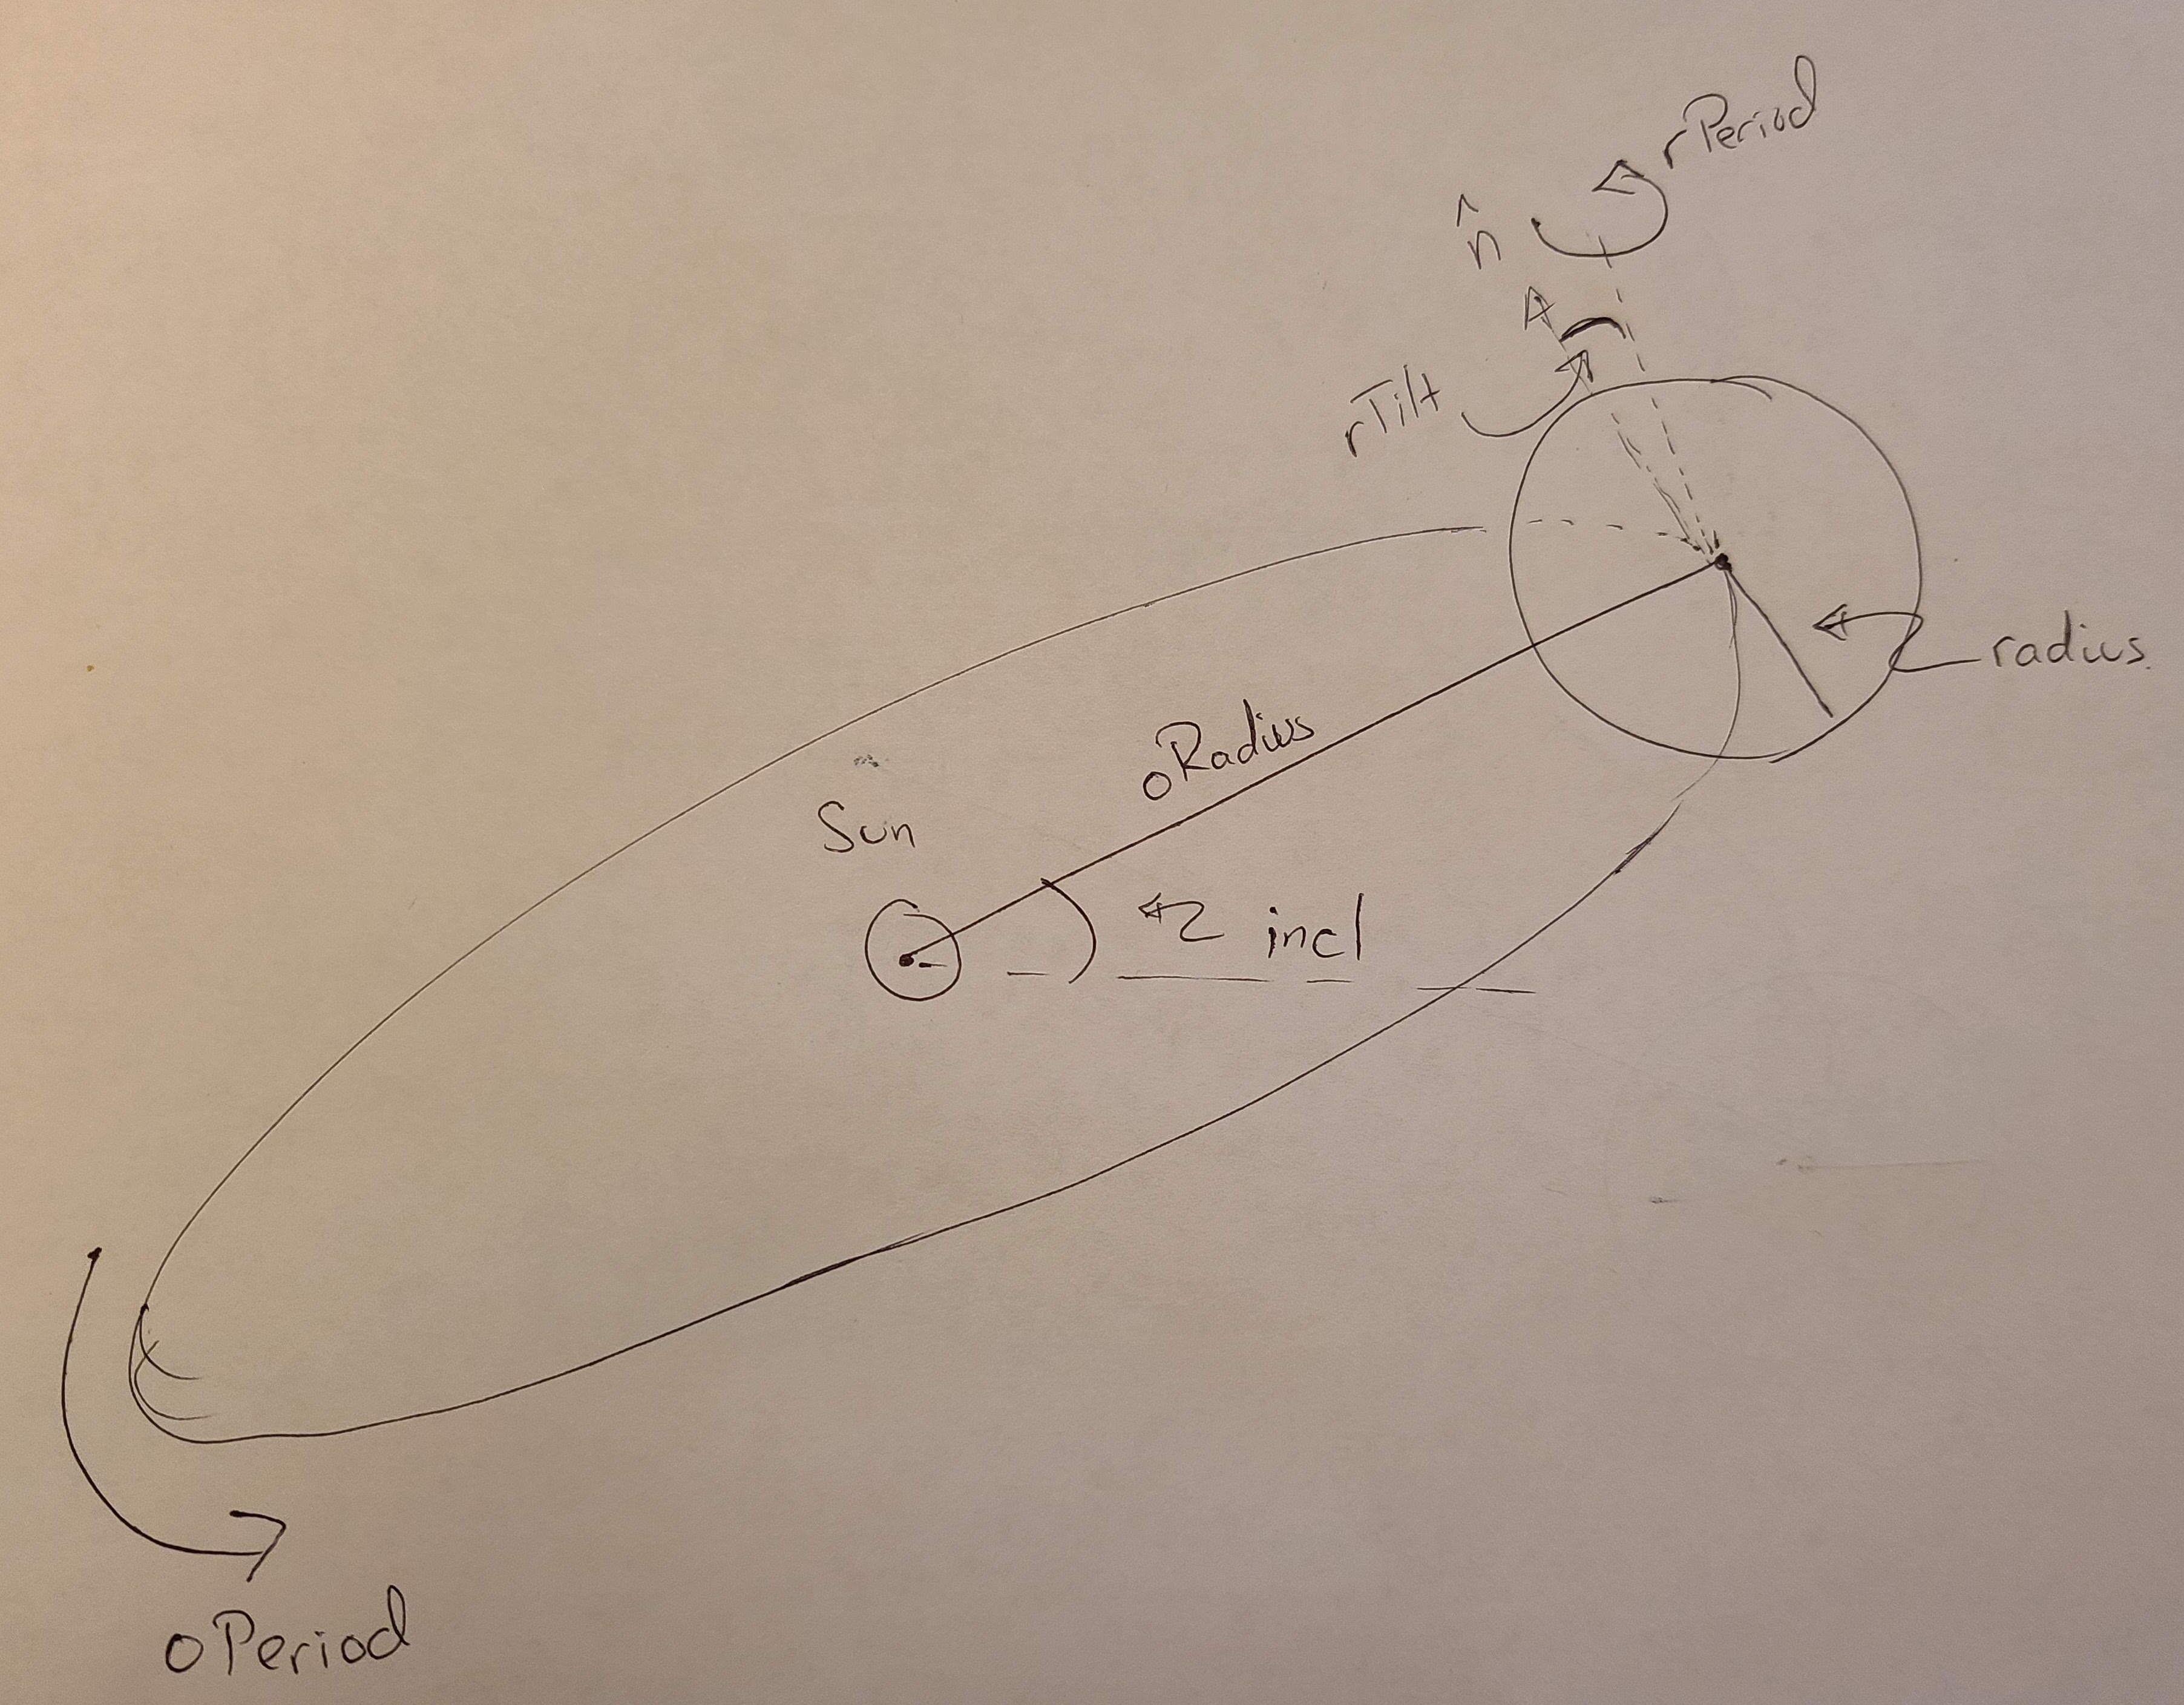
Radius: The radius of object in 1000s of kilometers. We will approximate each object as a sphere with this radius.
-
OrbRad: The orbital radius in millions (10^6) of kilometers. This is the distance from the center of the sun to the center of the object, assuming a circular orbit.
-
OrbTau: The time in Earth years that it takes the object to complete one orbit (a full 360° revolution) around the sun.
-
ecc: The eccentricity of the orbit. This is only used if you want to model elliptical orbits, which is an optional extension. An eccentricity of 0 means the orbit is completely circular. Only Mercury and Pluto have noticeable eccentricities.
-
incl: The inclination in degrees of the orbit with respect to the solar plane.
-
RotTau: The time in Earth days that it takes the object to complete one revolution around its own axis.
-
tilt: The tilt angle in degrees of the planet’s rotation with respect to the normal direction of its orbital plane.
The method MyPanelOpenGL::parsePlanets uses a QTextStream object to parse this file and extract data of the right type. You should modify this method to make a bunch of Planet objects after you sketch out a basic Planet class to hold relevant planet data. The parser results are labeled by the header names (e.g., name, incl, tilt), but you can come up with other names if you would like in your Planet constructor.
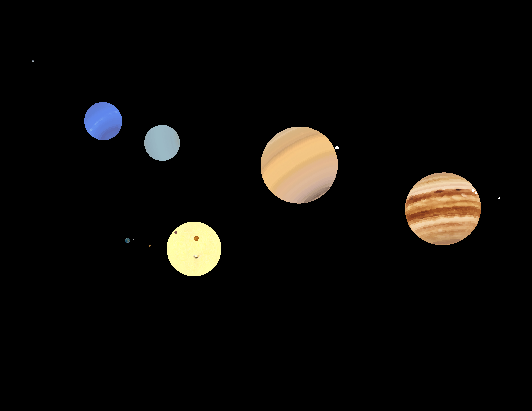
6. Drawing a Solar System
You will use the planet data you parsed and your planet class to model the full solar system. You do not need to model eccentricity, but you should model rotational (around the planet’s axis) and orbital (around the sun) motion. You will need to find a scale and coordinate system that works well for the solar system. Because the solar system is mostly empty space, I do not recommend converting the radius and orbital radius to the same real scale. Instead you can use the radius numbers as they are directly parsed from the data file, meaning, e.g. Mercury can have a radius of 2.4 and a distance of 57 away from the sun in some arbitrary OpenGL world units. The only exception may be to scale the sun separately. If we use the numbers as is, the radius of the sun, 695 is greater than the orbital radius of the first four planets, meaning that mars and closer planets would orbit inside the surface of the sun without additional scaling. By applying a separate scaling factor to the radius of the sun, you can make everything fit in the same window without too much customization.
At some point, you will need to adjust your default ortho projection. Initially it is set to be a scale of roughly -10 to 10 in all directions, but this does not match the data. You should adjust your ortho as needed to fit your scene on the canvas.
You must draw and animate the sun and at least the first eight planets listed. Feel free to express you opinions on Pluto in your final lab. All planets should revolve in the same direction around the sun, but not at the same rate. You may assume the planets revolve in circular orbits, but the eccentricity is given if you want to model elliptical orbits.
All planets should spin about their axis according to the time of day. The tilt column of SolarData.txt describes the tilt of the planet’s axis with respect its orbit. Planets should rotate around this tilted axis. You will likely want a way to speed up and slow down time so you can observe spinning and orbiting as desired.
Assign a texture to each of the planets. The texture files have been added to the data folder with the filename [planet].png
You must model at least one moon around one of the planets. You can choose the size of the moon, radius of orbit, and period of rotation, or consult a source for reasonable defaults. You can use the same moon texture for all moons, use a separate fragment shader, or modify your fragment shader to support textured and non-textured spheres.
Finally, add keyboard controls to pan and zoom. For this lab it does not have to be fancy, but there should be some way of moving around the scene.
7. Animating the Scene
Animation is in some sense the same as any other lab: update the geometry every time you call paintGL and redraw the new scene. It will be a bit easier to manage if you don’t use the time variable explicitly in this lab. Instead, maintain a speed variable that you can adjust through the GUI or perhaps the keyboard. Think of this speed as the number of Earth Hours that have elapsed since the last update.
On each call to paintGL, you will update each planet’s current location using the current speed. You can do this by maintaining a current rotational and orbital angle for each planet. Note this is separate from, but related to, the rotational and orbital period. When performing an update step, use the speed and the period to determine how far the planet would move, and update the current location by this amount. For example, if the speed is 2 Earth hours, then Earth would have moved by \$2 \cdot \frac{2\pi}{1.00*24}\$ radians about its axis, where \$2 \pi\$ is the amount of one full rotation, 1.00 is the rotation period in Earth days, 1.00*24 is the rotation period in Earth hours. If we add this angular displacement to the current rotational position, we can use the updated position to draw the planet with the correct rotation. Similarly, we can update the orbital position, though we need to convert the orbital period from Earth years to Earth hours to have the animation time scales be correct.
More precisely, suppose a planet p has an r_angle property that stores the current rotational angle. We want to compute a change \$\Delta = s \cdot \frac{2\pi}{T}\$, where s is the current speed (in say, Earth hours) and T is the rotational period (also in Earth hours). In paintGL, we update each planet’s r_angle by \$\Delta\$ according to each planet’s rotational period, then draw the scene with the new rotational angle.
Note you will want to be able to adjust the speed. With a low speed and zoomed in, you can observe rotational effects, but orbital effects will be too slow. A higher speed will show orbital effects, but rotational effects will be a blur.
8. Adding a Moon
Once you have animated your scene and can move around the scene through the keyboard or mouse, you must add a moon or satellite around one of the planets. How you design and implement this is up to you, but the object should orbit a planet which then orbits the sun.
9. Hints
You can use the same sphere geometry for all planets. Just set a different model matrix uniform and texture and draw the same sphere.
Work incrementally. Try some rotational motion first and scaling of planets by their radius before you try orbital motion and making larger adjustments to the ortho matrix.
It may help to draw the sun and one other planet first, then add other planets as you get more comfortable.
The wrap(angle) function can be helpful when animating to ensure your angles stay in the range \$0..2\pi\$.
9.1. Optional Features
The following are optional extensions and are not required for full credit.
-
Model the orbits as ellipses. See pdf notes on elliptical orbits. Create a highly eccentric orbit (a comet maybe?) to see the effect enhanced
-
Model rings around Saturn or another planet
-
Design a small 3D spaceship and put it in orbit around a planet, or launch it from one planet to the other. To be visible, the spaceship would actually have to be roughly the same size of a planet, which is not a very small spaceship.
-
Add a box around the entire solar system textured with a galaxy or star field. This can really help keep you oriented…if you can orient the box right in the first place.
-
Draw lines to indicate the path of the orbits. You may want to simply draw the path in point mode or
GL_LINESto get a reasonable effect
10. Summary of Requirements
Your project will be graded on the following components:
-
A working animation of the solar system
-
Correct transforms for rotation around planet axes and orbiting around the sun
-
Suitable time and spatial scales so that inner planets can be viewed at a reasonable animation and scale, and outer planets can be viewed at a different scale. Handling Pluto is optional.
-
A moon or other Satellite orbiting around at least one planet.
-
Answer to concept questions in the
Readme.adocfile. -
A small percentage of your grade will be based on style, and creativity. Have fun and explore.
You will not be graded on the lab survey questions in the Readme.adoc file
Submit
Once you have edited the files, you should publish your changes using add, commit and push.
The git push command sends your committed changes to the github server. If you do not run git push before the submission deadline, I will not see your changes, even if you have finished coding your solution in your local directory.
If you make changes to files after your push and want to share these changes, repeat the add, commit, push loop again to update the github server.
If you want to commit changes to files that have already been committed to git once, you can combine the add and commit steps using
$ git commit -am "bug fix/updates"The -a flag will automatically add files that have been previously committed. It will not add new files. When in doubt, use git status, and please do not use git add * ./
Please do not add your symlink to the data folder to the git repo. I have it set to be ignored, and it may create conflicts if partners are working with different links.