Lab Due Date: Tuesday, November 8th, 11:59 PM
Overview: Public Key Infrastructure
This lab is built on the SEED Labs for Security Education project by Prof. Wenliang Du, at Syracuse University. Images derived from Prof. Dave Levine at UMD.
Public key infrastructure is the foundation of today’s secure communication. It relies on public-key (asymmetric) and private-key (symmetric) encryption together with Digital Certificates to establish our security goals of confidentiality, integrity and availability in communication over an insecure communication medium.
We’ve seen symmetric key cryptography in the last lab, and in the first half of this lab, we will establish our own public-key infrastructure, similar to how large organizations like Google and Microsoft.
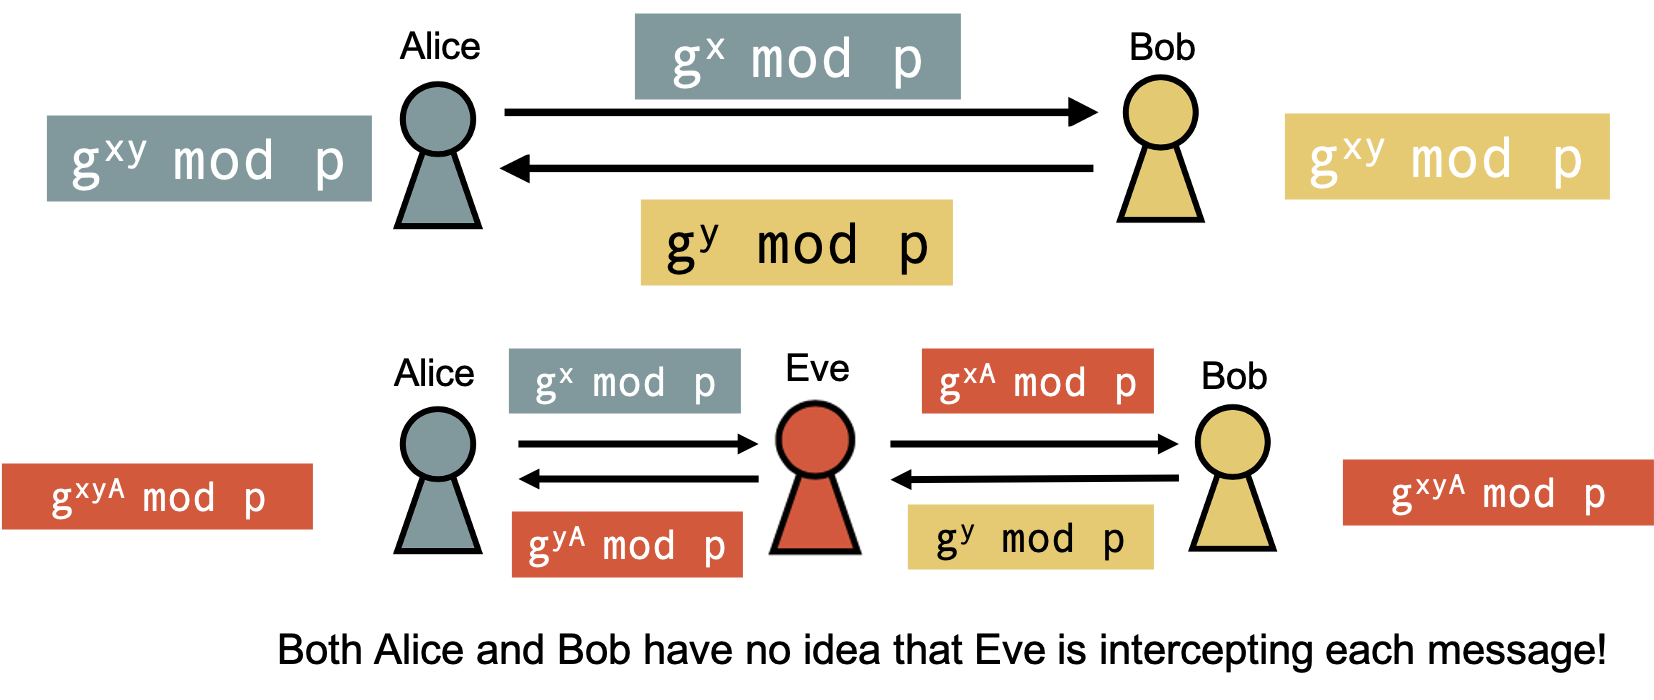
Diffie-Helman key exchange shows us that given an insecure channel, we can find ways to establish a shared secret using public, private key pairs. However we still have no good means of ensuring the authenticity of the message.
-
Is the Diffie-Helman key exchange that we just performed something that Eve can interfere with?
-
How do we ensure that the public key that Alice receives, is really hers?
-
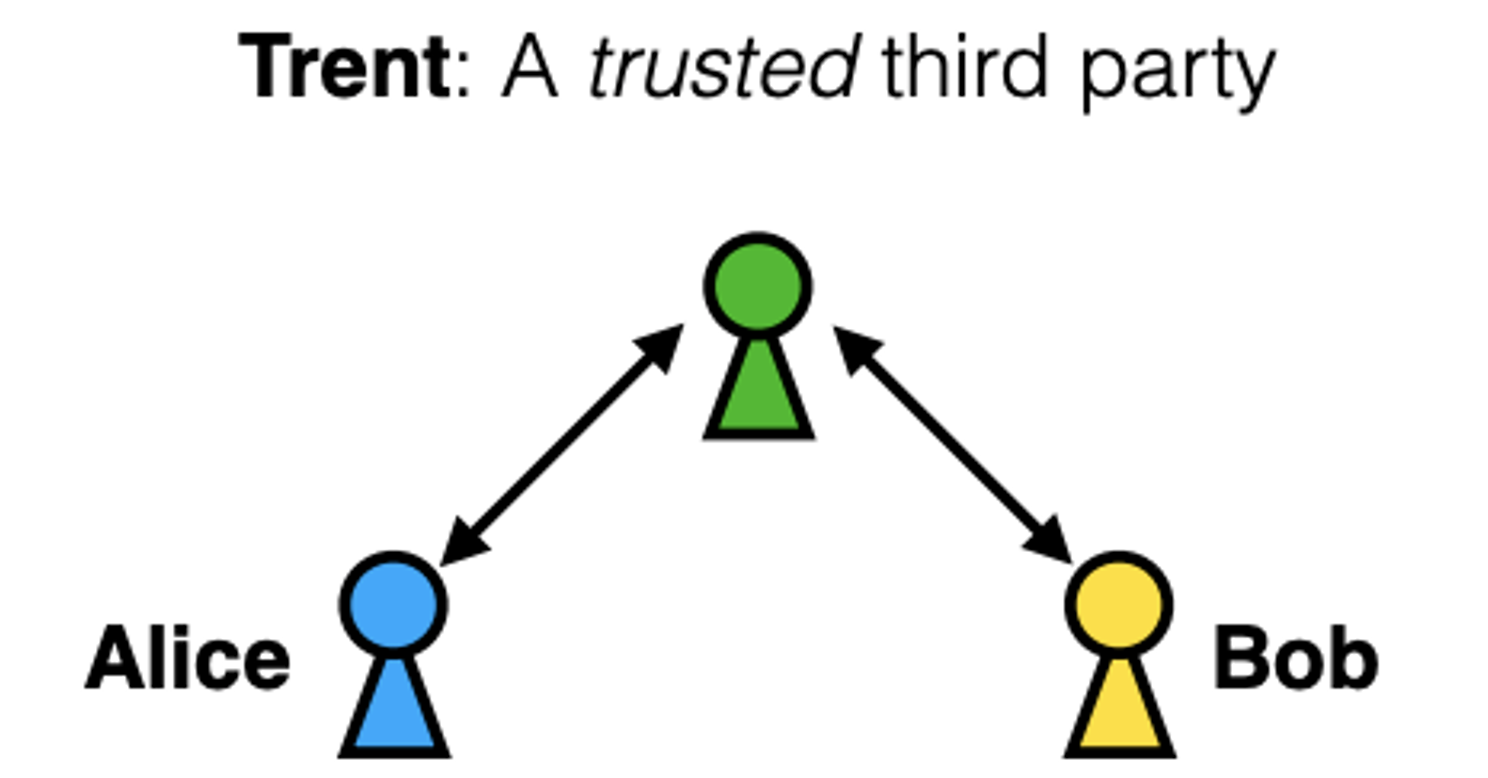
The first part of this lab will focus on solving the problem of certifying the following binding: Alice’s public key with Alice’s signature. And to do so, we will take the help of a trusted third-party entity, Trent.
-
We are going to call Trent a Certification Authority (CA), i.e., a certified entity tasked with providing authentication to end users like Bob and Alice.
-
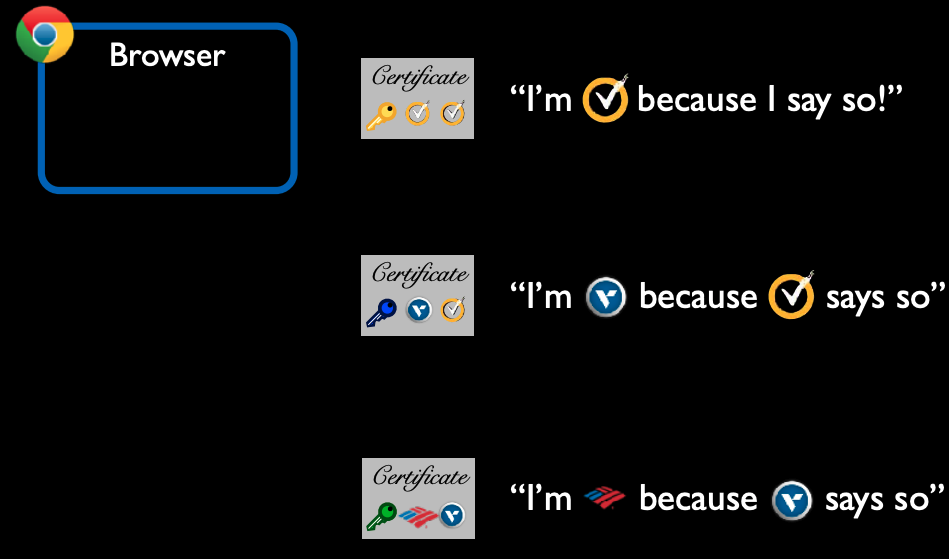
Great! But how do we know that someone won’t come along to impersonate Trent? This leads us to the Chain of Trust that is necessary for us to establish that the chain of Certification Authorities, are all certified, until we reach the Root CA.
In the figure below we have an example of a two-level Chain of Trust.
-
Here, we have an end customer, Bank of America (BoA), certifying that their public key is legitimate, and BoA are the true owners of their public key, because Verisign, an Intermediate CA has vouched for them.
-
Verisign the Intermediate CA is certified by Symantec a Root CA.
-
So now for the obvious next question: Who verifies a Root CA?
-
This is the responsibility of the companies shipping Operating Systems like Unix- based OSes (Linux and MAC OS), and Microsoft.
-
They are required to verify that the Root CAs are really who they say they are (e.g., a public key generated by Symantec actually belongs to Symantec and not Eve).
-
Browser Developers (Chrome, Safari, Firefox, etc.) are also similarly tasked with installing root server public keys by default in their browsers.
-
Root CA’s certificates are unconditionally trusted.
-
Lab Requirements
Weekly Deliverables
Week 1
-
Complete Task 1: Setting up an Enterprise Public Key Infrastructure
Week 2
-
Complete Task 2: Launching a DNS Rebinding IoT Attack
Task 1: Public-Key Infrastructure (PKI)
In this task, we will generate public-key certificates, and then use them to secure web servers. The certificate generation tasks will be conducted on the VM, and we will use a container to host the web server.
For this section of the lab, cd into the PKI subdirectory in lab4.
|
DNS setup
-
Similar to previous labs, we will modify the DNS mapping in
/etc/hosts. Let’s add the following entries to/etc/hosts:
$ sudo <your_fav_editor> /etc/hosts

127.0.0.1       localhost
127.0.1.1       VM

# The following lines are desirable for IPv6 capable hosts
::1     ip6-localhost ip6-loopback
fe00::0 ip6-localnet
ff00::0 ip6-mcastprefix
ff02::1 ip6-allnodes
ff02::2 ip6-allrouters

>>> ADD THE FOLLOWING >>>
# For PKI Checkpoint
10.9.0.80 www.bank32.com
10.9.0.80 www.bank32A.com
10.9.0.80 www.bank32B.com
10.9.0.80 www.bank32W.com
10.9.0.80 www.cs88.com
10.9.0.80 www.cs88A.com
10.9.0.80 www.cs88B.com
10.9.0.80 www.cs88W.com
Part A: Becoming an Enterprise Root Certificate Authority (Root CA)
-
We saw that a Certificate Authority (CA) is a trusted entity that issues digital certificates. The digital certificate certifies the ownership of a public key by the named subject of the certificate.
-
Typically, users who want to get digital certificates issued by commercial CAs need to pay those CAs. In this task, we will create digital certificates, while acting as a root CA ourselves.
| Are you wondering if this will even work? Didn’t we just say that Root CAs are installed by the OS? If you have any of these questions then you’ve understood the Chain-of-Trust! |
Setting up An Enterprise Root CA: Typically, along with globally trusted Root CAs, we can also have an enterprise, say Swarthmore, act as a Root CA and serve as the certification authority for all internal-facing web servers.
-
For e.g., Swarthmore might have
www.faculty-admin.servicesand it could ensure that this webpage receives its certification from Swarthmore. -
I.e., any one visiting this page from Swarthmore, will have the
Swarthmore Root CAcertificate preinstalled on their devices, and will therefore be able to identify that this page is a valid page certified by Swarthmore. -
Since the Swarthmore Root CA is not a global Root CA, it is clearly not going to be able to sign off on
www.google.com's certificate.
Once we establish our Root CA, we will then use our authority to issue certificate for other servers. Unlike most certificates, which are usually signed by another CA, the root CA’s certificates are self-signed.
Setting up the Configuration File:
Similar to the last lab, we will use OpenSSL to create certificates. This time we will use three OpenSSL commands: ca, req and x509 to generate and validate certificates.
-
We will first need a configuration file for
OpenSSLto use to generate certificates, and to find relevant information.-
Reference 1 and Reference 2 walk through the
OpenSSLconfiguration file. (They aren’t the most well written, but they do a good job of walking through the important parts of this file.) -
You can find an example of
openssl.cnfthat most OSes use by default here. -
You can also view your system defaults from this configuration file:
/usr/lib/ssl/openssl.cnf.
-
Based on the references listed above, answer the questions in lab4-checkpoint.adoc
|
Setting up our own config file: Since we want to setup our own CAs and Root CAs, we will need to make changes to OpenSSL config file.
-
To setup or config file, lets copy
/usr/lib/ssl/openssl.cnfinto our current directory, and instruct OpenSSL to use this copy instead.$ cd PKI PKI$ cp /usr/lib/ssl/openssl.cnf swatCA_openssl.cnf -
Next, let’s setup the [CA default] section of the configuration file. Modify the
swatCA_openssl.cnfin your favorite text editor to have the following contents:[ CA_default ] dir = ./swatCA # Where everything is kept certs = $dir/certs # Where the issued certs are kept crl_dir = $dir/crl # Where the issued crl are kept database = $dir/index.txt # database index file. # UNCOMMENT THE NEXT LINE. unique_subject = no # Set to ’no’ to allow creation of # several certs with same subject. new_certs_dir = $dir/newcerts # default place for new certs. serial = $dir/serial # The current serial number -
The modifications above are to let our config file know that we will use a directory called
swatCAto store ourcerts, andcrls. But these folders don’t currently exist in our lab repo! Let’s create this list of folders, and text files that the config file will look for:#setup seed@VM:~/../lab4/$ cd PKI seed@VM:~/../PKI/$ mkdir -p swatCA && cd swatCA seed@VM:~/../PKI/$ mkdir -p certs crl newcerts seed@VM:~/../PKI/$ rm -f index.txt index.txt.attr serial seed@VM:~/../PKI/$ touch index.txt index.txt.attr serial seed@VM:~/../PKI/$ echo "unique_subject = no" > index.txt.attr seed@VM:~/../PKI/$ echo 1000 > serial seed@VM:~/../PKI/$ cd ..
The index.txt file serves as our certificate information database, with one certificate per line. The index.txt.attr lets the config file know that we will create multiple certificates with the same name (CS88). Finally, we have the serial number. Refer to this page and explain what the serial number is used for in lab4-checkpoint.adoc.
|
We are ready to create and issue certificates!
Root Certificate Authority (Root CA)
As we described before, we need to generate a self-signed certificate for our Root CA. This means that this CA is totally trusted, and its certificate will serve as the root certificate.
-
Let’s create a self-signed certificate for our root swatCA in
rootCA.sh. In this file you should see an example for creating a certificate formodelCA. You want to instead create a root certificate forswatCA. Once you are done, you can run this bash script and see the following output:PKI$ chmod +x *.sh PKI$ ./rootCA.sh Generating a RSA private key ............................................................................................................................................................................................................................................................................................................++++ ..............................................++++ writing new private key to 'swatCA.key' PKI$ ls #shows swatCA.crt and swatCA.key docker-compose.yml image_www rootCA-solution.sh swatCA swatCA.crt swatCA.key swatCA_openssl.cnf volumes -----
Describe in lab4-checkpoint.adoc, what it means for a certificate to be self signed, using the following reference.
|
-
The output of the command above is stored in two files:
swatCA.keyandswatCA.crt.-
The file
swatCA.keycontains the Root CA’s private key, whileswatCA.crtcontains the public-key certificate.
-
-
We can now use the following commands to look at the decoded content of the
X509certificate and the RSA key. Run the command below to look at the certificates created.-
The
-textoption decodes the content into plaintext. -
The
-nooutoption says that we don’t want to print the encoded output.
-
PKI$ openssl x509 -in swatCA.crt -text -nooutLooking at the output of swatCA.crt you will probably notice that there are two algorithms being used.
-
First, a Public Key Algorithm that is used together with the private key, to authenticate the endpoint (i.e., Alice has a public key that can be used with the private key to decrypt messages from Bob).
-
Second, a Signature Algorithm to verify that the end user is really who they say they are, i.e., (in our analogy above this is the equivalent of Trent verifying that the public key does indeed belong to Alice).
Now lets look at swatCA.key:
PKI$ openssl rsa -in swatCA.key -text -noout
Enter pass phrase for swatCA.key: dees
Based on the .key and .crt files we saw, answer the related questions in your worksheet referring to Thursday’s readings.
|
Part B: Generating Certificates for a Webserver
The CS88 organization, www.cs88.com wants to now get a public key certificate from our root swatCA. Let’s now look at how we can generate a certificate signing request, and following that generate a certificate for our web page.
Generating a Certificate Signing Request.
-
A Certificate Signing Request (CSR), includes the organization’s public key and identity information.
-
The CSR will be sent to the rootCA, who will verify the identity information in the request, and then generate a certificate.
-
The command to generate a CSR is quite similar to the one we used in creating the self-signed certificate for the CA. The only difference is the
-x509option.-
Without the
-x509option: the command generates a request; -
With the
x509option: the command generates a self-signed certificate.
-
-
Modify the contents of
cs88_cert_req.shand run it to see the following output:PKI$ chmod +x *.sh PKI$ ./cs88_cert_req.sh Generating a RSA private key ...............................................+++++ ................................................................................................................................................................+++++ writing new private key to 'cs88_key.pem' PKI$ ls #shows the following *new files* cs88_key.pem cs88.csr -----The command above will generate a pair of public/private keys, and then create a certificate signing request from the public key.
-
We can use the following command to look at the decoded content of the CSR and private key files:
PKI$ openssl req -in cs88.csr -text -noout
PKI$ openssl rsa -in cs88_key.pem -text -noout
Adding Alternative names: Most websites go by a number of different URLs. As an example, www.example.com, example.com, example.net, and example.org can all point to the same web server.
-
Due to the hostname matching policy enforced by browsers, the common name (CN) in a certificate must match with the server’s hostname, or browsers will refuse to communicate with the server.
-
To allow a certificate to have multiple names, the X.509 specification defines extensions to be attached to a certificate.
-
This extension is called Subject Alternative Name (SAN). Using the SAN extension, it’s possible to specify several hostnames in the SAN field of a certificate.
-
To generate a certificate signing request with such a field, we can put all the necessary information in a configuration file or in a bash script. We will use a bash script in this task.
-
-
Let’s add alternate names that
www.cs88.comcan correspond to incs88_cert_req_altname.shwith the following extension fields.-addext "subjectAltName = DNS:www.cs88.com, \ DNS:www.cs88A.com, \ DNS:www.cs88B.com"Notice that in the subjectAltNameextension field, we first list the common name (i.e., www.cs88.com); otherwise, the common name will not be accepted as a valid name. -
If we now run
cs88_cert_req_altname.sh, we should now see the following:PKI$ ./cs88_cert_req_altname_solution.sh Generating a RSA private key ...............................+++++ ......................+++++ writing new private key to 'cs88_key.pem' -----
Write your responses to certificate request creation in lab4-checkpoint.adoc
|
Generating a Certificate for your server:
The Certificate Signing Request (CSR) file we generated above needs to have the Root CA’s signature to form a certificate.
-
In the real world, the CSR files are usually sent to a trusted CA for their signature (and usually $$). In this task, we will use our own trusted root CA to generate certificates.
-
The commands in
rootCA_sign_cert.shconverts the certificate signing request into an X509 certificate using the rootCA’s certificate and the key file. Update and runrootCA_sign_cert.shto see the following output:PKI$./rootCA_sign_cert.sh Using configuration from <your_config.cnf> Check that the request matches the signature Signature ok Certificate Details: Serial Number: 4096 (0x1000) Validity Not Before: Oct 26 15:59:54 2022 GMT Not After : Oct 23 15:59:54 2032 GMT Subject: countryName = US stateOrProvinceName = Swarthmore organizationName = Swarthmore . commonName = www.cs88.com X509v3 extensions: X509v3 Basic Constraints: CA:FALSE Netscape Comment: OpenSSL Generated Certificate X509v3 Subject Key Identifier: 5E:0E:DD:58:98:2B:53:DA:FB:F6:8C:9C:3B:89:25:F8:7E:C0:54:9B X509v3 Authority Key Identifier: keyid:5A:22:15:E8:A6:8C:A2:8E:93:C9:A2:B4:98:87:CA:59:B6:EA:83:B5 Certificate is to be certified until Oct 23 15:59:54 2032 GMT (3650 days) Write out database with 1 new entries Data Base Updated -
Notice that we use the policy
policy_anythingdefined in the configuration file. This is not the default policy; the default policy is more restrictive, requiring that the subject information in the request match that of the CA’s certificate. The policy used in the command, as indicated by its name, does not enforce any matching rule. Not to be used in real-world deployments! -
We also see a "Database Updated" statement at the end of the certificate signing. Let’s take a look at our database, and see what updates it has received. You should see something like the following:
PKI$ cat swatCA/index.txt
V 321023155954Z	1000 unknown /C=US/ST=<ORG NAME>/O=<ORG ADDR> ./CN=www.cs88.com
|
Copying the extension fields: For security reasons, the default setting in openssl.cnf does not allow the openssl ca command to copy the extension fields from the request to the final certificate.
-
Since we are setting up an enterprise or private chain-of-trust, we want to enable all the extensions or alternate names of
cs88.com(i.e.,cs88a.com, cs88b.com, etc) are also certified by the rootCA. -
To enable this feature, open your copy of the configuration file in your favorite text editor, and uncomment the following line:
# Extension copying option: use with caution.
copy_extensions = copy-
After signing the certificate, use the following command to print out the decoded content of the certificate, and check whether the alternative names are included. Run
rootCA_sign_cert.shto generate new output.
What difference do you observe in the new signature from the rootCA? Record your observations in lab4-checkpoint.adoc
|
Part C: Deploying Certificate in an Apache-Based HTTPS Website and launching a MITM Attack
Deploying our certificate on an Apache-Based HTTPS Website:
In this task, we will see how public-key certificates are used by websites to secure web browsing. The Apache server is pre-installed in our docker container, and we will use this to setup our secure HTTPs website.
-
Configure the private key and public certificate: We first need to configure the Apache server, so it knows where to get the private key and certificates.
-
In your
PKIfolder you should see a folder namedvolumes. This is a shared folder between your VM and the docker image. -
To install our private key and certificate on the Apache server in the docker, let’s first copy them over to the shared folder
volumes, before we start the docker container as follows:PKI$ cp cs88_cert.pem volumes/cs88.crt PKI$ cp cs88_key.pem volumes/cs88.key
-
-
Build and Start your Docker container: Let’s now get our docker container up and running:
PKI$ dcbuild .... Successfully built 860997d47d7d Successfully tagged seed-image-www-pki:latest PKI$ dcup Starting www-10.9.0.80 ... done Attaching to www-10.9.0.80 # Once you are done working on the lab. PKI$ dcdown Removing www-10.9.0.80 ... done Removing network net-10.9.0.0 -
Setting up the Apache Server: Now that we have our docker container up and running, lets
sshinto the Apache server:PKI$ dockps 4ddfc0f2e744 www-10.9.0.80 # --> YOUR DCBuild will generate a unique number associated with the webserver # --> USE your number don't copy paste :) PKI$ docksh 4dd root@4ddfc0f2e744:/# -
Now if we run
ls, we should see thevolumesfolder with the certificates we copied in. Let’s copy these certificates to thecertsfolder. -
Once you’ve done the previous step you should be able to see the following contents in your
certsfolder:root@4ddfc0f2e744:/# ls certs bank32.crt bank32.key cs88.crt cs88.key -
An Apache server can simultaneously host multiple websites. It needs to know the directory where a website’s files are stored. This is done via its VirtualHost file, located in the
`/etc/apache2/sites-availabledirectory. For the bank32 site, we have the following configurationbank32_apache_ssl.conf, that you can find here:root@4ddfc0f2e744:/# cd /etc/apache2/sites-available root@4ddfc0f2e744:/etc/apache2/sites-available# ls 000-default.conf bank32_apache_ssl.conf default-ssl.conf -
Our container is already setup to run an HTTPS site for
bank32.com. You can view the configurationbank32_apache_ssl.confand follow this example to set up your own HTTPS site.root@4ddfc0f2e744:/etc/apache2/sites-available# cat bank32_apache_ssl.conf-
Running the
catcommand above should show the following contents. I’ve added comments below to explain each line.
-
<VirtualHost *:443>             // setup  HTTPS site (443: default port)
DocumentRoot /var/www/bank32    // files for the website are stored here
ServerName www.bank32.com       // name of the website
ServerAlias www.bank32A.com     // alternate names of the website
ServerAlias www.bank32B.com
DirectoryIndex index.html
SSLEngine On
SSLCertificateFile /certs/bank32.crt     // location of server certificate
SSLCertificateKeyFile /certs/bank32.key  // location of private key
</VirtualHost>
|
-
Once you’ve completed the previous step, to get our webpage up and running, we need to enable Apache’s
sslmodule and then enable this site as shown below. You would need to do the same but for the webpagewww.cs88.com.# a2enmod ssl // Enable the SSL module # a2ensite bank32_apache_ssl // Enable the sites described in this .conf file
Starting the Apache server: The Apache server does not automatically start in the container, because we need to type the password to unlock the private key.
-
To start the server we can run the following commands
// Start the server # service apache2 start // Once you are done: Stop the server # service apache2 stop // To restart in case you need to: # service apache2 restart -
When Apache starts, it needs to load the private key for each HTTPS site. Our private key is encrypted, so Apache will ask us to type the password for decryption.
-
The steps above should show you the following output:
root@4ddfc0f2e744:/etc/apache2/sites-available# a2enmod ssl
Considering dependency setenvif for ssl:
Module setenvif already enabled
Considering dependency mime for ssl:
Module mime already enabled
Considering dependency socache_shmcb for ssl:
Module socache_shmcb already enabled
Module ssl already enabled
root@4ddfc0f2e744:/etc/apache2/sites-available# a2ensite cs88_apache_ssl
Enabling site cs88_apache_ssl
To activate the new configuration, you need to run:
  service apache2 reload
root@4ddfc0f2e744:/etc/apache2/sites-available# service apache2 start
 * Starting Apache httpd web server apache 2
 Enter passphrase for SSL/TLS keys for www.cs88.com:443 (RSA):
 *
root@4ddfc0f2e744:/etc/apache2/sites-available# cd ~
root@4ddfc0f2e744:~#
-
| The data in the Apache server is not persistent. I.e., if you shutdown the docker container and fire it up again, it will not have your cs88 configuration file. To avoid having to write it all over again, you can copy it into the volumes folder. Outside of the docker container, you can copy it from volumes into your github repo and commit the file. |
root@4ddfc0f2e744:/# cp /etc/apache2/sites-available/cs88_apache_ssl.conf volumes/.
PKI$ cp volumes/cs88_apache_ssl.conf .
PKI$ git add/commit/push <your files>-
Inside the container, the password used for
bank32isdees. Look at your own certificate scripts to figure out what password you used. Once everything is set up, we can browse our webpagewww.cs88.com, and all the traffic between the browser and the server will be encrypted!
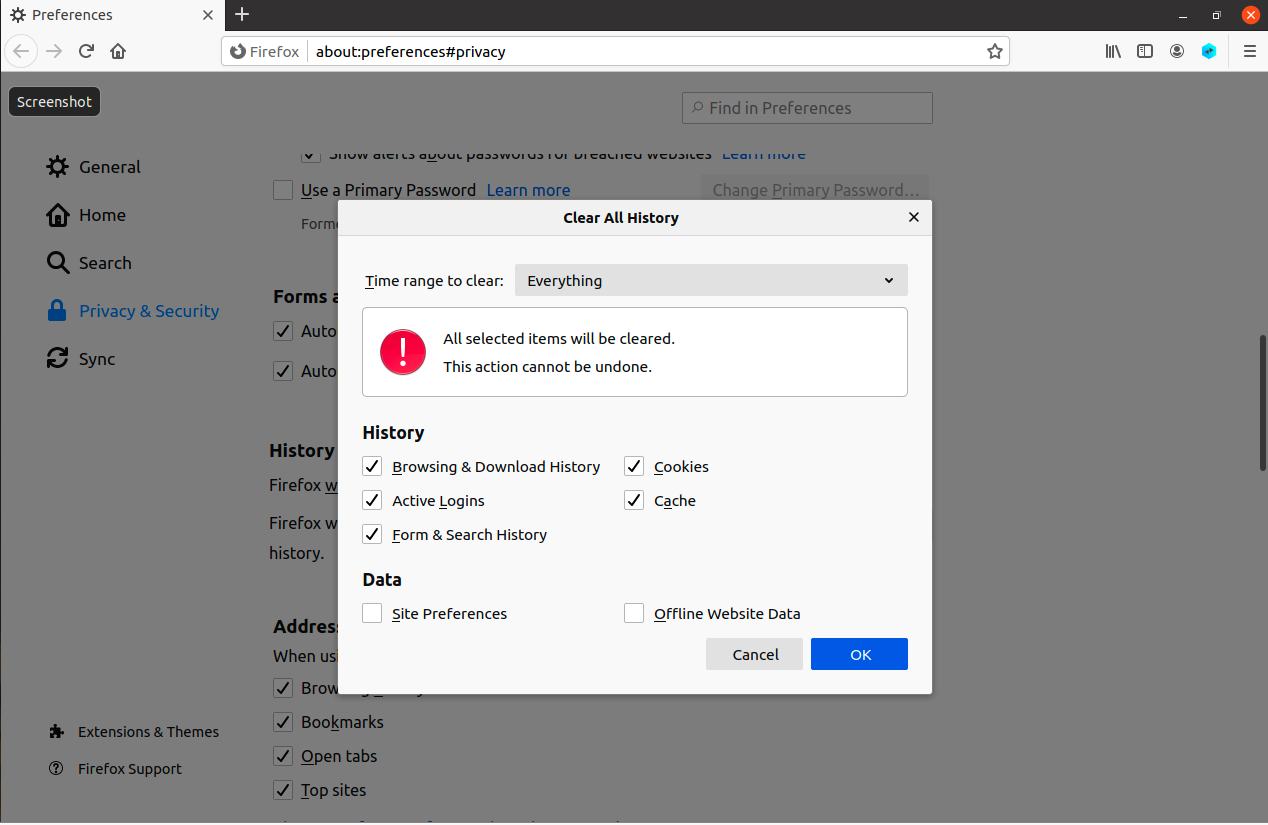
Safe Web Browsing We’re now ready to fire up our web server! In firefox, first clear history, as shown below:
-
In firefox lets load
http:www.cs88.com. You should see the following (stranger things themed) page in red. The red is a reminder that accessing this page is not safe. Why do you think accessing this page is unsafe?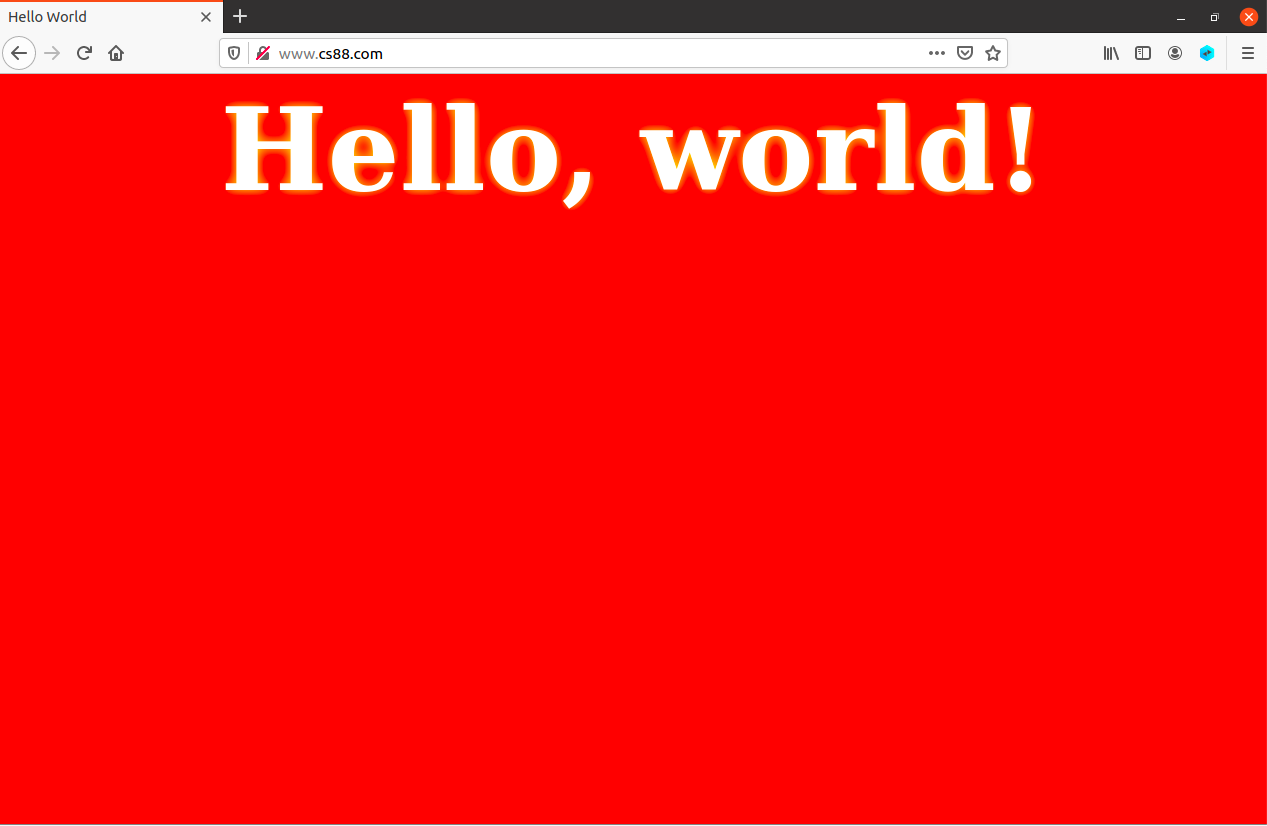
-
Now, lets load
https://www.cs88.com. You should see the following warning that Firefox gives you. Letting you know that since this is an HTTPS page, we are going to try to certify this page first (i.e., the cs88 page has been signed off by a valid CA to prove authenticity.) But Firefox is telling you that the rootCA that signedwww.cs88.com, is not in its list of rootCAs and therefore possibly untrustworthy.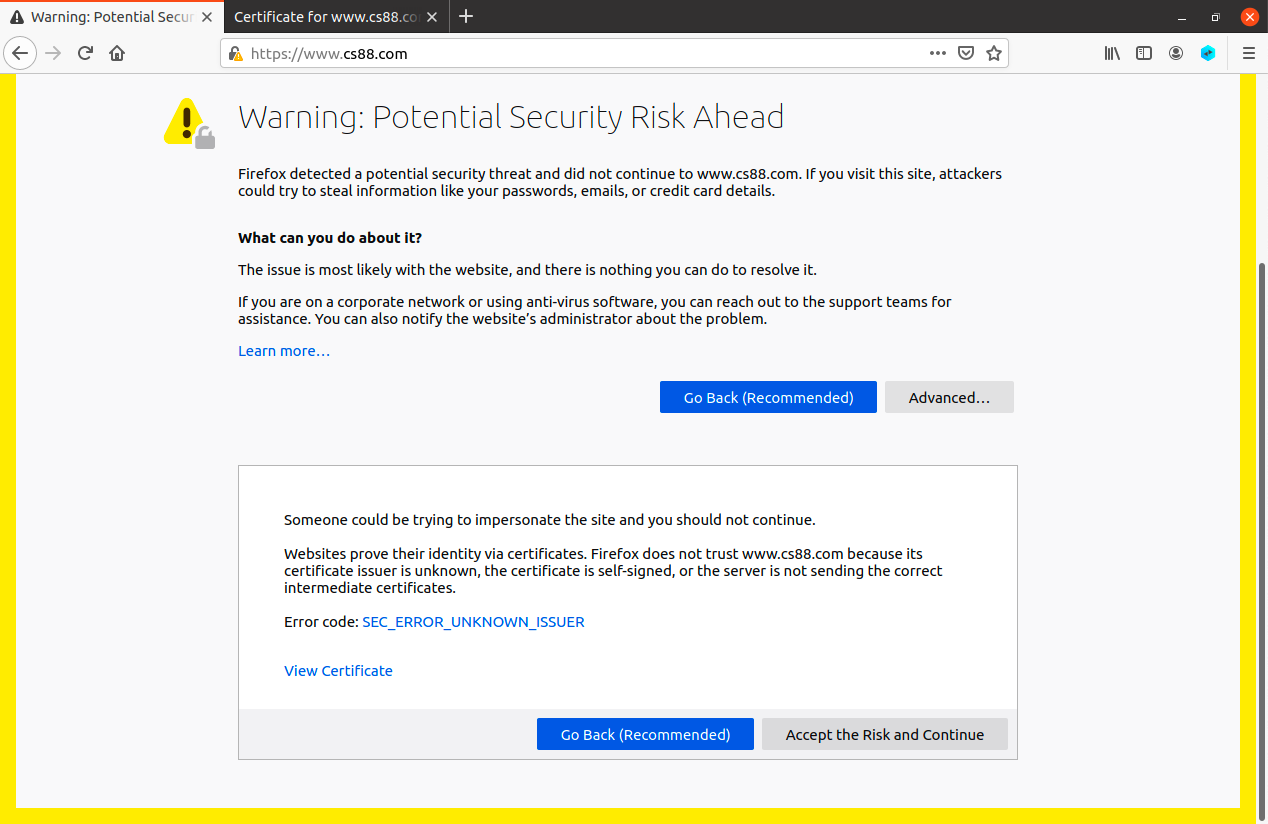
-
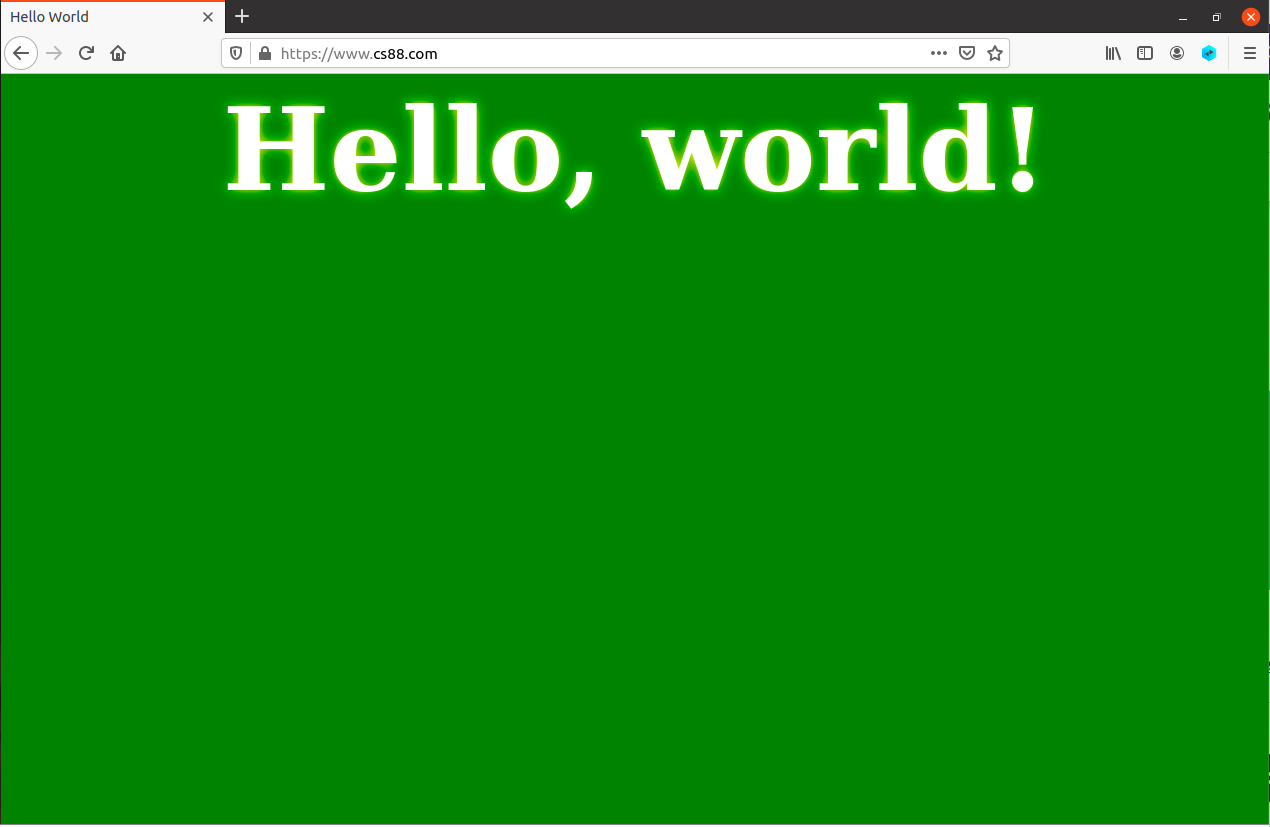
What steps can you take to install the rootCA certificate in Firefox to let the web browser know that the swat root CA can be trusted? Once you install the right certificate you should see the following page.
-
| This is not the same as checking the "Proceed Anyway" box! |
Securely viewing alias webpages of cs88.com Now let’s load up the alternate webpages that we setup in firefox. Try viewing https://www.cs88a.com, https://www.cs88b.com and https://www.cs88w.com. The last page should show you a Firefox warning of a potential security risk.
In lab4-checkpoint.adoc under the section on "Setting up the certificates for cs88.com", specify why you would see the Firefox warning under for https://www.cs88w.com.
|
Launching an MITM attack:Unsuccessfully
In this task, we will show how PKI can defeat Man-In-The-Middle (MITM) attacks. The PKI overview depicts how MITM attacks work.
In the task, we will emulate an MITM attack, and see how PKI can be used to defeat such attacks. We will assume that www.example.com acts as Eve, our active eavesdroppper, and that we are trying to redirect users from visiting www.google.com.
-
To do the steps listed above, we need to modify the DNS or the Domain Name Lookup service on the VM.
-
We will use the
digutility that maps domain names to IP addresses, to modify the victim’s mappings as shown below:seed@VM:~$ dig www.example.com ; <<>> DiG 9.16.1-Ubuntu <<>> www.example.com ;; global options: +cmd ;; Got answer: ;; ->>HEADER<<- opcode: QUERY, status: NOERROR, id: 35476 ;; flags: qr rd ra; QUERY: 1, ANSWER: 1, AUTHORITY: 0, ADDITIONAL: 1 ;; OPT PSEUDOSECTION: ; EDNS: version: 0, flags:; udp: 65494 ;; QUESTION SECTION: ;www.example.com. IN A ;; ANSWER SECTION: www.example.com. 17559 IN A 93.184.216.34 ;; Query time: 16 msec ;; SERVER: 127.0.0.53#53(127.0.0.53) ;; WHEN: Sat Oct 29 15:07:04 EDT 2022 ;; MSG SIZE rcvd: 60This shows us that the name
www.example.commaps to the IP address93.184.216.34. Now, let’s see whatwww.google.com. Note: these are publicdigqueries that anyone can launch.seed@VM:~$ dig google.com ; <<>> DiG 9.16.1-Ubuntu <<>> google.com ;; global options: +cmd ;; Got answer: ;; ->>HEADER<<- opcode: QUERY, status: NOERROR, id: 45816 ;; flags: qr rd ra; QUERY: 1, ANSWER: 1, AUTHORITY: 0, ADDITIONAL: 1 ;; OPT PSEUDOSECTION: ; EDNS: version: 0, flags:; udp: 65494 ;; QUESTION SECTION: ;google.com. IN A ;; ANSWER SECTION: google.com. 274 IN A 142.251.40.206 ;; Query time: 16 msec ;; SERVER: 127.0.0.53#53(127.0.0.53) ;; WHEN: Sat Oct 29 15:08:08 EDT 2022 ;; MSG SIZE rcvd: 55 -
Seeing the response returned above what address do you think
www.google.commaps to? -
What we are now going to do is get our VM to overwrite the mapping between
www.google.comand its IP address, and instead, pointwww.google.comto93.184.216.34, which iswww.example.comaddress. -
We will provide this over-ride of DNS to IP mappings in the
etc/hosts/file.
| You should never execute this command outside of this class project. |
-
Open
/etc/hostsfile in your favorite editor and add the following line:
93.184.216.34 www.google.com-
Now, let’s launch Firefox, first clear history as shown in the previous task, and then try to visit
https://www.google.com.
| What do you observe? If you see a warning message - then click on the advanced button to learn more about why Firefox won’t let you proceed. Explain why this MiTM attack fails when www.example.com tries to impersonate www.google.com. |
Launching a MiTM attack successfully
-
In this task, we assume that the Swat Root CA created in Task 1 is compromised by an attacker, and its private key is stolen. Therefore, the attacker can generate any arbitrary certificate using this CA’s private key.
-
Design an experiment to show that the attacker can successfully launch MITM attack by getting the root CA to validate
www.example.com. You will need to execute the same steps as we did forwww.cs88.com. Except that instead of your firefox directing you to the realwww.example.com, you should be visiting the fakewww.example.comthat you have created with the "stolen" private key from the root Swat CA.
To show that your attack is successful, you should be able to visit https://www.example.com and display the message Fake example.com!.
Explain how your attack works in lab4-checkpoint.adoc.
|
| Save all files you add inside the Apache server to your github repo, to make it easy to start where you left off. |
Task 2: DNS Rebinding Attack
In this second task, we will launch an attack based on the Internet’s name-to-IP mapping infrastructure the DNS. And we will use this attack, to compromise an IoT or Internet of Things Device.
An IoT device basically refers to any appliance, machine, or sensor that can be programmed, and can transmit data over the Internet. They typically refer to non-traditional computational systems - such as mobile devices, embedded sensors, "smart" household, industrial and medical devices.
IoT devices are usually small, and cheap. This means that they are easily deployable, enjoy "plug-and-play" features that all Internet connected devices do, and therefore pose a significant security risk. In fact they account for a large fraction of privacy issues, Distributed Denial-of-Service (DDoS) Attacks, and often are the weakest link in our security measures to protect other devices in the same network.
The Domain Name System
Now, let’s talk about the Domain Name System!
The DNS is the Internet’s equivalent of a telephone registry. It provides a host name to internet protocol address (IP address) mapping. The DNS is a core part of internet’s infrastructure, implemented as an application (i.e., a service that end-users can interact with).
How many DNS lookups do you think you do per day? It’s probably easily in the thousands! As you might guess, we don’t want a single-point-of-failure for such a critical service as the DNS. The DNS is is therefore implemented as a distributed database with a hierarchy of name servers.
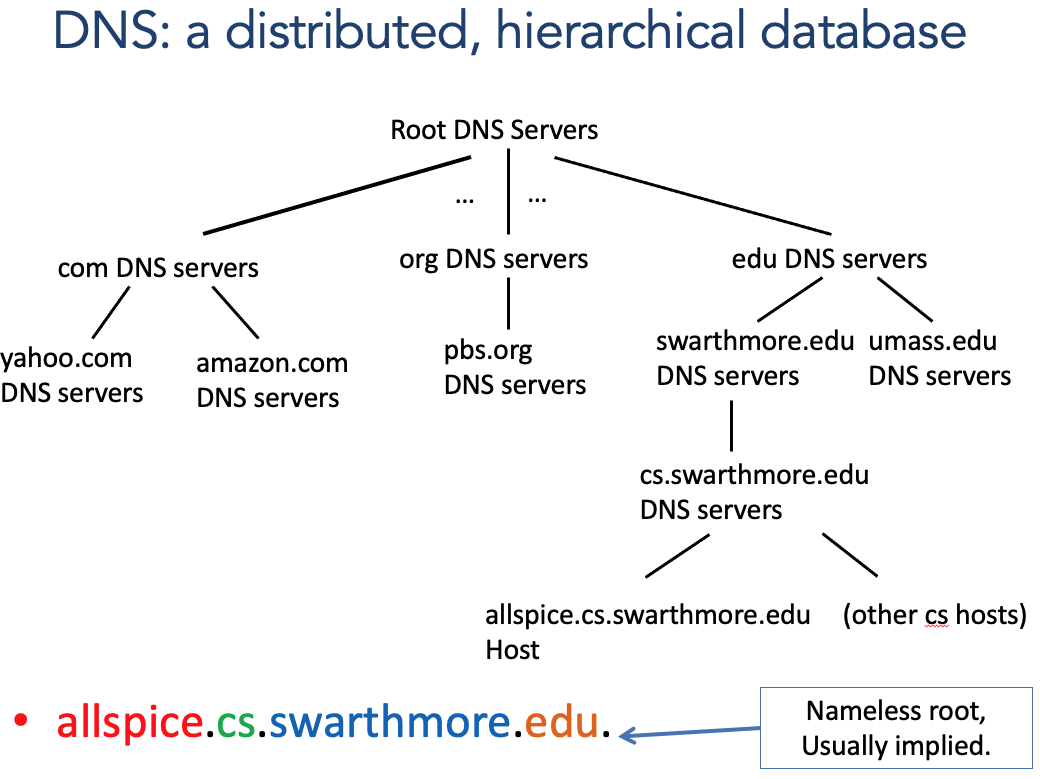
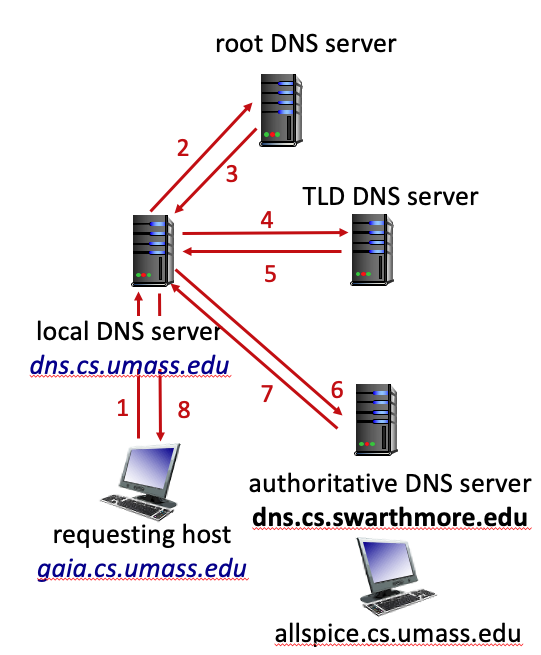
Remember when we talked about the Same-Origin Policy (SOP) for web servers? We talked briefly in the SOP context, about what it means for a hostname to have edu followed by mit followed by cs. This will hopefully make more sense, after you see how the DNS hierarchy works. Below is an example of the DNS Server Hierarchy that is used to resolve the hostname allspice.cs.swarthmore.edu. to an IP address.
|
|
In this example we will walk through resolving the IP address of allspice.cs.swarthmore.edu, a machine on the CS servers, to its IP address. But who do we ask for this resolution in the DNS system? And how does anyone querying the DNS hierarchy, know where to find this name to IP mapping? Glad you asked!
The DNS Hierarchy
Let’s unpack the figures above and breakdown how a DNS query is resolved:
-
First, let’s split the hostname into individual parts seperated by the period
.operator. So, now we have.,edu,swarthmore,csandallspice.-
This structure it turns out, is not random, but purposefully hierarchical. Each section of the hostname going right to left, increases in granularity — we get more and more specific about the name of this machine (i.e.,
allspiceis incs, which is inswarthmore, which is in theedudomain) -
The rightmost part of the name
., the single period, is often implicit and corresponds to the root of a host or domain name
-
-
We will see from the figures above, that resolving each section of the hostname is the responsibility of the corresponding tier in our DNS Hierarchy. The DNS has a similar structure to the Chain-of-Trust we used to establish our Public Key Infrastructure (in fact PKI’s model is inspired by the DNS Hierarchy).
-
Every server in the picture above maps to a set of IP addresses
-
At the top of the DNS Hierarchy are 13 root servers. These root servers map to a fixed set of IP addresses that are preinstalled in every machine.
-
Next, we have the Top Level Domain Servers, i.e., domains registered with
edu,com,orgthat are mapped to a set of IP addresses. -
Then we have the Authoritative DNS Servers, these are servers that are owned by the organization (for e.g., Swarthmore).
-
Finally, we can have a finer granuarlity within the Swarthmore jurisdiction i.e.,
cs.swarthmoreorbiology.swarthmore, etc.
-
Resolving a name to an IP address
Now that we have seen the DNS Hierarchy, we can use this system to resolve a name to an IP address. See figure on the right.
-
First, since we have the root server IPs preinstalled, we can go to the root server and ask What is the IP address of
allspice.cs.swarthmore.edu?-
The root server’s response will be "I don’t know, but I do know the IP address of the
eduserver."
-
-
Next, we ask the
eduserver - which responds "I don’t know but here’s the IP address of `swarthmore`" -
We continue in this manner until we get to the DNS server for
cs.swarthmore.edu, our Authoritative Domain Name Server. This domain name server will maintain a mapping fromallspice.cs.swarthmore.eduto an IP address, say,190.10.2.1.
Advantages of the DNS System
The domain name system has a clear separation of responsibility, that allows each set of servers in the hierarchy to contain a scalable set of name to IP address mappings.
As you can imagine, with the DNS being so critical to the Internet’s functionality, ensuring the DNS stays secure is an ongoing and evolving research area. In your lab4-worksheet.adoc, list three Design Principles of Security that you think are the most important to securing the DNS system.
|
dig queries
dig is a command-line utility that allows you to construct DNS queries. Let’s try out a dig query on the terminal. You can also use man dig to find out what input parameters it takes. Here’s an example dig query:
dig @8.8.8.8 demo.cs.swarthmore.edu-
This query is requesting Google’s local DNS resolver to resolve
demo.cs.swarthmore.edu. If we don’t specify a resolver, then dig will default to the ISP’s (Swarthmore’s CS) local resolver. -
8.8.8.8: Google’s DNS server -
demo.cs.swarthmore.edu: hostname for which we want to find the IP address.
Iterative dig queries
Let’s use dig to replicate the responses that we talked about above
dig . ns
dig +norec allspice.cs.swarthmore.edu @a.root-servers.net
dig +norec allspice.cs.swarthmore.edu @a.edu-servers.net
dig +norec allspice.cs.swarthmore.edu @ibext.its.swarthmore.edu| Complete the section on dig queries in your worksheet. |
Lab Setup
-
In this part of the lab setup, we have a simulated IoT device, which can be controlled through a web interface (this is typical for many IoT devices). Most IoT devices have weak (or often no) security defenses in place. Usually, if attackers can directly interact with these devices, they can trivially compromise them.
-
IoT devices usually have a simple built-in web server, so users can interact with these devices via web APIs. Typically, these IoT devices are protected by a firewall, i.e., they cannot be accessed directly from outside. A firewall, inspects the IP address of incoming packets, and throws out packets according to certain rules that are preinstalled. For e.g., a firewall might not allow you to access the IoT device settings webpage if your IP address is not in the same subnet as the IoT device. You can think of a subnet simply as a continuous range of IP addresses.
Smart Thermostat
The IoT device simulated in this lab is a thermostat, which controls the room temperature. To successfully set the temperature, the client needs to be able to interact with the IoT server.
-
Since the IoT device is behind the firewall, machines outside of the IoT’s subnet cannot interact with the IoT device, and will therefore not be able to control the thermostat. To defeat the firewall protection, the attacking code must get unto the internal network first.
Launching the attack
To launch this attack, we will use an attacker controlled webpage that mimics the real webpage that the victim would see when they try to change the thermostat’s settings.
-
We know from our module in web security, that if the victim clicks on the attacker’s page, then this page will run in the victim’s browser that is inside the firewall. However, browsers implement a sandbox protection that prevents the browsers' code from affecting any other system.
-
The objective of this lab is to use the DNS rebinding attack to circumvent the sandbox protection, so the JavaScript code from the attacker can successfully get the essential information from the IoT device and then use the information to set the temperature of the thermostat to a dangerously high value.
SmartHome setup
We emulate such a vulnerable IoT device using a simple web server, which serves two APIs: password and temperature. The IoT device can set the room temperature.
-
To set the temperature, we need to send out an HTTP request to the server’s temperature API; the request should include two pieces of data: the target temperature value and a password.
-
The password is a secret that changes periodically, but it can be fetched using the password API. Therefore, to successfully set the temperature, users needs to first get the password, and then attach the password in the temperature API.
-
The password is not meant for the authentication purpose; it is used to defeat the Cross-Site Request Forgery (CSRF) attack. Without this protection, a simple CSRF attack is sufficient; there is no need to use the more sophisticated DNS rebinding attack.
-
For the sake of simplicity, we hardcoded the password; in real systems, the password will be re-generated periodically.
-
Explain why the password prevents CSRF attacks in the lab4-worksheet.adoc
|
In this lab, we will use six machines. The lab environment setup is illustrated in the following figure. Only the victim’s machine will be using VM, and all the other machines will be hosted in containers.
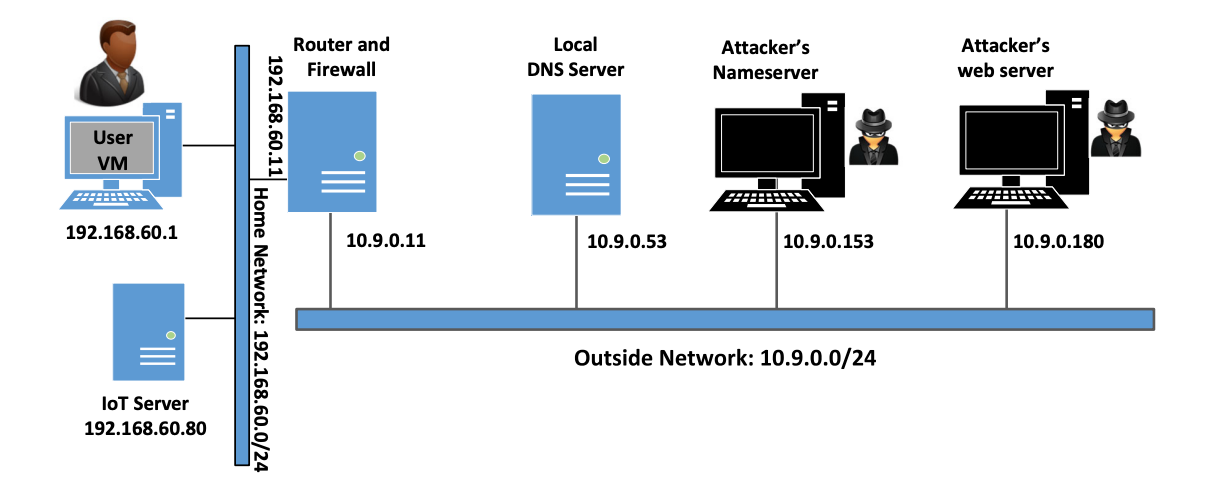
-
In the setup, we have two networks, a home network and an outside network. The home network simulates a typical network at home. The victim’s machine and the IoT services are connected to this network, which is protected by the firewall on the router container.
-
The firewall blocks all traffic going to the 192.168.60.80. This way, outside machines cannot access the IoT device. We also set up a NAT server on the router, so the machines on the home network can access outside (and the response packets can come back).
-
The second network simulates the outside world. In addition to the router, there are three containers attached to this network, one serving as the local DNS server, and the other two serving as the attacker’s nameserver and web server. The attacker owns the
attacker32.comdomain, which is hosted by the attacker’s nameserver container. The web server hosts a malicious website used for the attack.
Setting up the Docker Containers
Inside your VM, let’s run DC build inside the DNS folder:
DNS$ dcbuild
....
Successfully built 6940ee881863
Successfully tagged local-dns-server:latest
Firefox setup
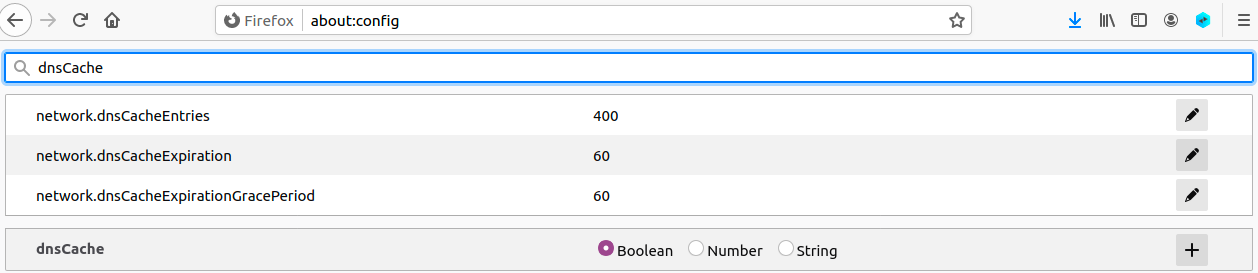
Let’s reduce the Firefox browser’s DNS caching time. To reduce load on DNS servers and to speed up response time, Firefox browser caches DNS results. By default, the cache’s expiration time is 60 seconds. That means that our DNS rebinding attack needs to wait for at least 60 seconds. To make our life easier, we reduce the time to 10 seconds or less. Type about:config in the URL field. After clicking through a warning page, we will see a list of preference names and their values. Search for dnsCache, find the following entry and change its value:
network.dnsCacheExpiration: change its value to 10 (default is 60)After making the change, lets exit from the Firefox browser, and restart it; otherwise this change will not take effect.
Change /etc/hosts
We need to add the following entry to the /etc/hosts file. We will
use www.seedIoT32.com as the name for the IoT server. Its IP address is 192.168.60.80. Add the following lines:
192.168.60.80 www.seedIoT32.com-
Now run
dcupyou should see the following:DNS$ dcup Creating attacker-www-10.9.0.180 ... done Creating iot-192.168.60.80 ... done Creating router ... done Creating attacker-ns-10.9.0.153 ... done Creating local-dns-server-10.9.0.53 ... done Attaching to local-dns-server-10.9.0.53, iot-192.168.60.80, attacker-ns-10.9.0.153, attacker-www-10.9.0.180, router local-dns-server-10.9.0.53 | * Starting domain name service... named [ OK ] attacker-ns-10.9.0.153 | * Starting domain name service... named [ OK ] iot-192.168.60.80 | * Serving Flask app "/app/rebind_iot" iot-192.168.60.80 | * Environment: production iot-192.168.60.80 | WARNING: This is a development server. Do not use it in a production deployment. iot-192.168.60.80 | Use a production WSGI server instead. iot-192.168.60.80 | * Debug mode: off iot-192.168.60.80 | * Running on http://0.0.0.0:80/ (Press CTRL+C to quit) attacker-www-10.9.0.180 | * Serving Flask app "/app/rebind_server" attacker-www-10.9.0.180 | * Environment: production attacker-www-10.9.0.180 | WARNING: This is a development server. Do not use it in a production deployment. attacker-www-10.9.0.180 | Use a production WSGI server instead. attacker-www-10.9.0.180 | * Debug mode: off attacker-www-10.9.0.180 | * Running on http://0.0.0.0:80/ (Press CTRL+C to quit) -
We can now test the IoT server. Point the browser to
www.seedIoT32.comon the User VM. If everything is set up correctly, we should be able to see a thermostat. We can also change the temperature setting by dragging the sliding bar.
Setting up our Local DNS Server
We need to get the victim’s VM to use a particular local DNS server. This is achieved by setting the local DNS server as the first nameserver entry in the resolver configuration file (`/etc/resolv.conf). Add the following entry to the /etc/resolvconf/resolv.conf.d/head file using vim or atom:
nameserver 10.9.0.53-
After making the change, lets run the following command for the change to take effect:
$ sudo resolvconf -u
Testing the lab setup
After configuring the victim’s VM, use the dig command as follows to get the IP address of www.attacker32.com and ns.attacker32.com. You should get 10.9.0.180 and 10.9.0.153, respectively. If you do
not get this, your lab environment is not set up correctly.
DNS$ dig www.attacker32.com

; <<>> DiG 9.16.1-Ubuntu <<>> www.attacker32.com
;; global options: +cmd
;; Got answer:
;; ->>HEADER<<- opcode: QUERY, status: NOERROR, id: 59152
;; flags: qr rd ra; QUERY: 1, ANSWER: 1, AUTHORITY: 0, ADDITIONAL: 1

;; OPT PSEUDOSECTION:
; EDNS: version: 0, flags:; udp: 4096
; COOKIE: 34fc688b707574b001000000635ec42288710ad993491466 (good)
;; QUESTION SECTION:
;www.attacker32.com.		IN	A

;; ANSWER SECTION:
www.attacker32.com.	259200	IN	A	10.9.0.180

;; Query time: 4 msec
;; SERVER: 10.9.0.53#53(10.9.0.53)
;; WHEN: Sun Oct 30 14:36:18 EDT 2022
;; MSG SIZE  rcvd: 91
DNS$ dig ns.attacker32.com
; <<>> DiG 9.16.1-Ubuntu <<>> ns.attacker32.com
;; global options: +cmd
;; Got answer:
;; ->>HEADER<<- opcode: QUERY, status: NOERROR, id: 719
;; flags: qr rd ra; QUERY: 1, ANSWER: 1, AUTHORITY: 0, ADDITIONAL: 1
;; OPT PSEUDOSECTION:
; EDNS: version: 0, flags:; udp: 4096
; COOKIE: 1d594caed344aae401000000635ec4499d5877c8251e1667 (good)
;; QUESTION SECTION:
;ns.attacker32.com. IN A
;; ANSWER SECTION:
ns.attacker32.com. 259200 IN A 10.9.0.153
;; Query time: 4 msec
;; SERVER: 10.9.0.53#53(10.9.0.53)
;; WHEN: Sun Oct 30 14:36:57 EDT 2022
;; MSG SIZE rcvd: 90-
Now let’s pull up the attackers webpage
wwww.attacker32.com.
Launch our Attack on the IoT Device
We are ready to launch the attack on the IoT device. Let’s first understand the same-origin policy protection implemented on browsers. On the victim’s VM, let’s pull up the following three URLs side-by-side. (You want to visually have all of them in front of you as shown below).
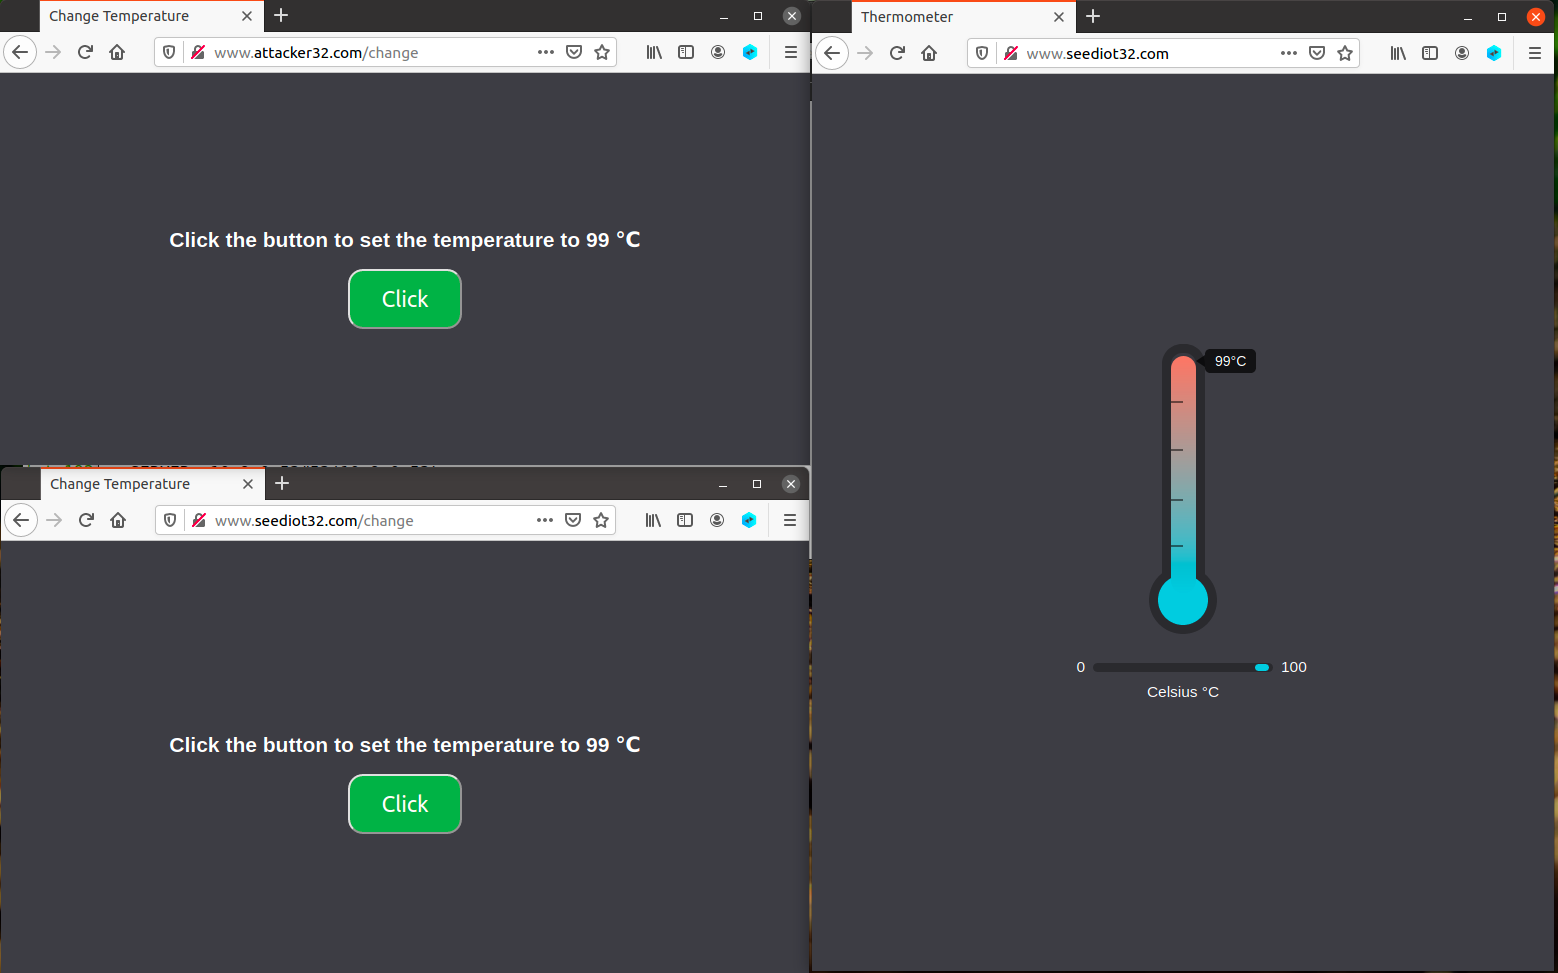
-
The seed IoT page on the right lets us see the current temperature setting of the thermostat. It fetches the temperature value from the IoT server once every second. Let’s keep this page always visible, so we can see the temperature setting on the thermostat.
-
The other two pages are identical, except that one comes from the IoT server, and the other comes from the attacker’s server. When we click the button on both pages, a request will be sent out to the IoT server to set its temperature.
Click the button on the pages used to set the thermostat, and describe your observation in lab4-worksheet.adoc. Which page can successfully set the thermostat’s temperature? To find the reason, click the following menu sequence from Firefox: Tools → Web Developer → Web Console. A console window will appear, which displays error messages if any. Hint: the reason is related to the same-origin policy enforced by browsers. Please explain why this policy causes one of the pages to fail.
|
Defeat the Same-Origin Policy Protection
From the previous task, it seems impossible to set the thermostat’s temperature from the attacker’s page, due to the browser’s same-origin policy protection. The objective of this task is to defeat such a protection, so we can set the temperature from this page.
The main idea for defeating the same origin protection comes from the fact that the policy enforcement is based on the host name, not on the IP address, so as long as we use www.attacker32.com in the
URL, we are complying with the SOP policy, but that does not mean we are restricted to communicate with the www.attacker32.com web server.
Before the user’s browser sends out requests to www.attacker32.com, it first needs to know the IP address of www.attacker32.com. A DNS request will be sent out from the victim’s machine. If the IP address is not cached at the local DNS server, a DNS request will eventually be sent to attacker32.com ’s nameserver, which is controlled by the attacker. Therefore, the attacker can decide what to put in the response.
Modify the JavaScript code
On the attacker’s web server, the JavaScript code running inside
the www.attacker32.com/change page is stored in the following file: /app/rebind_server/templates/js/change.js. Since this page comes from the www.attacker32.com server, according to the same-origin policy, it can only interact with the same server. Therefore, we need to change the first line of the code from http://www.seediot32.com to http://www.attacker32.com (we will have to work with the nano editor in the container):
-
First run
dockpsanddockshinto the attacker’s server:seed@VM:~/.../DNS$ dockps 3163dd7f9610 attacker-ns-10.9.0.153 43171fb012c6 router 646a9c53d55c local-dns-server-10.9.0.53 7be85d4a29c3 iot-192.168.60.80 c6ffc7e134bc attacker-www-10.9.0.180 seed@VM:~/.../DNS$ docksh c6 -
After you are done making the changes above, then exit, and restart the docker container
seed@VM:~/.../DNS$ docker container restart c6ff
Conduct the DNS rebinding.
Our JavaScript code sends requests to www.attacker32.com,
i.e., the requests will come back to the Attacker’s web server. That is not what we want; we want the requests to go to the IoT server. This can be achieved using the DNS rebinding technique. We first map
www.attacker32.com to the IP address of the attacker’s web server, so the user can get the actual page from http://www.attacker32.com/change. Before we click on the button on the page, we remap
the www.attacker32.com hostname to the IP address of the IoT server, so the request triggered by the button will go to the IoT server. That is exactly what we want.
To change the DNS mapping modify the zone_attacker32.com file inside attacker’s nameserver container. The zone file can be found in the /etc/bind folder. The following shows the content of the zone file. The first entry is the default Time-To-Live (TTL) value (seconds) for the response, specifying how long the response can stay in the DNS cache.
| This value may need to be modified. The following is the content of the zone file currently: |
$TTL 1000
@ IN SOA ns.attacker32.com. admin.attacker32.com. (
    2008111001
    8H
    2H
    4W
    1D)
@ IN NS ns.attacker32.com.
@ IN A 10.9.0.22
www IN A 10.9.0.22
ns IN A 10.9.0.21
* IN A 10.9.0.22
In some cases the /etc/bind folder does not show up. If this happens run the following command inside the nameserver docker container:`root@3163dd7f9610:/etc# apt-get install bind9 -y`
|
After making the changes to the zone file, run the following command to ask the nameserver to reload the revised zone data.
root@3163dd7f9610:/etc# rndc reload attacker32.comBecause of the tasks conducted previously, the DNS mapping for the www.attacker32.com has already been cached by the local DNS server, it will not expire until 1000 seconds later. To shorten the
wait clean out the cache using the following command (on the local DNS server). However, this can only be conducted before the attack starts.
// Run this command on the **local DNS server container**
# rndc flush| Once the attack starts, you are not allowed to modify or interact with the local DNS server. |
If both steps in this task are done correctly, clicking the button on the change page from www.attacker32.com should be able to change the thermostat’s temperature successfully.
Launch the Attack
In the previous task, the victim has to click the button to set the temperature to the dangerously high value. Obviously, it is unlikely that typical users will do that. In this task, we need to do that automatically. We have already created a web page for that purpose. It can be accessed using http://www.attacker32.com.
Once you have loaded this page into the User VM, you should be able to see a page with a timer, which goes down from 10 to 0. Once it reaches 0, the JavaScript code on this page will send the set-temperature request to http://www.attacker32.com, and then reset the timer value to 10. Use the DNS rebinding technique, so once the timer reaches 0, the thermostat’s temperature is set to 88 Celsius.
Explain how your attack works in lab4-worksheet.adoc.
|