Lab Due Date: Tuesday, September 27, 11:59 PM
Overview
This lab is built on the SEED Labs for Security Education project by Prof. Wenliang Du, at Syracuse University and by Deian Stefan at UCSD.
This lab is composed of two distinct web security attacks. The first is an SQL injection attack and the second is a Cross-Site Scripting (XSS) attacks. Since these are two disparate types of attacks, in week 1 we will focus on SQL Injection attacks and in week 2 we will focus on XSS attacks.
This lab page describes SQL, and launching SQL Injection attacks. In week 2 we will discuss XSS attacks.
Lab 2a Goals
The goal of this lab is to gain hands-on experience exploiting server-side SQL vulnerabilities and launching SQL injection attacks!
This lab will demonstrate how simple vulnerabilities (often occurring due to the carelessness of the website developer) can be really harmful to the website’s owners. These security attacks include (but aren’t limited) to stealing sensitive information, injecting malicious code, and causing the host server to crash.
The goal is to find ways to exploit the SQL injection vulnerabilities, demonstrate the damage that can be achieved by the attack, and master the techniques that can help defend against such type of attacks.
SQL Injection
SQL injection is a code injection technique that exploits the vulnerabilities in the interface between web applications and database servers. The vulnerability is present when user’s inputs are not correctly checked within the web applications before being sent to the back-end database servers.
Web applications often take inputs from users, and then use these inputs to construct SQL queries, so they can either validate/authorize a user, or retrieve information from the database (shopping, banking applications, etc). Web applications use SQL queries to store information in the database.
Prior Knowledge
During the lab, you may encounter situations that may require to either execute HTML, Client-side JavaScript or SQL statements. However, no code that you are expected to write in this assignment exceeds 10 (very small) lines. Most of the expected code is pretty generic and the references above will help you find the code.
The aim of the assignment is not to teach you coding in the said languages, but to give you hands-on experience with the tricks that most “hackers” or exploiters use in today’s world. During no time are you expected to know “truly fancy” stuff like PHP, ASP, server-side JavaScript, AJAX, JQuery, Flash, CSS or in general - anything beyond the realms of the aforementioned techniques.
Lab Requirements
-
Complete and submit
lab2a-sql.adoc. -
Successfully conduct the following:
-
Compose SQL queries to a database: SELECT and UPDATE statements
-
Successfully run a series of SQL injection attacks
-
Defend against SQL injection attacks using the Prepared statement
-
-
Submit your
Getting your Lab2 Starting Point Code
Power-up the CS88 VM through VirtualBox and login. Then, pull up a browser in your VM and log into CS88 Github for our class and get the ssh-URL to your lab git repository. Follow along with the prompts below to SSH, create a lab directory and clone your lab repos.
In this lab we will be using a VM - [installation and setup steps in Lab1] where we will clone the code from github.
# Turn on your VM through virtualbox

# create a cs88/labs sub-directory in your home directory
$ seed@VM: mkdir ~/cs88
$ seed@VM: cd cs88
$ seed@VM: mkdir labs
$ seed@VM: cd labs

# clone your lab1 repo into your labs sub-directory
$ seed@VM: git clone [your-ssh-URL]

# change directory to list its contents
$ seed@VM: cd lab1-username1-username2

# ls should list the following contents
$ seed@VM: ls
 Makefile README.md lab1-worksheet.adoc
Lab Environment Setup
Setting up docker containers for the database and the web-server
In the last lab we saw how we can setup a virtual machine and we talked about what a VM does - i.e., creates virtual instances of the entire system hardware up!
You can think of a Docker container as a light-weight VM. Docker virtualizes the application environment in which all of your software applications, code and data live. If you think of the hardware as "bare metal" and the OS as managing computer resources, then the Docker container sits on top of the OS, giving us a sandboxed environment to work in, without the overhead of the entire virtual machine. You can read more about Docker containers here.
In this lab, we are going to run two Docker VMs inside our virtual machine. One for the web server that takes user input and one for our the SQL database.
Can you run a docker inside a VM? Yes! How about a docker inside a docker inside a VM? also yes!… it’s turtles all the way down…
The Web Application
For this lab, we have a simple employee management application. Employees can view and update their personal information in the database through this web application. There are two user profiles in our application:
-
Administrator: who has root privileges and can manage employee’s profile information.
-
Employee: who can view and update their own profile information.
| Name | Employee ID | Password | Salary | Birthday | SSN | Nickname | Address | Phone | |
|---|---|---|---|---|---|---|---|---|---|
Admin |
99999 |
seedadmin |
400,000 |
3/5 |
423-54-314 |
||||
Alice |
10000 |
seedalice |
20,000 |
9/20 |
102-11-002 |
||||
Boby |
20000 |
seedboby |
50000 |
4/20 |
102-13-352 |
||||
Ryan |
30000 |
seedryan |
90000 |
4/10 |
321-93-525 |
||||
Samy |
40000 |
seedsamy |
400000 |
1/11 |
321-11-1111 |
||||
Ted |
50000 |
seedted |
110,000 |
11/3 |
243-43-244 |
Setting up an IP address
First we need to configure an IP address where we want to host our web server. To do so, we need to modify the /etc/hosts file that maintains a mapping of the IP addresses for each domain name (e.g. www.google.com maps to 8.8.8.8).
We will first make a copy of the hosts file (so we don’t inadvertently get rid of it!). Then, we will open hosts in atom and edit the file as shown below.
seed@VM:~/$ cd /etc/
seed@VM:~/$ sudo cp hosts hosts-original
seed@VM:~/$ atom hosts
In atom, your hosts file should be updated to the following:
127.0.0.1       localhost
127.0.1.1       VM

# The following lines are desirable for IPv6 capable hosts
::1     ip6-localhost ip6-loopback
fe00::0 ip6-localnet
ff00::0 ip6-mcastprefix
ff02::1 ip6-allnodes
ff02::2 ip6-allrouters

--->>>> CHANGE FROM HERE ONWARDS ------>>>>>
# For SQL Injection Lab
10.9.0.5        www.seed-server.com
Save your file, and at the Authentication Required prompt, enter your password for your VM (i.e., the password associated with your user login to the VM).

Getting our Docker VM up and running
-
We first need to build our docker image just like we built our vm.
The next two steps will need to be performed every time you login to your VM and want to work on your lab. seed@VM:~$ cd lab2a-username1-username2 seed@VM:~/.../lab2a$ dcbuild # this step will take a couple of minutes -
Next, we want to run
dcupwhich starts the docker container. This is equivalent to starting our VM.seed@VM:~/.../lab2a$ dcupYou should now have a docker container up and running! The
dcupcommand will swallow the cursor. To interact with the docker, we will need to open up a new terminal.
In-Lab Tasks
In lab today, we will first explore the web interface, and get familiar with MySQL syntax for the lab. We will then build on this knowledge to execute SQL injection attacks. The pre-class videos for Thursday go over SQL injection attacks in more detail and we will also go through more examples of SQL commands and injections in class on Thursday.
Getting familiar with the web interface
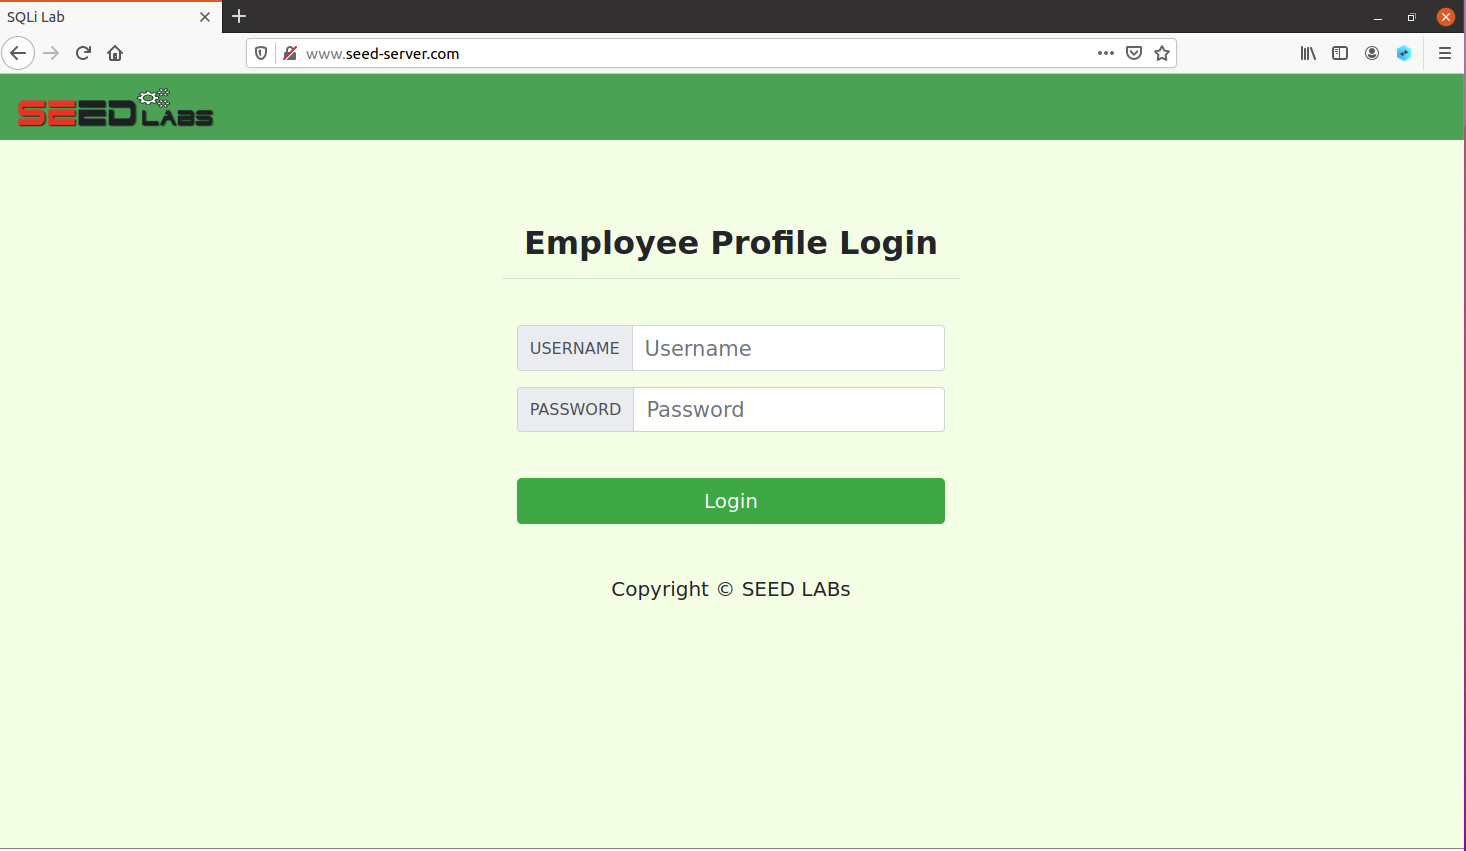
To interact with our newly launched web server, let’s pull up the firefox browser and load our web server address www.seed-server.com.
You should see the following page displayed:
-
Try to login as Alice using the information provided in the SQL Table above and you should see Alice’s information provided.
-
Next, click on the Edit Profile link and notice that you are only allowed to edit a small subset of fields and not all of the information maintained about Alice. For e.g., you can’t edit her salary for obvious reasons :).
-
You can try to edit Alice’s email or phone number and we will see that change propagated to our MySQL database.
-
Also notice that when you are on Alice’s homepage the web address looks like the following
http://www.seed-server.com/unsafe_home.php?username=alice&Password=seedalice -
You can already see the structure of the underlying SQL query that is being passed to the database to be something of the form:
From the table of users, select the person with username "Alice" and password "seedalice". -
You can try logging in as different users, editing their profiles and observe how this URL changes.
Getting familiar with SQL Statements
In order to interact with the SQL database directly, we can login on the terminal, to the docker VM that is running the database. To do so, we will frist need to run dockps to find the ID of the docker container running the SQL database.
You may not see the same ID for the docker containers on your end. They are randomly generated when the docker container starts up.
|
seed@VM:~/.../lab2a$ dockps
825e6711e8a9  mysql-10.9.0.6
205da2129e2b  www-10.9.0.5
Now, we want to start a shell on the mysql docker container. To do so we can execute the following. Note: We only need to specify the first two characters that uniquely identify the docker container to get a shell prompt started:
$ docksh 82
root@825e6711e8a9:/#
We are now logged into the docker container! We will now use the mysql client program to interact with the database. The login credentials for the database are:
 username: root
 password: dees
To login to the SQL database we will use the following command. Note: there is no space between p and dees in the command below.
root@825e6711e8a9:/# mysql -u root -pdees

# warning messages displayed#
mysql>-
Show Databases: First, we can view the databases in our database management system:
mysql> SHOW databases;
+--------------------+
| Database           |
+--------------------+
| information_schema |
| mysql              |
| performance_schema |
| sqllab_users       |
| sys                |
+--------------------+
5 rows in set (0.00 sec)
We see that we have 5 databases. The one that we are going to be experimenting with is called
sqllab_users. -
Show tables in a database: We can now see all the tables in a particular database.
mysql> USE sqllab_users;
Database changed
mysql> SHOW tables;
+------------------------+
| Tables_in_sqllab_users |
+------------------------+
| credential |
+------------------------+
SQL Tutorial
In this section we are going to do a brief tutorial on using a mySQL database. By the end of this section, you should be ready to start attempting your lab! If you are already familiar with mySQL syntax feel free to skip this section.
Create a database
Inside our MySQL database, we can use the SHOW DATABASES that we saw above to list existing databases. We can also create new databases. Let’s create a new database called 'under_the_sea'. And create
mysql> CREATE DATABASE under_the_sea;  <-- don't forget the semicolon!
mysql> USE under_the_sea
mysql> CREATE TABLE ocean(
    -> ID       INT (6) NOT NULL AUTO_INCREMENT,
    -> Name     VARCHAR (30) NOT NULL,
    -> Age      INT (10),
    -> Email    VARCHAR (60),
    -> Password VARCHAR (60),
    -> PRIMARY  KEY (ID)
    -> );

mysql> DESCRIBE ocean;
+----------+-------------+------+-----+---------+----------------+
| Field    | Type        | Null | Key | Default | Extra          |
+----------+-------------+------+-----+---------+----------------+
| ID       | int         | NO   | PRI | NULL    | auto_increment |
| Name     | varchar(30) | NO   |     | NULL    |                |
| Age      | int         | YES  |     | NULL    |                |
| Email    | varchar(60) | YES  |     | NULL    |                |
| Password | varchar(60) | YES  |     | NULL    |                |
+----------+-------------+------+-----+---------+----------------+
5 rows in set (0.00 sec)
Insert and Update the database
We can use the INSERT INTO statement to insert a new record into the table. Note that we do not need to specify a value of the ID column, as it will be automatically set by the database.
mysql> INSERT INTO ocean (Name, Age, Email, Password)
    -> VALUES ('Spongebob', 20, 'sponge@ocean.com', '12345!!');
Query OK, 1 row affected (0.01 sec)
We can view our new entry in the table using the SELECT statement.
mysql> SELECT * FROM ocean;
+----+-----------+------+------------------+----------+
| ID | Name      | Age  | Email            | Password |
+----+-----------+------+------------------+----------+
|  1 | Spongebob |   20 | sponge@ocean.com | 12345!!  |
+----+-----------+------+------------------+----------+
1 row in set (0.00 sec)
We can use the UPDATE statement to modify an existing record.
mysql> UPDATE ocean SET Password='topsecret' WHERE Name='Spongebob';
Query OK, 1 row affected (0.00 sec)
Rows matched: 1  Changed: 1  Warnings: 0

mysql> SELECT * FROM ocean;
+----+-----------+------+------------------+-----------+
| ID | Name      | Age  | Email            | Password  |
+----+-----------+------+------------------+-----------+
|  1 | Spongebob |   20 | sponge@ocean.com | topsecret |
+----+-----------+------+------------------+-----------+
1 row in set (0.00 sec)
SELECT, WHERE and UNION clauses
The SELECT statement is the most common operation on databases. It retrieves information from a database and can be used in conjunction with the where clause to express more complex queries.
A simple example of SELECT that builds on what we have seen so far is to display a subset of columns in our table. For example, we can choose to only depict the name and password of all the users in ocean.
mysql> SELECT Name, Password FROM ocean;
+-----------+-----------+
| Name      | Password  |
+-----------+-----------+
| Spongebob | topsecret |
+-----------+-----------+
1 row in set (0.00 sec)
We can now apply the WHERE clause that has the format: SQL Statement WHERE predicate;
-
Here, the SQL statement only reflects the rows for which the predicate in the WHERE clause is TRUE.
-
The predicate is a logical expression; multiple predicates can be combined using keywords AND and OR.
Let’s first populate more users into our table. You can choose your own rows, but as an example here are the rows that I’ve populated into ocean:
mysql> SELECT * FROM ocean;
+----+--------------+------+-------------------+-------------+
| ID | Name         | Age  | Email             | Password    |
+----+--------------+------+-------------------+-------------+
|  1 | Spongebob    |   20 | sponge@ocean.com  | topsecret   |
|  2 | Squidward    |   60 | squiddy@ocean.com | clarinet%%  |
|  3 | Patrick Star |   21 | patrick@ocean.com | theStar5    |
|  4 | Mr. Krabs    |   55 | krusty@ocean.com  | noFreeLunch |
+----+--------------+------+-------------------+-------------+
4 rows in set (0.01 sec)
Using the WHERE clause: The example below shows two clauses. The first, just returns a record where the ID=4, and the second returns the record where the ID = 4 or the Name = Squidward.
mysql> SELECT * FROM ocean WHERE ID=4;
+----+-----------+------+------------------+-------------+
| ID | NAME      | Age  | Email            | Password    |
+----+-----------+------+------------------+-------------+
|  4 | Mr. Krabs |   55 | krusty@ocean.com | noFreeLunch |
+----+-----------+------+------------------+-------------+
1 row in set (0.00 sec)

mysql> SELECT * FROM ocean WHERE ID=4 OR Name='Squidward';
+----+-----------+------+-------------------+-------------+
| ID | NAME      | Age  | Email             | Password    |
+----+-----------+------+-------------------+-------------+
|  2 | Squidward |   60 | squiddy@ocean.com | clarinet%%  |
|  4 | Mr. Krabs |   55 | krusty@ocean.com  | noFreeLunch |
+----+-----------+------+-------------------+-------------+
2 rows in set (0.00 sec)-
We can also use a slightly strange clause that will be really handy when we start running SQL injection attacks. In the example below the
1=1will always evaluate to TRUE no matter what other clauses exist before it! This ability for us to be able to append a1=1to any clause can create a whole host of vulnerabilities. You can try changing the clause before1=1and see if the results change.
mysql> SELECT * FROM ocean WHERE ID=4 OR 1=1;
+----+--------------+------+-------------------+-------------+
| ID | NAME         | Age  | Email             | Password    |
+----+--------------+------+-------------------+-------------+
|  1 | Spongebob    |   20 | sponge@ocean.com  | topsecret   |
|  2 | Squidward    |   60 | squiddy@ocean.com | clarinet%%  |
|  3 | Patrick Star |   21 | patrick@ocean.com | theStar5    |
|  4 | Mr. Krabs    |   55 | krusty@ocean.com  | noFreeLunch |
+----+--------------+------+-------------------+-------------+
4 rows in set (0.00 sec)
The UNION operator: The UNION operator is used to combine the results of more than one SELECT statement where:
-
The same number of columns are returned from both
SELECTstatements and, -
The columns from both the tables have the same data type
mysql> SELECT Email, Password FROM sqllab_users.credential UNION
    -> SELECT Name, Password FROM under_the_sea.ocean;
+----------------+------------------------------------------+
| Email          | Password                                 |
+----------------+------------------------------------------+
| alice@seed.com | fdbe918bdae83000aa54747fc95fe0470fff4976 |
|                | b78ed97677c161c1c82c142906674ad15242b2d4 |
|                | a3c50276cb120637cca669eb38fb9928b017e9ef |
|                | 995b8b8c183f349b3cab0ae7fccd39133508d2af |
|                | 99343bff28a7bb51cb6f22cb20a618701a2c2f58 |
|                | a5bdf35a1df4ea895905f6f6618e83951a6effc0 |
| Spongebob      | topsecret                                |
| Squidward      | clarinet%%                               |
| Patrick Star   | theStar5                                 |
| Mr. Krabs      | noFreeLunch                              |
+----------------+------------------------------------------+
10 rows in set (0.00 sec)
Adding Comments
We can add comments in three differnt styles in mySQL as shown below. We shall soon see that adding comments can invalidate the rest of the line, and canalso result in a whole host of vulnerabilities!
mysql> SELECT * FROM ocean; # Comment to end the line (the rest of the line is not parsed)  WHERE ID=4
+----+--------------+------+-------------------+-------------+
| ID | NAME         | Age  | Email             | Password    |
+----+--------------+------+-------------------+-------------+
|  1 | Spongebob    |   20 | sponge@ocean.com  | topsecret   |
|  2 | Squidward    |   60 | squiddy@ocean.com | clarinet%%  |
|  3 | Patrick Star |   21 | patrick@ocean.com | theStar5    |
|  4 | Mr. Krabs    |   55 | krusty@ocean.com  | noFreeLunch |
+----+--------------+------+-------------------+-------------+
4 rows in set (0.00 sec)

mysql> SELECT * FROM ocean; -- Comment to end the line (the rest of the line is not parsed)  WHERE 'Name = Spongebob'
+----+--------------+------+-------------------+-------------+
| ID | NAME         | Age  | Email             | Password    |
+----+--------------+------+-------------------+-------------+
|  1 | Spongebob    |   20 | sponge@ocean.com  | topsecret   |
|  2 | Squidward    |   60 | squiddy@ocean.com | clarinet%%  |
|  3 | Patrick Star |   21 | patrick@ocean.com | theStar5    |
|  4 | Mr. Krabs    |   55 | krusty@ocean.com  | noFreeLunch |
+----+--------------+------+-------------------+-------------+
4 rows in set (0.00 sec)

mysql> SELECT * FROM /* this is an inline comment */ ocean;
+----+--------------+------+-------------------+-------------+
| ID | NAME         | Age  | Email             | Password    |
+----+--------------+------+-------------------+-------------+
|  1 | Spongebob    |   20 | sponge@ocean.com  | topsecret   |
|  2 | Squidward    |   60 | squiddy@ocean.com | clarinet%%  |
|  3 | Patrick Star |   21 | patrick@ocean.com | theStar5    |
|  4 | Mr. Krabs    |   55 | krusty@ocean.com  | noFreeLunch |
+----+--------------+------+-------------------+-------------+
4 rows in set (0.00 sec)
Exiting
You can exit from mysql and the database docker container by using two exit commands
mysql> exit
Bye
root@825e6711e8a9:/# exit
exit
seed@VM:~/.../lab2a$
Getting started with SQL Injection Attacks
Now that we have a basic understanding of how SQL commands work, and we’ve interacted with the front-end database. Let’s try to apply them together to expose vulnerabilities in the front-end web-server.
In the figure below, we are functioning as the user, sitting at a web browser (www.seed-server.com) accessing the web server that retrieves content from the backend database.
Web server functionality
-
When the user provides input in the input fields, the request is sent to the Web-server, which then parses the user input into an SQL query. Based on the data that is displayed upon loggin in as Alice we can guess that the query that the webserver send to the database looks something like the following:
SELECT name, eid, salary, eamil FROM credential WHERE name = 'alice' and Password = 'seedalice'; -
Since the webserver is performing no input verification, we can essentially put in anything we like in the two input fields for username and password. Let’s see an example of this.
-
In the following login attempt as an attacker, let’s assume we don’t know Alice’s password but we do know that there is a user called Alice in the system. We might then try to just put in the username without a password, and as expected, this will result in an error as shown below.

-
The figure also shows what the underlying SQL query might look like when we provide just the name
aliceand no password.
-

-
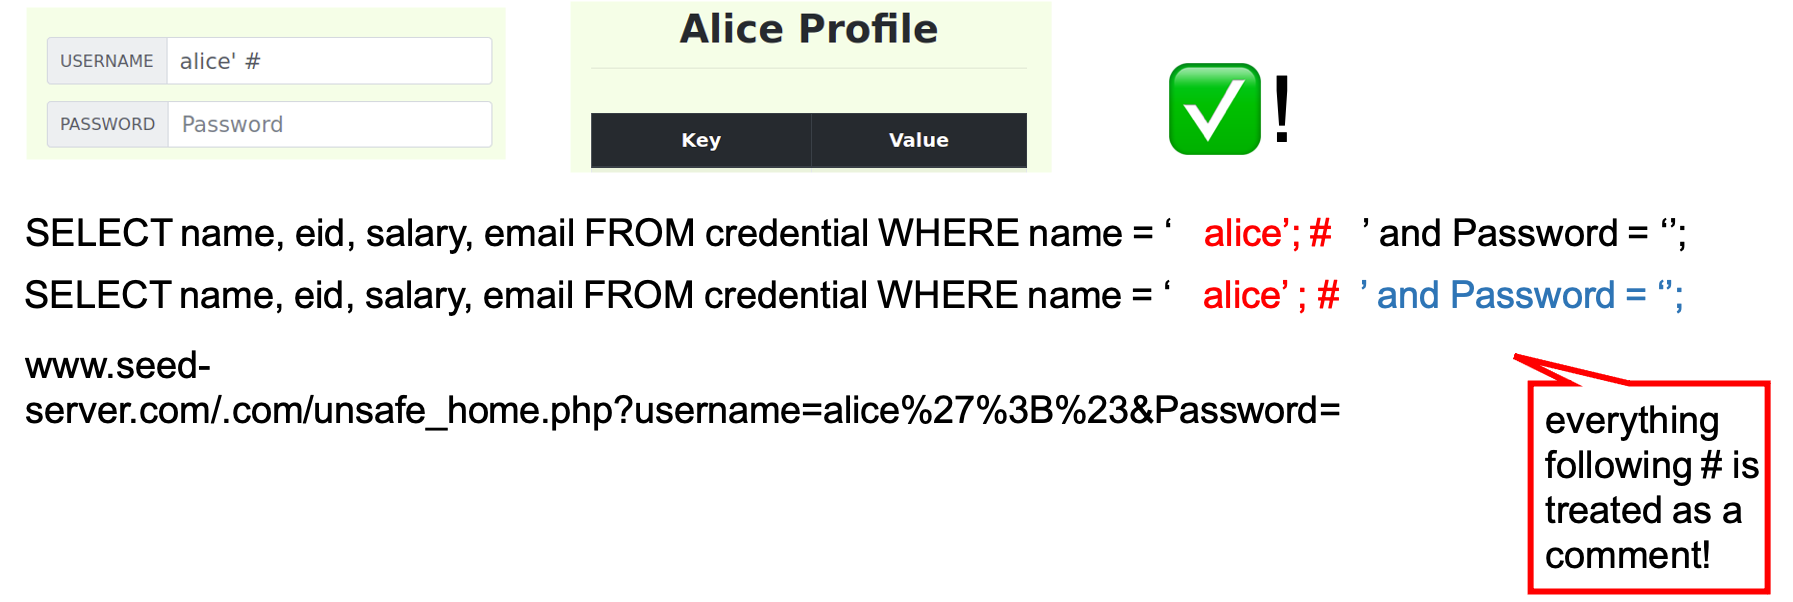
In our second attempt, we provide a new input where in the name field we type in
alice '#. Now suddenly we seemed to have logged in without providing the password! If we look at the underlying SQL query, we see that our input has effectively terminated the string input when we added the'right afteralice, and we commented out the rest of the query by adding the#character!
Launch your attacks!
Our goal for the SQL injection attacks is going to leverage vulnerability in the manner in which data is read into the web server, to login and change individual users' details without (a), having the right credentials (e.g., login as Alice without having Alice’s password), or (b), having the right user privileges (e.g. Alice’s salary being updated without logging in as Admin).
You are now ready to launch all five attacks listed in lab2a-worksheet.adoc. For every level that you succeed in attempting, write down the corresponding SQL query on the worksheet.
Grading Rubric
Lab 2 Part A is worth 4% that is going to be graded as follows:
-
2 points for launching SQL Injection Attacks and demonstrating them in lab the following week.
-
2 points for completing
lab2a-worksheet.adoc
Submitting
Please remove any debugging output prior to submitting.
To submit your code, simply commit your changes locally using git add and git commit. Then run git push while in your lab directory.