Lab Due Date: Thursday, September 24, 11:59PM ET
Handy References
-
RFC 1945: HTTP 1.0 Specification. Sections 4, 5, and 6 are probably the most helpful.
-
C Pointers and C Strings by Prof. Tia Newhall.
Lab 1 Goals
-
Use
gitto clone a repository full of starter code. -
Apply top-down design to write a web-client.
-
Practice with C networking basics: sockets,
send(),receive()and DNS (name-to-IP resolution). -
Manipulate HTTP headers with C string functions.
Overview
In this lab we will write our first networking application — a barebones web client. A web client corresponds with a web server, and they both "speak" HTTP, the Hypertext Transfer Protocol.
HTTP uses a client-server model of communication: in which the client (your lab code) initiates communication, and a server that is always-on, passively waits and responds. The web client and web server correspond using HTTP queries and responses. One way to think of HTTP, is as a document retrieval system over the web. We will look into the HTTP protocol format in a lot more detail in class on Tuesday.
Lab Requirements
We will write a command-line program called lab1 that takes a URL as its only parameter, retrieves and the indicated file specified in the URL, and stores it in the local directory with the appropriate filename. If the URL does not end in a filename, your program should automatically name the file index.html.
For example:
# This should create a local file named 'pride_and_prejudice.txt' containing lots of text.
 $ ./lab1 http://demo.cs.swarthmore.edu/example/pride_and_prejudice.txt
Getting your Lab1 Starting Point Code
Log into CS43 Github for our class and get the ssh-URL to your lab git repository. Follow along with the prompts below to SSH, create a lab directory and clone your lab repos. For a refresher on getting setup with git take a look at Git Setup.
# ssh into our lab machines
ssh yourusername@lab.cs.swarthmore.edu

# create a cs43/labs sub-directory in your home directory
mkdir ~/cs43
cd cs43
mkdir labs
cd labs

# clone your lab1 repo into your labs sub-directory
git clone [your-ssh-URL]

# change directory to list its contents
cd lab1-you

# ls should list the following contents
ls
 Makefile README.md Worksheet.txt getaddrinfo_example.c lab1.c
In-lab deliverables
-
At the end of today’s lab, you should have read through the lab page, and made significant progress to completing your lab
worksheet.txtin your Github folder. -
As you read through the lab page you will see an alert like the following that asks you to complete a section of the worksheet.
| This is an example of a prompt to complete a section of the worksheet. |
-
Complete this worksheet first before starting to write code! This will allow you to understand how this lab works, and complete the lab in time.
Lab-1 Functionality: Try wget!
Running ./lab1 should have the same functionality as wget. SSH into the CS machines and try the following on the command line to get a sense of how wget works. NOTE: your code does not need to print extra information that wget does.
$ cd lab1-you

# This should create a local file named 'pride_and_prejudice.txt' containing lots of text.
 $ wget http://demo.cs.swarthmore.edu/example/pride_and_prejudice.txt
# View the file:
 $ less pride_and_prejudice.txt

# This should create a local file named 'index.html' containing the demo server's home page contents.
 $ wget http://demo.cs.swarthmore.edu

# This should return a 404 not found error since this file does not exist.
$ wget http://demo.cs.swarthmore.edu/example/hi.txt

# This should create a local image file named 'fiona.jpg' containing a cute cat picture.
 $ wget http://demo.cs.swarthmore.edu/example/fiona.jpg
Workflow of your program
The following shows you a workflow for you to structure and write your code. Refer back to this section when you are ready to start working on your lab code.
-
Given a URL of the form
http://host/path, construct a HTTP query to send to the web-server.-
separate the host from the file portions using string parsing
-
look up the hostname via DNS to get its IP address necessary to route the packet
-
create a socket and connect to the IP address above, on port 80, the port used for HTTP.
-
generate an HTTP 1.0 request for the file
-
use the
send()system-call to send the request over the network
-
-
Parse the HTTP response headers received from the web-server and either:
-
faithfully download byte-for-byte copies of both text (e.g.,
html) and binary files (e.g.,images) using therecv()system call. -
report any errors or unexpected responses the web-client encounters.
-
-
Finally, if there are no errors, save the file according to the name of the file in the URL argument.
Lab Components
Reading HTTP Messages: Try TELNET!
Before we get into writing code, let’s see how we can "speak" HTTP — What an HTTP message format looks like and how we can generate an HTTP GET request from the command-line.
Wait, you can just look at the HTTP message structure? Yes! HTTP is an all-text application layer protocol (it’s really old), meaning we can actually read the request and response fields. In later labs, we will see application-layer protocols that are all binary for which we will need other tools to parse the header fields.
Telnet is an application layer protocol that was used for remote login to access network servers (this has been replaced today by SSH). SSH into the school machines, and at the terminal, try the following command:
telnet demo.cs.swarthmore.edu 80
<you should see the following>
Trying 130.58.68.26...
Connected to demo.cs.swarthmore.edu.
Escape character is '^]'.
<try typing out the following HTTP request>
GET / HTTP/1.0
Host: demo.cs.swarthmore.edu

(press return twice after the last line)
HTTP Request message breakdown:
-
demo.cs.swarthmore.edu: hostname to connect -
80: theport numberthe transport layer identifier for an HTTP message so that when the destination device receives this message, they know it is an HTTP message. -
GET: HTTP "verb" to request data. -
/: path being requested -
HTTP/1.0: HTTP version being "spoken" by the client. -
Host:hostname: Required header field -
\r\n\r\n: TwoCRLFs (carriage-returns similar to hitting enter twice) to indicate end of the header
HTTP Response message breakdown:
HTTP/1.0 200 OK
Vary: Accept-Encoding
Content-Type: text/html
Accept-Ranges: bytes
ETag: "1383709636"
Last-Modified: Mon, 24 Feb 2020 06:06:27 GMT
Content-Length: 1062
Connection: close
Date: Wed, 09 Sep 2020 19:49:55 GMT
Server: lighttpd/1.4.45

<body of file>-
HTTP/1.0: HTTP version spoken by webserver -
200 OK: HTTP Response Code: File exists, being transferred. -
Bunch of Optional Header fields
-
\r\n\r\n: TwoCRLFs (two carriage-returns) to indicate the end of the header. -
Body of message follows.
| Try running TELNET queries listed on the worksheet.txt and provide your answers. |
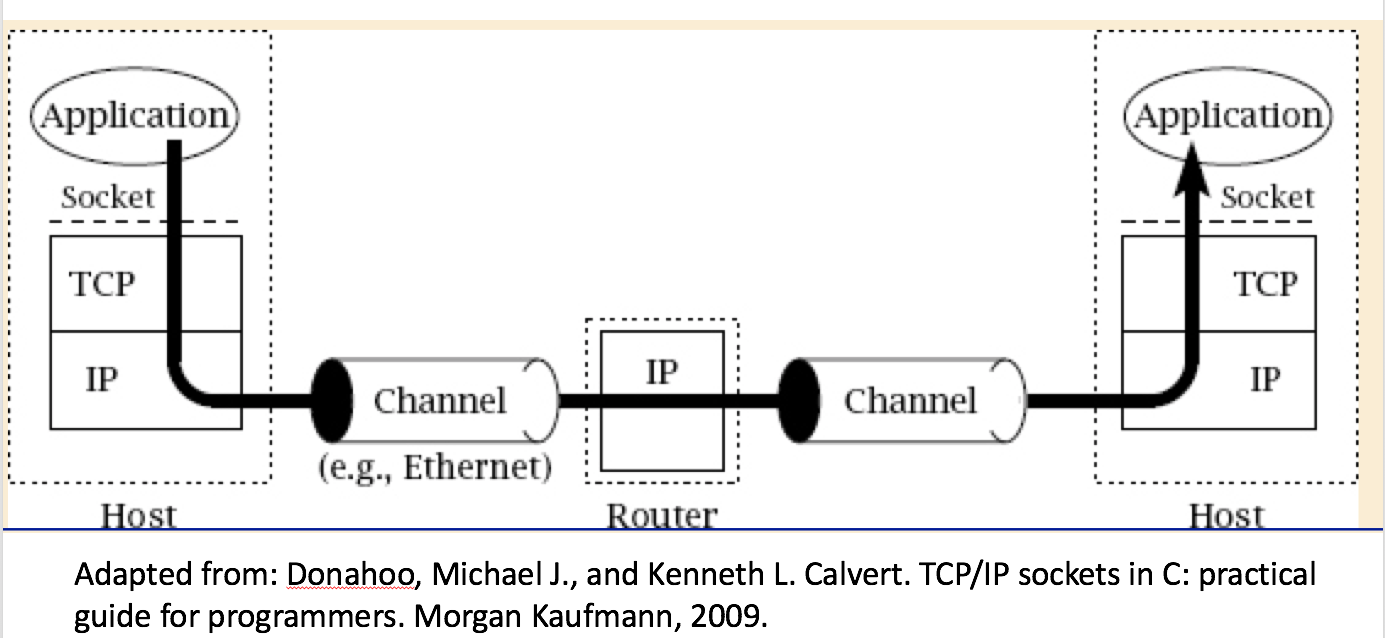
Socket Programming
As we saw yesterday, a protocol defines both the message + header format and transfer procedure. We saw that like a human protocol (initial Hello), the network protocol must first establish a connection, before we start sending and receiving data.
-
To establish this connection, the application layer HTTP message, relies on a transport layer protocol known as TCP. TCP is very often used as the transport protocol of choice for in-order, reliable delivery.
-
To start a TCP connection, we associate the client with a socket. You can think of a socket like a mailbox to send and receive mail.
-
In this lab, we will have to setup a socket structure before we can send and receive HTTP messages.
Socket system-calls
Here on out, we will refer to the lab1 we are building as the client, and the web server we are connecting to as the server. First we need to setup a socket on the client side, the following system-calls are used to send, receive data and eventually close the socket.
Look through the system calls provided in lab1.c and fill in worksheet.txt
|
String Parsing and Name-to-IP resolution
As stated in lab requirements, your lab1 program takes in a URL as its only parameter, retrieves the indicated file, and stores it in the local directory with the appropriate filename.
-
If the URL does not end in a filename, your program should automatically name the file
index.html. -
You may assume that the URL will be no more than 100 characters long and that it will be of the form
http://host/path. -
The path may or may not be an empty string, and may or may not contain multiple slashes (for subdirectories), and may or may not contain a file name.
-
If no path is given, your client should request:
/. The server will send you back anindex.htmlfile, if it has one.
You may assume that the files you’ll be retrieving are no larger than one megabyte. This means you can statically declare storage space for the response, which makes life a bit easier.
| You can attempt extra credit portion on the pointers and strings refresher in worksheet.txt. |
Resolving a hostname to an IP address
Before we can send our HTTP GET message to the destination, we need to translate the destination’s hostname (demo.cs.swarthmore.edu) to an IP address.
-
The host portion may be a hostname like
demo.cs.swarthmore.edu. Socket programming requires an IP address for communication (e.g., 130.58.68.137), so when given a hostname, you’ll need to query the domain name system (DNS) to find the corresponding IP address. -
To look up an IP address for a given host name, use
getaddrinfo()(man getaddrinfoon the command line will give you the details), or consult thegetaddrinfo_example.cin your starter code. We will cover DNS in much more detail later in the course, so for now, you can treat it like a black box that magically converts hostnames to IP addresses.
Run getaddrinfo_example.c in your starter code to understand how to use getaddrinfo and
return an IP address for given a hostname. You can attempt the extra-credit portion on structs in the worksheet.
|
Miscellaneous hints and background information
| Good systems programming involves: |
-
writing a small bit of code
-
testing
-
brief comments
-
repeat step 1
-
All HTTP headers are ASCII string characters, so you can use the
strfamily of functions to manipulate them safely.
Do NOT use strlen, or any other string functions, on the body of the response. The response body is not necessarily a string. In some cases (e.g., html responses) it will be, but in other cases (e.g., image files) it won’t be. Remember that the C string functions look for, and typically terminate when they find, the null terminator character. A null terminator is nothing more than a byte whose value is zero (0). Such bytes are LIKELY TO BE PRESENT in binary response data. If you call strlen() on binary data and it finds a 0, it will stop and return the WRONG ANSWER to you.
|
-
"But, if I can’t call
strlen()on the response, how will I know how much data I received?"The
recv()function’s return value will tell you how many bytes you received every time you call it. Likewise, thesend()function will tell you how many bytes you successfully transmitted.
You should ALWAYS check the return values of these functions because the answer may not be what you expect. That is, even if you tell recv() to get 1000 bytes, the call may return with fewer bytes, and the only way you’ll know is to check the return value. Likewise, you may tell send() to transmit 1000 bytes, but it may only have room to buffer fewer bytes. You can’t just assume that all 1000 bytes were sent! Instead, check the return value of send() to see if (or which) bytes need to be resent.For this lab assignment, your life will be easier if you call send() and recv() each in exactly one place (inside a loop). Use send() in a loop to send the entire request and recv() in a loop to read the entire response. If recv() returns 0, it means you’ve reached the end of the data.
|
-
Use HTTP version 1.0 — version 1.1 can get a lot more complicated. The subset of the HTTP 1.0 protocol you’ll need to implement for this assignment is quite small, but you may find the full protocol specification to be helpful.
-
Section 2.2 in the book should also be helpful. Your book talks about the "request line" and "header lines" for an HTTP request. You will only need to use the request line and the host line of the header.
-
Good functions to use for handling filenames and text include:
snprintf,sscanf,strstr, andstrchr. You can learn more about these and other useful functions (e.g.,sendandrecv) by reading theirmanpages. For example, tryman snprintfon the command line. -
Newlines, which signal the end of a message in many protocols, are represented in HTTP as
\r\n, not just\n. -
You will need to remove the HTTP headers from the web server’s response before saving the data to a file.
-
Spend some time thinking about how to do the string manipulation. It does not need to be complex. The complete program, including comments, error handling etc. can be written in about 100-150 leisurely lines.
-
The
fopen,fwrite, andfclosefunctions may be useful for writing the output file.
Testing
To test your program, you’ll want to ensure that the files it’s saving are identical to the originals.
For a quick check, you can open the file in a browser, and it should appear like the original website. Note that appearance alone does NOT guarantee that the file is byte-for-byte identical.
An easy and more precise way to check that the files are correct is to use wget, which downloads files much like your lab program, to retrieve a correct copy of the file. You will need to use md5sum to make sure binary files (images, pdfs) are identical. You can then compare wget 's file with yours. Example below:
$ md5sum index.html index.html.1
937e1d7af5e5cc0ce63694cdd2969233  index.html
937e1d7af5e5cc0ce63694cdd2969233  index.html.1
For text files, you can use diff to see if the files are identical. For all files (text and binary) you can use something like md5sum to generate a hash of the two files. If the hashes differ, so do the files. If the files are identical you will see no output:
$ diff index.html index.html.1
$
If the files are not identical, diff will show you the lines that differ. For e.g.,
diff index.html index.html.1
21a22,23
> </body>
> </html>
>
Grading Rubric
Total: 8 points
-
2 points for completing the worksheet.
-
2 points for transferring text files correctly - MD5sums must match.
-
2 points for transferring binary image files correctly - MD5sums must match.
-
1 point for correctly identifying and reporting error messages.
-
0.5 points for naming files correctly.
-
0.5 points for no valgrind errors.
-
1 point extra credit, for completing the extra credit portion of the worksheet.
Submitting
Please remove any debugging output prior to submitting.
To submit your code, simply commit your changes locally using git add and git commit. Then run git push while in your lab directory.