The following is information, tutorials, and help links for tools that we will use in for remote course activites and course work. More course-specific information is available off the CS 43 webpage, and from individual assignment pages.
Remote Lecture, Lab, and Office hours
These are tools that we will use for lecture, lab meetings and office hours in CS 43:
zoom
We will use zoom for class meetings, and for paired-lab partnerships. There are instructions for using zoom off the college’s Working Remotely page.
Class Meetings: Download the google calendar with recurring zoom meeting information from Piazza before the start of class.
Class Participation Protocol
-
When joining the class Zoom meeting, make sure to keep the Participants and Chat tab open.
-
When you join the class meeting, your video will be automatically turned off, and microphone muted. If you are not asking a question, please keep your microphone muted to prevent other background sounds from being heard.
-
To ask questions: We will use the raise hand icon in the participants tab in zoom to ask a question. If the instructor calls you, you may either type your question/answer into the chat or voice it by unmuting yourself.
-
We will use breakout-rooms in class through zoom. This allows us to break the class into smaller discussion groups to create the virtual equivalent of in-class discussions.
Lab Partnerships: Setup Recurring Meetings for your Lab partnerships
Set-up and try out a zoom meeting with your lab partner or project group members
-
One of you should create a zoom meeting for your lab work:
-
Name the meeting something like
labXmeetingwhere X is the number of your lab assignment -
Make it a Recurring meeting with the Recurrence→No Fixed Time option.
-
Enable join before host in the Meeting options
-
Save and send your lab partner the zoom link (Join URL associated with your meeting or copy the invitation link)
-
-
Contact each other to find a time for a 10 minute practice zoom meeting.
-
At the time you arranged to meet, join your zoom meeting (because "join before host" is selected any of you can start the meeting).
slack
We will use slack to manage labs and office hours. This is also probably the easiest way to have 1-1 discussions with your lab/class group partners. We will have slack channels that are described further below.
| Slack has a limit of 10,000 messages, after which old messages will expire. We will use slack for primarily ephemeral/conversational discussions. To maintain persistent course/lab related questions - post questions to Piazza. |
Joining Slack: You will receive an invitation to join the class slack page at the start of the semester.
Navigating Slack
Slack breaks up workspace into channels, which are listed in the sidebar on the left. Some channels we will use in this course are:
-
#general: for general announcements about the class -
#office-hoursfor class office hours. You can send a quick message to the professor here and start a zoom session to which s/he will attach. -
#lab-Xwe will often move to slack after starting each lab session on the course zoom page. Here you can get individual help on your lab work, and we will check in with each lab group. -
For both
#office-hoursand#lab-Xwe will follow a queuing protocol, to meet with groups in order. More about this in the#generalchannel.
To start a zoom session in slack:
-
First choose the slack channel for the type of session (lab or office hours), then you can start a zoom session to which the professor/TA will attach and help you with your specific question(s) or just check in with you.
-
To start a zoom session just type
/zoom. If you are working on a partnered lab one of you and your partner can start, and the other can join. -
In zoom you can share your screen to display and run your code, or display your homework to your instructor.
Accessibility
The course staff is committed to making all course material accessible to you. To access Slack’s accessibility settings, start by clicking on the workspace name at the top of the navigation pane on a laptop or desktop.
Then from the dropdown menu choose Preferences, then select Accessibility from the navigation bar on the left. Options include:
-
Content magnification (“Zoom”). Allows you to enlarge content shown in Slack
-
Animation. Please uncheck this box if you are sensitive to animated images.
-
Keyboard. Options for non-mouse navigation.
Code of Conduct
The course slack workspace is accessed by a wide variety of people all working in different environments and timezones. We ask that you be respectful of the staff as well as your fellow students. We expect you to follow these general rules:
-
Do not use Slack to harass faculty, staff, or other students.
-
Do not spam any channels or direct messages with garbage. Try to make posts in academic channels concise.
-
Follow channel guidelines. E.g. do not post idle conversations in the #lab-X channel.
-
Respect others’ time. When you are in lab, or in office hours, try to respond promptly to messages directed to you.
-
Note that any messages you post in a channel will be visible to everyone in that channel. Think before you post!
If there is a problem where someone is violating the code of conduct or otherwise failing to respect others, please raise the issue to one of the class professors or instructors.
Slack Links
-
Slack documentation on using slack.
-
Documentation on using zoom in slack (scroll past the how to install zoom to "Use Zoom in Slack" part)
Remote Access and Code Envirnoment Tools:
ssh and scp
ssh is useful for remotely logging into the CS lab machines. scp is useful for copying files between your local system and the CS system.
ssh
You can remotely connect to any machine by sshing in as you to lab.cs.swarthmore.edu or to a particular machine by logging in as you
to a specific machinename.cs.swarthmore.edu. For example:
# log into some lab machine:
ssh yourusername@lab.cs.swarthmore.edu
# log into owl:
ssh yourusername@owl.cs.swarthmore.edu
You can find the names of lab machines here: cs lab machines
scp
scp is like the cp command, but for copying files between two different machines.
# copy a file named "bio.txt" from the "cs43/labs/lab01" directory on a lab machine to your machine
scp yourusername@cs.swarthmore.edu:cs43/labs/lab01/bio.txt .
# copy a file named "bio2.txt" from current directory on your machine onto a lab machine
# Note: by default, this will place the file in your home directory; i.e.,  "/home/yourusername"
scp bio2.txt yourusername@cs.swarthmore.edu:
# copy a file named "bio3.txt" from current directory on your machine onto a lab machine in the "cs43/labs/lab01" directory
scp bio3.txt yourusername@cs.swarthmore.edu:cs43/labs/lab01
ssh and scp links
tmux
tmux (and screen) are used to start sessions on a machine that you can
detach from and keep running when you log out and then re-attach to
later.
tmux is particularly useful for setting up an environment
for remote lab work on a particular CS lab machine. You can then
detach from the tmux session and logout, and later ssh back into the
machine, re-attach to the tmux session and continue from where you left off.
tmux is also handy in that it allows you to create multi-panned windows in a
single tmux session. This way, you don’t have to open a separate ssh connection for each new terminal window. For code development is it nice to have at least two panes: one for editing the file, and another for compiling and running. The CS department help pages has some information for getting started using tmux:
CS help tmux page. Here,
also, are a few basics:
## tmux commands from bash shell

$ tmux        # create a tmux session
$ tmux attach # attach to an existing tmux session
$ tmux ls     # list existing tmux sessions
$ tmux attach -t sessionname # attach to tmux session named sessionname
$ tmux kill-session -t sessionname # kill tmux session named sessionname


## tmux commands from within a session CNTRL-b initiates these
## first type CNTRL-b then one of the following keys to do:

CNTRL-b d             # detach from the current session
CNTRL-b an_arrow_key  # to move to a different pane within a session
CNTRL-b :             # get tmux prompt to enter all kinds of commands
                      # (ex. to create and configure panes)
Scrolling and copy/paste within a pane is a bit weird. Here are some commands for doing both:
# to scroll within a pane:
CNTRL-b [             # then use page-up and page-down to scroll in pane

# to copy from one pane only:
CNTRL-b [             # to copy from a pane:
  space               # start copying from curser
                      # move curser to end of what you want to copy
  enter               # stop copying at curser

# to paste into same or different pane (be in insert mode if pasting in vim):
CNTRL-b ]             # paste
writing and using bash scripts to create custom tmux session:
It is often useful to write a bash script for creating a tmux session
with a regularly used tmux set-up.
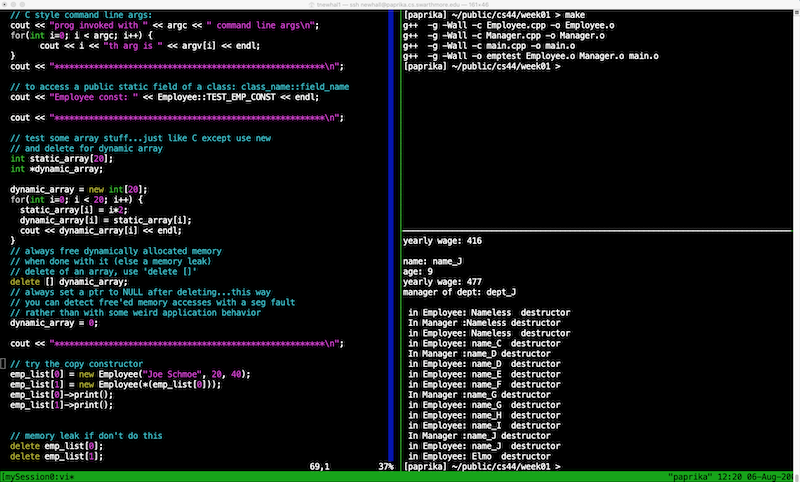
Professor Newhall has an example script (mytmux.sh).
that sets up a tmux session with 3 panes. It is designed to be useful
for code development and testing, where the left-most pane can be used to run
an editor (e.g. vim) to edit a source code file, and
the right panes are useful for compiling, running, debugging, and
other purposes. The script, when run, produces a tmux session that looks
like this:
-
you can run the script directly like this to start your own tmux session using this configuration:
~newhall/bin/mytmux.sh -
or you can copy it over into your home directory, and edit as you would like, and run it to start your own custom
tmuxsession (really 2 panes might be enough and easier to manage):cd cp ~newhall/bin/mytmux.sh . chmod 700 mytmux.sh # set this to executable ./mytmux.sh # open in an editor (vim, emacs, ...) to edit the file to customize # in a different way (we find that 2-3 panes is useful, and more than # that starts to make the session more difficult to use): vim mytmux.sh
|
Avoid leaving old tmux sessions running.
When using
|
tmux resources and links:
-
CS Help page on tmux includes some basic commands for creating, attaching, detaching and creating and configuring panes.
-
screen and tmux basic information about tux (and screen) and links to more resources.
finding good/idle/undercommitted machines to use in our system
If you are ssh’ed into a lab machine and notice that it is running slowly, not responding well, you will want to find a better machine to use.
Here are few utilities to see what is running on a machine and to help you find another machine that will respond better and ssh into that one instead.
getting usage info on a machine (who, and top (and htop))
First, you can run who to see if there are a lot of other users logged into
the same machine as you are:
whoIf there are a lot of users logged into a machine, it may be one that could become overloaded. If all the users are idle, however, it will not be.
A better way to see real cpu and memory load on a machine is to
run top and htop. htop has nicer output, so I’d recommend that:
htophtop shows CPU usage on each core, maybe 1-12 on one of the lab machines, Mem usage, and Swp usage. If the CPU and/or Mem usage is high, and particularly if the machine is Swapping (Swap is active), you want to pick another lab machine to use. Here is some more information about using top and htop
tools for finding a good machine(s)
smarterSSH to find a good lab machine to use
smarterSSH can be used to ssh into a machine that has a lot more available
RAM and CPU resources, and should perform well. Running it directly will
ssh you in to a good machine, but you may want to run using the -i
command line option to list the top machines, then exit the slow machine
(kiling any tmux sessions on it first), and then directly ssh into it
from home.
Here is the way you may want to run smarterSSH:
smarterSSH -i -v -n 20This lists the best 20 machines in terms of available RAM and CPU. Choose one of the machines listed to ssh into (you don’t always want to pick the top one, as maybe others are also choosing it, but if you select one in the top 10 or so, it should perform well)
Here are some other sample line options for using smarterSSH:
# directly ssh's you into one of the best machines
smarterSSH

# list the command line options
smarterSSH -h

# lists top 50 machines based on their available RAM
# probably want the default that orders based on a function of RAM and CPU
smarterSSH -i  -v -n 50 -m

# lists top 50 machines based on their available cpu
smarterSSH -i  -v -n 50 -c
system dashboard for machine stats
You could also look at the status dashboard off the CS department machines page to try to find a machine that looks less loaded.
links to more info:
-
tools for examining system state (FYI: way more than to find idle machines)
vpn
Using vpn is not necessary for most remote access, but is necessary for a few things like access to digital library contents.
If you are not on campus, then set up vpn on your home system so that you can access the college’s digital library subscriptions and any private web content. Follow these instructions: VPN setup and running steps. You do not always need to run vpn, but if you want to access digital library contents and anything else that is private to the Swarthmore network, you need to use it.
You can test out if it was successful by trying to access pdf versions of papers from the ACM and IEEE digital library using Swarthmore’s subscription (you should be able to download pdf versions of papers without entering a user name or password). Here are two examples to test it out: one from IEEE, another from ACM
Tools for lab work
Piazza and GitHub
We will use Piazza for all course announcements & Q&A. Make sure to turn Piazza notifications on to receive course updates. We will use Github for lab assignments. Here is some more information about both, and links to piazza and github for CS 43:
Git and the college’s Enterprise GitHub are used for lab work.
git resources
-
using git for CS labs contains some basic (and verbose) git instructions for using git for CS course lab work. It is written using cs31 as an example, but replace with your own course number.
-
git setup for home computers: if you plan on using your own computer for lab work, and you haven’t set up github to push to your computer before, you will have to create an SSH key and setup github access for your home computer.
-
solving git merge conflicts: you might come across merge conflicts as you work with your lab partner. Use this guide to resolve them.
-
git on our system and git help: this is a more complete reference for using git on our system.
Unix Basics
For course work you should set up a course-specific subdirectory in your home directory. First read the resource on ssh about remotely connection to the CS system, then ssh into our system and create a subdirectory for cs43:
# from home ssh into a cs lab machine:
ssh <yourusername>@labs.cs.swarthmore.edu

# on the CS system:
$  cd                 # change current working directory to your home directory
$  pwd                # print current working directory
$  mkdir cs43 # create a new subdirectory named cs43
$  ls                 # list contents of current working directory (your home directory)
$  cd cs43    # change current working directory to cs43
$  pwd                # print current working directory
Some useful command line tools for the course
We will come across many more as we go through the course.
# from home ssh into a cs lab machine:
ssh <yourusername>@labs.cs.swarthmore.edu

# on the CS system:
$  man strcpy   # query Unix manual pages for C functions
$  man ping     # query Unix manual pages for information on ping a networking tool.
$  ip address    # display the current system's IP address
$  dig cs.swarthmore.edu     # Output of a DNS lookup for cs.swat.edu
$  traceroute swarthmore.edu # Path taken by an Internet packet to destination, swarthmore.edu
Using Unix and Useful Commands and Resources:
-
CS department’s Using Unix tutorial/pages
-
man, man pages, apropos for reading manual entries about specific unix commands and library functions, and for finding functions, command, utilities
vim (and vi)
The vi (and vim) editor is available on every Unix system. It is a very efficient and lightweight text editor that is easy to use after learning a few basic commands, which that you can learn by running though the vimtutor tutorial.
vim is particularly useful when working remotely, ssh’ed into a machine.
Vi (vim) also has a lot of advanced features that are very nice, and
is very configurable, often through the use of a .vimrc file. However,
just a few basic commands is enough to use vim to edit files on our
system.
Learning vim (and vi)
Vim operates in two modes:
-
insert mode: keystrokes are interpreted as inserts into the file contents at the point of the cursor.
-
command or escape mode: keystrokes are insterpreted as vim commands, which allow a user to do such things as saving, exiting, searching, or moving around in the file.
In insert mode to switch to command mode by hit the ESC key.
In comand mode there are many ways to switch to insert mode, one is
to hit the i key.
To learn the vim editor, run vimtutor:
-
ssh into our system and run vimtutor ( more info on remote access, and more info on ssh):
home$  ssh yourusername@lab.cs.swarthmore.edu

cs$  cd cs43
cs$  pwd
cs$  vimtutor           # start the vim tutorial
-
Go through the sections listed below of vimtutor (the other sections cover more obscure features that are not necessary). It will take about 30 minutes to run through these lessons.
-
all of Lesson 1 (moving around, x, i, A, :wq)
-
Lesson 2.6 (dd)
-
Lesson 2.7 (undo)
-
Lesson 3.1 (p) and 3.2 (r)
-
Lesson 4.1 (G) and 4.2 (searching)
-
Lesson 6.2 (a), 6.3 ( R ), and 6.4 (y and p)
-
Configuring vim
You do not need to configure vim in any way to use it on our system. However, you may want to based on forground and background terminal colors, and set some other opio
In your home directory you can add a configuration file for vim, named
.vimrc. On start-up, vim examines this file to set different configuration
options for the vim session, including setting a color scheme, and default
window size.
To see if you have one already, run ls -a in your home directory to list
all your dot files:
cd
ls -a
If so, you can open it in vim and edit it like any other file:
vim .vimrcIf not, it is often easiest to start with someone else’s .vimrc file
and then edit what you want. From your home directory, you can copy
someone else’s. Here is one you can copy over into your home directory
that uses a color scheme that shows up well on dark background windows:
cd
cp ~newhall/.vimrc .
At the bottom of this .vimrc file are some settings to give you a visual cue about not line wrapping source code in files. One sets the widowsize to 80 (or 81) chars when you start vim, others can be used to set visual reminders when a line exceeds 80 chars:
tail -20 .vimrc   # dump the last 20 lines of the file .vimrc
                  # note lines that start with double quote are comments

set colorcolumn=80
highlight ColorColumn ctermbg=darkblue
" resize to 81 to more easily see colorcolumn (set to 80 if don't use colorcolumn)
set columns=81
autocmd VimResized * if (&columns > 81) | set columns=81 | endif
set wrap
set linebreak
" visually shows +++ when go past columns limit
set showbreak=+++
You can copy this into your .vimrc file if you’d like this functionality
Vim Resources and Links
VSCode
If you would like to download a code editor, you could also use VSCode to work on paired lab assignments. Most of you might be familiar with Atom as a code editor. VSCode is especially useful, since it features a live-share option, that allows both you and your lab partner to edit code at the same time.
If you would like to install VSCode locally, you can download VSCode for your platform (Linux, MacOS or Windows) and download the following extensions:
-
Remote SSH: This allows you to SSH into a networked machine, and access and edit the directory structure on the remote machine as if you were looking at a local directory.
-
C++ language Debugger and support: This extension allows you to interactively debug your code using GDB. Think back to DDD with the 31 maze lab, but less clunky. Note that if you connect to a remote machine (i.e. SSH into our lab machines) and then try to debug your code, you will have to install this extension on the remote machine as well. This feature can be a bit overwhelming, so I’d highly recommend being able to use GDB via the command line first before trying interactive debugging.
-
Live Share: This is one of the best features of VSCode, given the remote nature of this semester. To access this feature, you will need to setup yet another online account - either a Github account (on github.com rather than github.swarthmore.edu); or a Microsoft account that allows you to attach to a LiveShare instance.
-
To use
LiveShare, one of the members in your lab partnership will share a URL that will allow you to connect to their directory. -
Now, both you and your lab partner can simultaneously edit code in the shared project directory - either the same file or multiple files.
-
You can try
LiveSharewith a lab partner, and use the little push-pin icon to "follow" your partner around as they work on different files, or different parts of a file. This way you can see the same section of code that they are working on. -
Note that all changes are made only on one member’s files (the one setting up the
LiveShareinstance). Togit pullthe latest code from github, you will still need to make sure the changes were committed and pushed first.
-
General Help Documentation and Links
(specific links for each tool are included above)