Due: Tuesday, November 26, 11:59 PM
1. Handy references:
-
The protocol you implement will be simpler than TCP, but you may find TCP’s header information to be useful for inspiration.
-
select() manual. (You will need to set timers for your timeout, select makes this easy.)
2. Lab 6 Goals
-
Understand principles of reliability at the transport layer
-
Design and implement a protocol that pipelines transmissions - i.e., has multiple packets in flight using either Go-Back-N (GBN) or Selective Repeat (SR).
-
Develop C library code for your protocol over a UDP socket and implement congestion control using Additive Increase, Multiplicative Decrease (AIMD).
-
Learn to use mininet, a network emulator to design and test your protocol.
3. Overview & Requirements
For this lab, you will be continuing your development of a reliable data transfer protocol over an unreliable (simulated) link and transfer all packets from source to destination over a simple dumbbell network. This time, since you are pipelining packets, your transfer rate should improve significantly!
Your submission will still be in the form of a library that mimics the type of functionality that you would expect to get from an OS’s transport-layer implementation.
Requirements: Fast reliable transport specifications:
-
Your protocol should provide in-order delivery*. That is, the receiver should receive packets in the same order that the sender sends them, even if something occurs (e.g., losses) that causes a later-sent packet to arrive before an earlier-sent one.
-
Your protocol should provide as much performance as network conditions will reasonably allow. If there is free space in the router or switch queue, your protocol should attempt to take advantage of that. If it overflows the queues, it should back off. You should mimic TCP’s AIMD congestion control behavior.
-
Similar to Lab 5 your protocol should:
-
perform RTT estimation to determine setting timeout values.
-
cleanly shutdown connections on both ends, even if packets get lost.
-
you do not have to deal with checksums or error detection and corruption.
-
-
Your library (
lab6.handlab6.c) should allow any application that’s built on top of it to achieve reliable communication. When transferring files with your library, you should get byte-for-byte identical copies usingdiff,md5sum. -
To test your code the parameters are the same as the lab 5.
./lab6_receiver 9000 > [output_file]
Once that’s running, you can fire up a sender that will send a file to it. The sender reads its input from standard in. For example, on h1:
./lab6_sender 10.0.0.2 9000 < [input_file]
Use
diff input_file output_fileto see the number of packets lost on the receiver end. Once your reliability is built in, these files should be identical.
4. Implementing a Fast Reliable Protocol
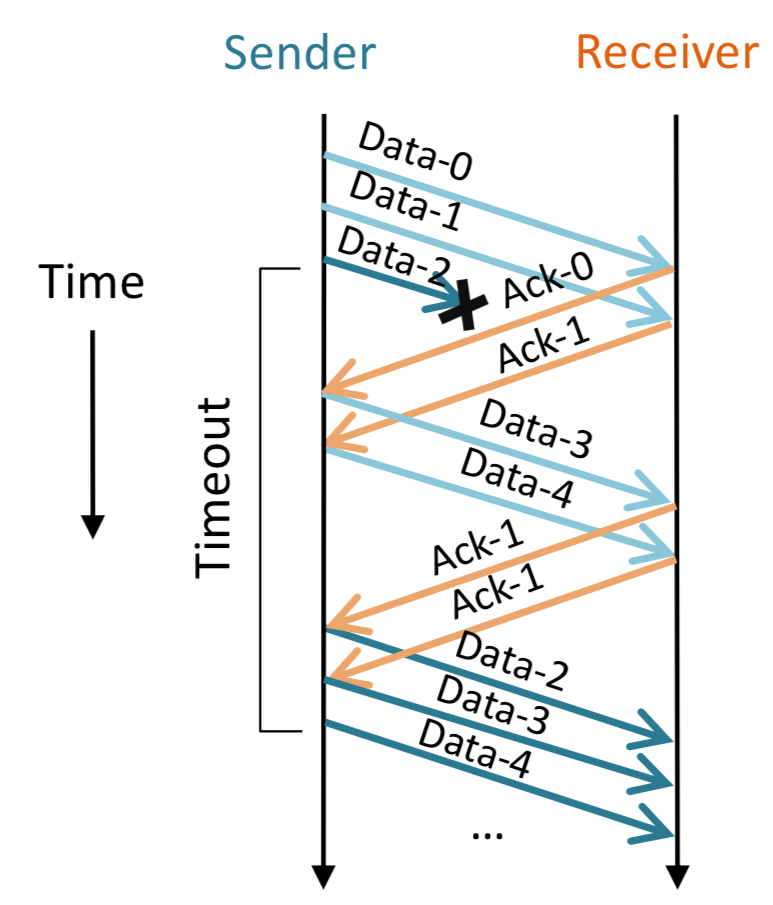
The figure shows both Go-Back-N and Selective Repeat protocols with two end-hosts; one functioning as the sender and other, the receiver. The sender sends a pipelined window of data packets at a time. The receiver, depending on the protocol and waits till they get an ACK from the receiver.
-
In Go-Back-N: Packets are retransmitted from point of loss.
-
Segments between loss event and retransmission are ignored.
-
Packet transmissions, "Go-back-N” if a timeout event occurs.
-
-
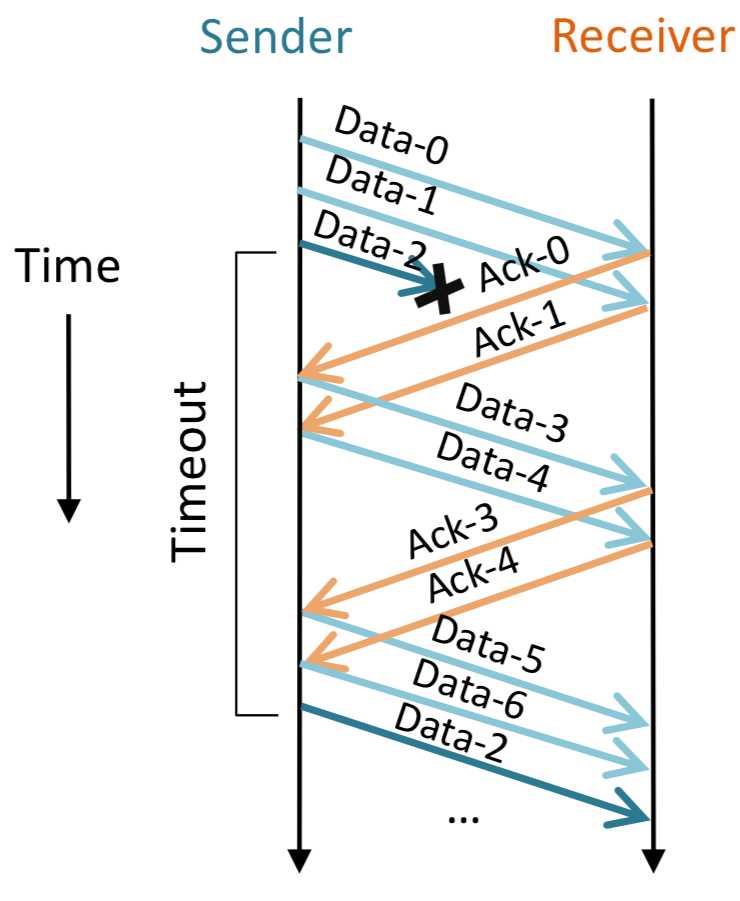
In Selective-Repeat:
-
Receiver ACKs each segment individually (not cumulative)
-
Sender only resends those not ACKed
-
Requires extra buffering and state on the receiver
-
-
Protocol API: You are responsible for writing/editing only the following functions:
-
in
lab6.c:my_socket,my_send,my_rtt,my_recvandmy_close. -
in
lab6.h: add state tostruct lab6_hdr -
to send and receive data across the wire, we will be using UDP’s unreliable
sendandrecvfrominmy_sendandmy_recv. Your code in the functions above are responsible for implementing reliability on top of UDP.
-
-
Application layer:
lab6_sender.candlab6_receiver.cimplement the application layer that calls your library functions.lab6_sender.candlab6_receiver.ceach get their own copy of your library functions.-
You may only edit
lab6_sender.candlab6_receiver.cfor your own testings purposes. When grading, I will use the default version, so do not rely on changes to the application layer for correct operation.
-
4.1. Setting up headers and state
Setting up window size
-
Your
my_sendfunction is now responsible for sending more than one packet at a time. This means that you can accept as many packets as your window size. -
For convenience you can define your window size to be
# def WINDOW_SIZE_CAP = 2000. You can allocate a static array of that size and assume your window will never approach this value. -
This static array is your version of the socket buffer through which you can keep advancing and forwarding as you send data and get packets ACKED. If you reach the end of the array, you want to implement the array as a circular queue and start back from the beginning.
-
Within this array which is your socket buffer, you should keep track of the packets that are in flight but not acked, acked, and not yet sent.
-
You can implement each element of this array as a
structwith everything you need to know about a packet. Essentially your array, is an array of struct packets. Some of the fields of this struct would be:-
char array[MAX_PACKET]//hold the header + packet. -
timeout value associated with this packet.
-
sequence number
-
packet status (retransmitted, etc.)
-
Scheduling Timeouts.
Since we are no longer checking for one timeout like before, we need to now schedule timeouts for each packet.
-
At the time the packet is handed to you, look at the current time, and add the timeout value
estimatedRTT + 4*DevRtt + time_nowand record that as the timeout for this packet. -
If the packet hasn’t been acked yet, and you reach the timeout value, that is the point you retransmit the packet (or all the packets there on) depending on whether you are implementing GBN or SR.
4.2. my_send function:
-
This function is responsible for reliable delivery of data packets from the sender to the receiver. Only
lab6_sender.cwill callmy_send. -
To implement reliable delivery, this time you do not want to wait to receive an ACK before returning to the sender!! Instead you want to keep adding packets to your array of struct packets, and return to the sender once you have sent at least one window’s worth of packets/
-
At a high-level this would look like the following:
1: if you have open slots in your window:
2:  copy the packet that the application layer has given us to the array
3:  setup state required for that packet, including timeouts etc.
4:  send the packet
5: return to the application layer
6: if all your open slots are full:
7:  enter a while loop and call a separate function to receive ACKs
-
Receiving ACKs:
1: Receiving ACKs:
2:  find the packet with the earliest packet_timeout
3:  to set the timeout calculate: packet_timeout - curr_time
2:  call select and put this timeout value in
3:  if select timesout
4:    send all the packets that have timed out
5:    for every packet retransmitted, reset the timeout.
6: if select does not timeout
7:    calculate the RTT using EWMA
-
Note that the
timeout_structhas to be reinitialized every time you callselect!selectinternally decrements the value of thetimeout_structuntil you receive an ACK.
4.3. Implementing AIMD to change window size.
Initially your code should start with a window size of 1. As you have ACKs coming in, you should use TCP slow start and double the window size. If a packet times out, then you can cut the window size in half.
-
To simplify implementation you can stay in congestion avoidance and don’t have to go to slow start like TCP. You only have a one time transition from beginning to congestion loss phase.
-
You only want to double the window size when you get the same number of ACKs as the window size.
-
You can move your window forward, whenever you have received at least one ACK. Note this is different from doubling the size!
4.4. RTT estimation in my_rtt
-
Your implementation will need to perform RTT estimation to determine how you should set timeout values.
-
Use
current_msec()to get an estimate of the current time stamp and usemsec_to_timeval()to fill outstruct timeval. -
To estimate RTT, we will use an exponentially weighted moving average (EWMA) estimate that we discussed in class.
EstimatedRTT  = (1 – a) * EstimatedRTT + a * SampleRTT, with a = 1/8
DevRTT = (1 – B) * DevRTT + B * | SampleRTT – EstimatedRTT |, with b = 1/4
TimeoutInterval = EstimatedRTT + 4*DevRTT + 15
Normally you wouldn’t export such information up to the application/user, but I’ll use this to check your RTT calculation.
-
Your starter code has an initial RTT of 1000. You can change that to around 100 and let your code converge to the network RTT.
-
Like TCP, you should compute your timeout as a function of the current RTT estimate, sampling only those segments for which no retransmission is necessary. If a timeout occurs, you should double the timeout for each subsequent retransmission of the same segment.
|
Adding 15 to the TimeoutInterval
The EstimatedRTT and DevRTT estimation assumes that there is some noise in your estimation (DevRTT > 0), as it tries to converge to the network RTT. In practice, network RTT also has some variance, but since this is mininet, we have artificially set a fixed value for the network RTT for every packet. This means, as we increase the file sizes that we send, the estimate of DevRTT will start to converge to zero! With DevRTT zero, the TimeoutInterval will be exactly equal to the RTT and most of your calls to send will timeout! If we add some constant parameter to your timeout formula we can ensure that you are not going to timeout exactly at EstimatedRTT. |
4.5. my_recv function:
-
The receiver is responsible for sending ACKs to the sender. The implementation here is almost identical to stop-and-wait.
-
Only
lab6_receiver.cwill callmy_recv. -
The receiver should use UDP
recvfromto receive data, andsendan ACK for every packet received. -
my_recvshould only return to the application if a new packet has been received. Your might want some sort of a loop to implement this functionality. -
Since the receiver is only responsible for sending ACKs, we do not need to keep timeouts, or use
selecton the receiver side.
| For both send or receive we are not going to be using a loop. This time, the underlying socket is using UDP rather than TCP, so there is no byte stream abstraction. When you call receive, you will get one UDP datagram whose size is exactly the size of of MAX_PACKET. It is our responsibility to build reliability over the underlying UDP send and receive. |
4.6. Implementing my_close
Your implementation should cleanly shut down connections on both ends, even if packets get lost. You do NOT need to implement the TCP behavior that allows each side to shutdown independently. TCP is substantially more complex than the protocol you’re building because your protocol is unidirectional.
-
Like TCP though, in
my_close(), you may want to wait for some time, to make sure the last ACK didn’t get lost (leaving one end hanging). -
HINT: since you are closing reliably, you can call
my_sendinmy_close. -
You should NOT rely on ICMP error messages to help your closing procedure. To be safe, it’s best to disable ICMP from both hosts before starting the sender and receiver with:
iptables -I OUTPUT -p icmp -j DROP -
This time your code should make sure that if there are other packets in the window that need to be sent out, make sure the receiver gets them before the receiver acts upon the close.
-
Your code should not just drop anything you have going here in this outstanding window. As soon as you see close, make sure to drain outstanding packets and that you have an ACK.
-
The actual shutdown sequence does not change much.
-
4.7. struct casting tricks
Network folks often write code with the following weird syntax:
char packet[MAX_PACKET];
memset(packet, 0, sizeof(packet));
struct lab6_hdr *hdr = (struct lab6_hdr *) packet;
-
The syntax above lets us create a pointer to the packet of type
struct lab6_hdr. This means, that anytime we want to pack values into the header we can use a more intuitive representation of the data we are packing.uint32_t ack_number = 1; /* without struct casting */ memcpy(packet+4, htonl(ack_number)) //packing ack_number = ntohl(*((uint32_t *) &packet[4])) //unpacking /* with struct casting */ hdr->ack_number = htonl(ack_number); //packing ack_number = ntohl(hdr->ack_number); //unpacking
5. Grading Rubric
This assignment is worth five points.
-
1 - Provide a description of how you tested and debugged your protocol.
-
1 - Your protocol delivers packets reliably and in-order, regardless of link buffer size, with a window size that is larger than one.
-
1 - Your protocol’s performance increases significantly when network conditions are more favorable.
-
1 - Your protocol cleanly terminates connections such that both ends agree that the connection is closed.
-
1 - Your protocol has no memory leaks or invalid memory accesses (i.e., valgrind should not complain about anything). Your pseudo-kernel library will need to keep track of the window and outstanding packets, and it would be very bad for the kernel to have memory problems.
6. Testing
-
If you want to add a print statement to your library, use
fprintfto print to thestderrstream rather than the usualstdout. There are examples of this in the library already. The benefit of using this method is that it won’t interfere with the results that are outputted by the receiver, since that captures only stdout. -
You should experiment with a range of loss rates in
mininet. You can go from 1% to 10% (effective overall loss rate of 35%) at most. If you set higher loss rates, you will need larger files to allow your RTT estimate to converge to the network RTT. -
Autogenerating Test Files: You can test for longer files using the code below:
#!/usr/bin/env python
for size in [1000, 10000, 100000, 1000000]:
    f = open('%dlines' % size, 'w')
    for i in xrange(size):
        f.write('This is line number %d\n' % i)
    f.close()
7. Tips
-
START EARLY! The earlier you start, the sooner you can ask questions if you get stuck. Test your code in small increments. It’s much easier to localize a bug when you’ve only changed a few lines.
-
You may find the textbook to be more useful for this lab than it has been previously. It has good descriptions of the various reliability mechanisms that you might want to adopt.
-
Because you have root account access on your VM, you will have the necessary permissions to run Wireshark. You may find that to be useful while debugging. It won’t be quite as nice as when we used it to look at DNS, since it knows how to decode DNS and it knows nothing about your protocol, but you can still use it to look at the raw values, if necessary.
8. Submitting
Please remove any debugging output prior to submitting.
Please do not submit output file(s) that you used in testing.
To submit your code, simply commit your changes locally using git add and git commit. Then run git push while in your lab directory.