Lab 1: Image Processing
Due Monday, 14 September 2020, before 7am
This is an individual lab assignment. There will be an opportunity for partnered labs soon.
1. Lab Goals
Through this lab you will learn to
-
Setup and use tools needed throughout the semester
-
Manipulate images at the pixel level
-
Code some basic Javascript, WebGL, and GLSL
-
Program a WebGL fragment shader
-
Recognize the parallel nature of shader programming
2. References
3. Cloning Files
As with all lab assignments this semester, you will use git, a version control system, to get starting files as well as handing in your assignments. When you start an assignment, you’ll execute a git command to grab some starting files. Similarly, when you want to submit an assignment, you’ll execute a couple of git commands. Later on in the course, you’ll be using git to facilitate paired lab assignments.
Since we are starting a new course, there is some first time setup required. The quick instructions below assume that you have access to your Swarthmore GitHub account and are logged into a terminal on the Swarthmore CS network via ssh. Please consult the Remote Tools help if you need help connecting with ssh.
First, we will make directory for all our labs and clone lab1 from Github CS40-F20 org
cd
mkdir -p cs40/labs   #make your labs dir
cd cs40/labs
pwd                   # should list /home/you/cs40/labs
git clone git@github.swarthmore.edu:CS40-F20/lab1-you
Longer GitHub setup instructions are available off the Remote Tools pages if you need help.
3.1. Setting a Symbolic Link
We will be starting with some low level graphics work in WebGL2, but we will not be writing everything from scratch. Much of graphics programming builds off of various third party libraries. We will use several of those throughout the course of this semester. Instead of every student installing a separate copy of these libraries, I have installed them centrally, and you can set a symbolic link to them. We’ll start by setting one link to a path that is hard to remember. Your git repos will have automatically contain relative symbolic links to the parent link for each lab.
cd
cd cs40/labs   #make sure you are in labs, not lab1
pwd                   # should list /home/you/cs40/labs
ln -s /usr/local/stow/CS40-F20/lib/cs40lib/
3.2. Fixing a Symbolic Link
The original started code contained a bad link/file. You will need to fix this prior to getting the lab to work.
cd
cd cs40/labs   #make sure you are in labs, not lab1
cd lab1-you   #use your username
rm lib
ln -s ../cs40lib ./lib   #pay attention to the dots
4. Running and Viewing your Lab
developing our labs this semester in JavaScript. Since computer graphics is naturally a very visual course, we need some way to view our results. If we try to do all the computation at Swarthmore and forward the display remotely, we use a lot of bandwidth and network resources. We can compress the image display, but then our hard work looks like a pixelated jpg meme shared on facebook.
Our approach instead this semester is to develop our labs this semester in JavaScript and host the code on a web server. You can then use your local web browser to fetch the code from Swarthmore and then run the computation and display the result through your browser.
This will require that you have a browser with WebGL2 support. Please visit the WebGL2 Check site and verify that you can see the spinning cube on your browser. WebGL2 can be used on most browsers, though support on Safari is "experimental". Try using an up to date version of Edge, Chrome, or Firefox.
Assuming your browser support WebGL2, we are ready to use your browser to view your code that you cloned on the CS machines. For somewhat technical reasons, the lab code must be run through a webserver. You cannot just open the files locally using file:/// in your browser if you clone your repos to your personal machine. Furthermore, since the code you write is your JavaScript files will be visible to anyone accessing the webserver, we can’t just drop your files in say your ~public_html/ folder on CS, because then everyone can see your solutions.
Our approach for remote development will be to launch a small webserver locally on the Swarthmore CS machines and create a tunnel that provides a temporary URL that you can use to view your files remotely. This will allow you to view and test your code, without others being able to easily guess the URL and viewing your solutions without your knowledge.
4.1. python3 -m http.server
We will use a python3 http server to start the service locally on Swarthmore machines, and ngrok to set up the tunnel.
To run the server, change to the directory you want to serve and run the following command using python3. Note the & at the end to run the server in the background.
cd
cd cs40/labs/lab1
python3 -m http.server &
You should get a message saying
Serving HTTP on 0.0.0.0 port 8000 (http://0.0.0.0:8000/)If instead you get a long error message ending in
OSError: [Errno 98] Address already in useIt may mean someone else is running a server on the same port, possibly you. If it is you, you can either continue using the existing server, or kill the old server using
pkill python3You can also try running your server on a different port other than 8000
cd
cd cs40/labs/lab1
python3 -m http.server 8080 &

Serving HTTP on 0.0.0.0 port 8080 (http://0.0.0.0:8080/)
As long as we eventually get a Serving HTTP message, we are ready to proceed to the next step
4.2. ngrok http 8000
The address http://0.0.0.0:8080/ is only usable if you are on campus and logged in directly to the machine you started the server on.
The ngrok tool will create a temporary public URL that you can use to access your webserver from anywhere. To run it, just provide the protocol and port number that your webserver is running on.
ngrok http 8000This should pop up a small display in your terminal listing a Forwarding URL.
Forwarding https://b985958321b9.ngrok.ioThe session will last at most 8 hours, or until you stop the process with CTRL-C
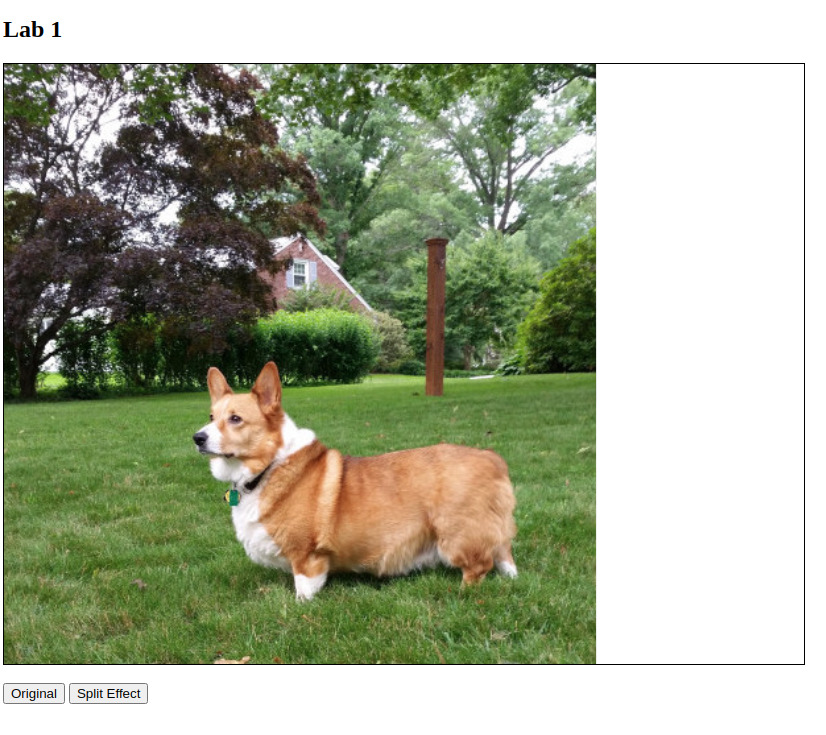
You should now be able to go to the link given by ngrok in a browser on your personal computer at home. If everything works, you should see the lab1 start page.
5. Making Modifications
The goal for this lab is to use programmable fragment shaders to process a sample image using WebGL2. Since we don’t know that much yet about any of these topics, most of the boilerplate has been provided and you can skip much of the code provided.
When you click one of the buttons on the page, it triggers a JavaScript event to switch the current WebGL program in use and redraw the canvas using the new filter. You will be asked to implement one filter of my choosing and then add two filters of your own.
If you make modifications to the files on the CS server and save them, you should be able to refresh the browser and see your changes without needing to restart the servers or ngrok tunnel. If it appears your changes are not visible in your browser, you can try a hard refresh.
6. Add Split
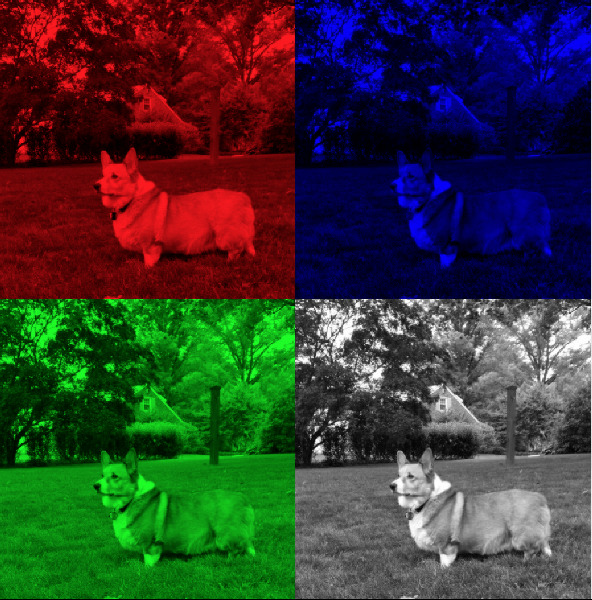
The split filter should split the original image into four mini images, with each image only showing one color channel; red, blue, green, and greyscale. The greyscale image is created by averaging the values of the red, green, and blue components of a given pixel.
With the starter code provided, the split button simply creates a solid red image. Your output should be similar to the image below.
6.1. Shaders
You can implement this effect by modifying the file fs_split.js. This file contains the content of a OpenGL fragment shader, a programmable piece of code that runs for every potential pixel/fragment in an output image. We will go into more details about shaders throughout the semester, but this week, I’ll try to explain enough to get you started quickly. For technical reasons, JavaScript expects this shader source to be a single multi-line string. That tends to mess up any syntax highlight your editor might do. You can likely fix the highlighting but commenting out the first line
//export default `
but you’ll have to uncomment it before saving and running your program.
Each fragment shader has a single main() function whose job is to compute and set a single output variable that is the color for a particular pixel. In this context, that output variable has the name outColor and type vec4 meaning it has four components, a red, green, blue, and alpha channel. For this week, and for several more weeks, you can safely ignore the alpha channel and always set it to 1. You can access the individual components of a vec4 variable using the accessors .r, .g, .b and .a. These values are in the range 0.0 to 1.0, with white being vec4(1,1,1,1) and black being vec4(0,0,0,1).
float red = outColor.r;6.1.1. Shader Parallelism
a single call to main() only processes a single pixel. OpenGL will call the shader multiple times for different pixels in parallel. This happens transparently behind the scenes without you needing to worry about it. You only need to worry about how to process one pixel.
Each time a fragment shader is called it may have different input variables. In this example, the only input variable is
in vec2 v_texCoord;which describes the relative position of the pixel across the image. You can access the individual components of v_texCoord using .x and .y, both of which are in the range 0. to 1. for this lab.
We can use these v_texCoord coordinates to sample the provided image using
outColor = texture(u_image, v_texCoord);and in fact, this is what is done for the fs_pass.js file connected to the Original button. Each time the shader is called, v_texCoord has a different value and a new color is computed at that position. When the shader is called for all pixels in the canvas, a copy of the original image is produced.
6.1.2. Modifying the Shader
Your first goal is to modify the body of main() in fs_split.js to compute the correct value of outColor to implement the split effect. You can create additional helper variables, manipulate vectors, and tweak components as needed. It won’t be a single one liner, but it isn’t that long either.
Make small changes until you understand how things work. The debug console (F12 on chrome) can display some helpful error messages for debugging your JavaScript.
Here are some examples that while wrong, might help you understand how the variables work.
outColor = texture(u_image, 0.5*v_texCoord);vec2 offset = vec2(0.5, 0.5);
outColor = texture(u_image, v_texCoord+offset);/* does not use colors from image at all */
outColor = vec4(v_texCoord.x, v_texCoord.y, 0., 1.);Remember, the program will automatically run main() for you multiple times on each pixel, you do not need to write any nested for loops to process each row/column.
7. Create Two New Effects
With one effect complete, be creative and add two more effects of your own choosing. Do not modify fs_pass.js or fs_split.js to implement your effects. Instead copy fs_pass.js to two new files and make your changes there, similar to how you modified fs_split. Your effects should be a bit more elaborate than the ones you may have done in a similar lab for CS35
In addition to adding new shaders, there are a couple other places where you must modify code, but these changes are relatively small.
7.1. Adding Buttons
You need new buttons for your new effects. This is done in index.html. Copy and paste the line
<button type="button" id="split">Split Effect</button>And give each effect an new name and unique id. When you refresh the page, the buttons should appear, but they don’t do anything.
7.2. Import your new shaders
Near the top of main.js you will need to import the new shader files you created with your new effects. Copy and paste
import fshader2 from "./fs_split.js";and use the new names for your shader files. Give each one a new name (fshader3 and fshader4 are fine for this week, we’re just learning).
7.3. addEffect()
Finally in main.js modify the init(image) function to add two more addEffect(…) lines that connect your button id names to shader import variables.
If all those steps are done correctly, your new effects should apply when you click their appropriate buttons. If something isn’t working, check the debugger console, or the TODO points in the code.
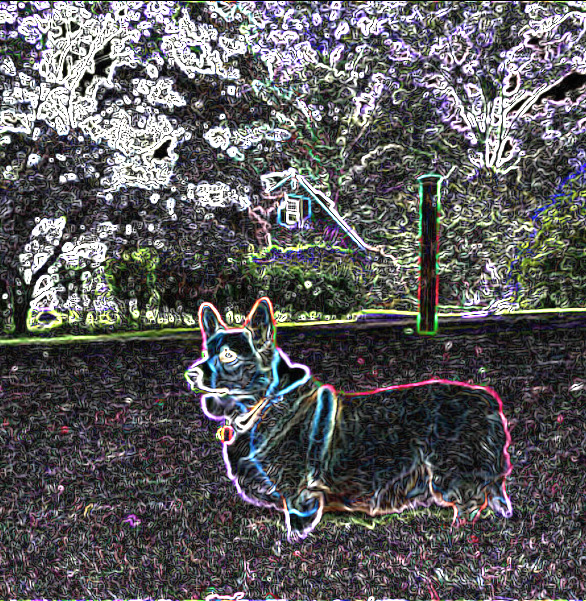
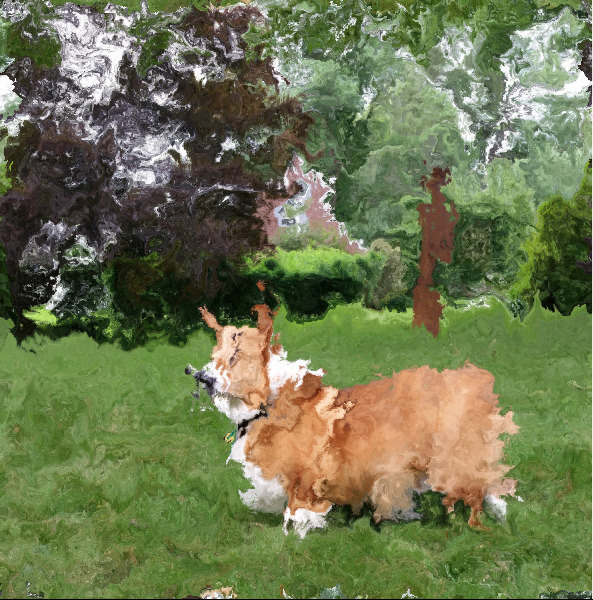
Below are two possible effects using somewhat advanced filters, but still within a single shader. Feel free to experiment.
8. Closing the Web Server
When you are finished with a session, be sure to close your ngrok and python3 session. ngrok is likely running in the foreground and can be stopped using Ctrl-C.
You can stop all your python3 jobs using
pkill -u adanner python3replacing adanner with your username.
9. Summary of Requirements
Your project will be graded on the following components:
-
A working split function plus one additional image processing effect that was not an effect you implement in the CS35 pic filter lab.
-
Easy to read shaders.
-
Answer to concept questions in the
Readme.mdfile. -
A small percentage of your grade will be based on style, creativity, and your new effect. A very simple or a snarky make blank effect meets the letter of the requirements, but not the spirit. Have fun and try something a little more elaborate.
You will not be graded on the lab survey questions in the Readme.md file
Submit
Once you have edited the files, you should publish your changes using the following steps:
$ git add <files you changed>The git add step adds modified files to be part of the next commit to the github server.
$ git commit -m "completed lab1"The git commit step makes a record of the recently added changes. The -m "completed lab1" part is a descriptive message describing what are the primary changes in this commit. Making a commit allows you to review or undo changes easily in the future, if needed.
$ git pushThe git push command sends your committed changes to the github server. If you do not run git push before the submission deadline, I will not see your changes, even if you have finished coding your solution in your local directory.
If you make changes to files after your push and want to share these changes, repeat the add, commit, push loop again to update the github server.
If you want to commit changes to files that have already been committed to git once, you can combine the add and commit steps using
$ git commit -am "bug fix/updates"The -a flag will automatically add files that have been previously committed. It will not add new files. When in doubt, use git status, and please do not use git add * ./
To recap, the git commit cycle is git add, git commit, git push. Don’t forget to git push when you have completed an assignment.