CS40 Lab 1: Pixel Buffer Intro
Lab 1 goals
- Gain proficiency using the development tools for this course
- Manipulate images at the pixel level
- Understand the RGB color space
- Learn to navigate the Qt5 Documentation
- Make ponies look fancy
Useful references
- Swarthmore Github Enterprise (GHE)
- Basic git usage
- Resolving merge conflicts in git
- QImage documentation
- QColor documentation
As with all lab assignments this semester, you will use git, a version control system, to get starting files as well as handing in your assignments. When you start an assignment, you'll execute a git command to grab some starting files. Similarly, when you want to submit an assignment, you'll execute a couple of git commands. Later on in the course, you'll be using git to facilitate paired lab assignments.
Git is a large piece of software, and there is a lot to learn with git. Fortunately, it is easy to get up and running on git with just a small number of commands.
- If you have not set up account before, there are a couple of steps you need to take to start using git. First do the initial setup steps listed here. It is assumed most students have done this as part of CS31 or CS35.
- Move to your cs40 folder with
cdcd ~/cs40
- Clone the git repo for lab01 by executing this
command:
git clone git@github.swarthmore.edu:CS40-F18/lab01-<user>.git ./lab01
where <user> is your ITS username. - At this point, you should have the lab starter code and be ready to start the lab.
- We recommend that you read the "Commands for using a git repo" that lists the commands that you will need to submit your lab assignments. In particular, you should understand how to use "git add", "git commit" and "git push".
As a reminder, the git commit cycle is git add, git commit, git push. Don't forget to git push when you have completed an assignment.
Making and building code
Make a build directory in your projects directory and run cmake, and make. You can also do this in QtCreator by selecting new project and opening the file~/cs40/lab01/CMakeLists.txt
[]$ cd ~/cs40/lab01
[01]$ mkdir build
[01]$ cd build
[build]$ cmake ..
[build]$ make -j8
[build]$ ./lab1
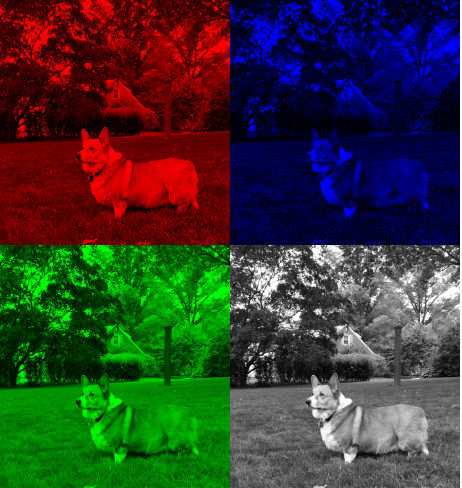
r,g,b components for a given pixel. An example is shown below
lab01, and design at least the UI part in qtcreator. The project should build in either qtcreator or standard CMake. Much, but not all of the UI design has been completed already.
If you run ./lab1 you'll see the load and quit buttons work. The split button has signal and slots connected and will pop up a window saying this feature is not yet implemented. The New effect button, which can be a new image effect of your own choosing is not connected to a MyImageBox slot. You will need to edit slots/signals for this button in the UI designer and then implement the desired behavior in the MyImageBox class.
Implementing Split
You should implement split inmyimagebox.cpp. Look for the function stub
void MyImageBox::split() {
    infoPopup("Oops!, This is not implemented ");
}
Remove the stub code and write code to create a new QImage object, newImage that splits the current image m_current. At the end of processing, set the current image to be your new image, and update the widget to show the new image.
m_current=newImage;
m_imageLabel->setPixmap(QPixmap::fromImage(m_current));
To help implement your split method, you may want to look at the following
QImage and QColor methods. Note that the file testQImage.cpp shows how to use some of these methods to copy a sample image file. You may want to edit this file to do some simple tests on the QColor class before integrating your solution into myimagebox.cpp. Nothing in testQImage.cpp will be graded.
QImage
- QImage(int width, int height, Format format) constructor
- height()
- width()
- pixelColor(int x, int y)
- setPixelColor(int x, int y, QColor clr)
QColor
- QColor(int r, int g, int b, int a = 255) Create a QColor object from separate r,g,b components
- red(), green(), blue()
When testing your code, be sure to consider the following cases
- What if the user does not load an image before clicking Split? You should detect this case and display a QMessageBox.
- What happens if you click split twice?
Adding a new effect
To add a new effect, edit themainwindow.ui file in the Designer window of QtCreator.
- Change the name of the button label to something more descriptive.
- Create an event that connects the
clicked()signal on the new button to a new slot in theMyImageBoxwidget. You may need to add a slot in the Designer window and give the new slot a descriptive name for your effect. - Add the new slot method name to the
MyImageBoxheader - Implement your new effect similar to the way you implemented split()
- If no image is loaded when the button is clicked, display an informational QMessageBox.
To make this moderately challenging, you cannot use any of the Pic Filter effects from a frequently used CS35 lab. These effects are noRed, noBlue, noGreen, Greyscale, invert, vertical flip, and horizontal flip. The idea is to try something a little more fun and new. That said, you effect doesn't have to be super exotic if you aren't feeling inspired.
If you would like to add more effects, you will need to add more buttons and slots.
- Start early, proceed incrementally.
- Commit and push when something new is working.
- You may want to make a
QString imgNameprivate member variable to remember the name of the last opened image. - Use the QT Documentation. Remember, some methods might be defined in a base class. We are using Qt version 5.9.5. The documentation is for 5.11, but most of the features should be the same. Qt is pretty good about noting when a method was introduced. For example, pixelColor was introduced in 5.6, and we were using 5.4 last time I taught graphics. You get new stuff! If you search for "QWidget" online you might get a Qt4 search result. Don't use this documentation. Search for e.g. "QWidget qt5", or use the search bar at the top of the Qt5 documentation.
- The only source files you really need to change are
myimagebox.* - Aside from
QColorand perhapsQString, all other QT classes you need are used at least once inmyimagebox.cpp
README.md file and answer the Concept Questions and the Quick Lab Survey. Add, commit, and push your answers to these questions along with your source
To submit your code, simply commit your changes locally using git add and git commit. Then run git push while in the lab01 directory.
- A working split function plus one additional image processing effect that was not an effect you implement in the CS35 pic filter lab.
- Suitable error handling for when a user clicks a button and an image is not loaded.
- Easy to read code. New methods should have a descriptive comment.
- Answers to the concept questions in the
README.md. You will not be graded on the Lab Survey questions in that file. - A small percentage of your grade will be based on style, creativity, and your new effect. A very simple or a snarky make blank effect meets the letter of the requirements, but not the spirit. Have fun and try something a little more elaborate.
- Add more elaborate image effects for manipulating RGBImages. Examples might include blur or posterize.
- You can add images to your data folder and commit them to git if you have a favorite sample image. Don't go crazy though. Two to three examples max, please.
- Use a
QVector<QImage>(orQStack) ofQImageobjects and implement an undo button that can undo multiple filters.
Once you have edited the files, you should publish your changes using the following steps:
$ git add <files you changed>The git add step adds modified files to be part of the next commit to the github server.
$ git commit -m "completed lab1"The git commit step makes a record of the recently added changes. The -m "completed lab1" part is a descriptive message describing what are the primary changes in this commit. Making a commit allows you to review or undo changes easily in the future, if needed.
$ git pushThe git push command sends your committed changes to the github server. If you do not run git push before the submission deadline, the instructor will not see your changes, even if you have finished coding your solution in your local directory.
If you make changes to files after your push and want to share these changes, repeat the add, commit, push loop again to update the github server.
If you want to commit changes to files that have already been committed to git once, you can combine the add and commit steps using
$ git commit -am "bug fix/updates"
The -a flag will automatically add files that have been previously committed. It will not add new files. When in doubt, use git status, and please do not use git add *.
To recap, the git commit cycle is git add, git commit, git push. Don't forget to git push when you have completed an assignment.
You can review the basic git commands on the github help pages. Eventually, you should get in the habit of using git status to see if everything has been published, but we will talk about this more throughout the semester.
Remember to add, commit, push. You may commit and push as often as you like, and only the most recent push will be graded.