CS35 Lab 01: Image Editor
This is an individual assignment. You must complete this lab on your own, although you may discuss lab concepts with other students. Please keep the Academic Integrity Policy in mind---do not show your code to anyone outside of the professors and ninjas, and do not look at anyone else's code for this lab. If you need help, please post a question on Piazza, or contact the professors or ninjas.
The goal of this lab is to introduce you to basic concepts in the C++ program language. Concepts you will be familiar with after this lab include:
- basic user input/output (i.e., cin, cout)
- function declarations, definitions, and calls
- managing arrays, including passing to functions
- for loops
- defensive programming (e.g., detecting improper input)
Please get a copy of the starter code for this lab by cloning the appropriate git repository, e.g.:
$ cd ~/cs35/
$ git clone git@github.swarthmore.edu:CS35-F17/lab01-<user>.git ./lab01
For this lab, we also are hosting several test image files. Instead of giving everyone identical copies of the somewhat large files, you will create a symbolic link to the folder containing the files.
$ cd ~/cs35/lab01
$ ln -s /usr/local/doc/lab01-images/  ./test_data
Useful links (visit after reading the lab):
This lab will have you write a program to load and output image files. In addition, you will provide a user the option to perform some basic image manipulation, including color alteration and horizontal flipping. To begin, we will first learn about the PPM Image format. Click here for information about the PPM format (and how to parse it) as well as tips for viewing and creating PPM image files.
Reading about the PPM format may seem overwhelming, but it's actually fairly simple to get started. You will write a program called picfilter which allows the user to manipulate PPM files. Your program will read a PPM file into memory as an array, perform a transformation on it, and then save it in another PPM file. Your program will ask the user to enter the name of the input PPM file, the name of the output PPM file, and the name of the transformation to perform.
$  clang++ -std=c++11 -o picfilter picfilter.cpp image.cpp ppmio.cpp
$  ./picfilter
Welcome to the Portable Pixmap (PPM) Image Editor

Enter name of input file:  test_data/MachuPicchu.ppm
Enter name of output file:  output.ppm
Enter filter command:  grayscale

Image converted.  Goodbye!
The original and resulting image:
| MachuPicchu.ppm | MachuPicchu-gray.ppm |
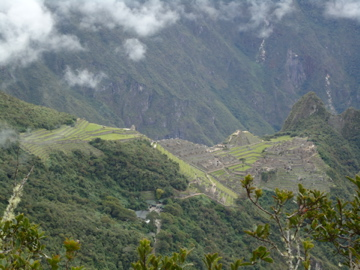 |
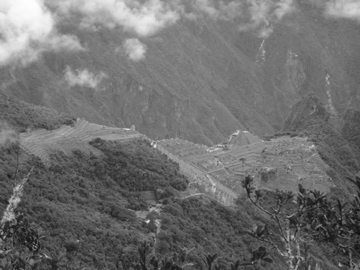 |
Reading PPMs
To read a PPM file, you will pass its filename to three functions:
- ppm_width: Returns an int describing the number of columns in the image.
- ppm_height: Returns an int describing the number of rows in the image.
- read_ppm: Fills in an integer array with pixel data.
The array of pixels may be larger than you'd expect; it will actually be three times the size of the number of pixels in the image. For instance, a 100x100 PPM image would produce an array of size 30,000. This is because each pixel is represented by three numbers: the amount of red, green, and blue light to show for the pixel. Each number ranges from 0 (no light) to 255 (all the light). Here are some example pixel values:
- 0 0 0: No red, green, or blue light. This color is black.
- 255 255 255: All red, green, and blue light. This is bright white.
- 0 255 0: No red or blue light; all green light. This is a bright neon green.
- 255 255 0: Red and green light, but no blue light. This winds up looking yellow.
- 128 0 64: No green light. Some red light and just a little blue light. This color is a dark reddish-purple.
The read_ppm function takes care of opening a PPM file, reading the image data into it, and giving it back to you the array you provided. Once you've read the PPM, you can change it and then write it back out into another file using the corresponding write_ppm function. These functions are defined in ppmio.h.
Transforming PPMs
Once you've read in your PPM as an array of integers, it's up to you to change those integers in any way you like. You could loop over the entire image and set every number to 255, resulting in a giant white rectangle (since every pixel is now white). You could loop over each position in the first row and set each third number to 0, draining all of the blue light from the top line of the image.
As mentioned above, the user specifies an input file, a transformation, and an output file. Here are the transformations the user is allowed to request:
- noRed: Every pixel's red value is set to 0.
- noGreen: Every pixel's green value is set to 0.
- noBlue: Every pixel's blue value is set to 0.
- invert: All channels are subtracted from 255. For instance, 255 128 0 would become 0 127 255.
- grayscale: The channels of each pixel are averaged. For instance, the pixel 255 128 0 would become 127 127 127 (since (255+128+0)/3 is approximately 127).
- flipHorizontally: All pixels are moved across the X axis. The first pixel in each row becomes the last pixel in that row, the second pixel in each row becomes the second-to-last pixel in that row, and so on.
- flipVertically: All pixels are moved across the Y axis, causing the image to appear upside-down.
For each of these transformations, you will write a void function of the same name that takes an int array containing a PPM image and makes the appropriate changes. You will then complete a main function which asks a user for the name of the input and output files, as well as the transformation to perform, loads the image, calls the right transformation function, and then saves the result. If the user gives an invalid transformation (e.g. flipDiagonal), your program should tell the user so and ask again for a valid transformation. Keep asking until the user enters a valid transformation. You are allowed to ignore errors caused when the user gives non-existent or invalid filenames.
Your starter code has been separated into several files:
- image.cpp: This file is where you will write your image transformation functions (e.g. flipHorizontally).
- image.h: You will write headers for your image transformation functions here.
- picfilter.cpp: You will complete your main function here.
- ppmio.h/ppmio.cpp: These files contain the functions read_ppm and write_ppm that let you read and write PPM images. You do not need to change these files.
Compiling Your Program
To compile your program, clang++ will need to know about all three .cpp files. Make sure to include them in your compilation command:
$ clang++ -std=c++11 -o picfilter picfilter.cpp image.cpp ppmio.cpp
Getting Started
Remember: you don't have to write everything all at once. It's often best to get a small amount of your code to work and then move on to the next part. You can follow these steps to complete your lab:
-
Start by completing your
mainfunction. Much of this code has been given to you -- we've already shown you how to define an array for the ppm file, ask the user for input/output file names, and read the file into an array. The starter file also recognizes when a user asks for noRed and calls the appropriate transformation function. First, you should add in code that tells the user when they've entered an invalid transformation, and you should write the transformed ppm image out to the output file. For now, assume that noRed is the only valid transformation. -
We've given you a function stub for noRed. This is an empty function definition that does nothing. At this point, you should be able to run picfilter, call noRed, and write the result out to a file; however, the output should match the input file. Next, implement noRed and verify that it removes all red from the input image.
-
One by one, implement more transformations, adding them to
mainas you complete them. Try each of them out before you move on to the next one. -
Once you've finished writing your transformations, run your program several times and compare it to the files in test_data to see if your transformations work correctly.
You can use ImageMagick, a package installed on the CS network, together with picfilter to edit your own images! Start by converting your picture to PPM format:
$ convert my_image.jpg -compress none my_image.ppm
Then, do anything you want with picfilter:
$ ./picfilter
Welcome to the Portable Pixmap (PPM) Image Editor

Enter name of input file:  my_image.ppm
Enter name of output file:  my_image-gray.ppm
Enter filter command: grayscale

Image converted.  Goodbye!
Finally, convert your new image back to some other format.
$ convert my_image-gray.ppm my_image_2.jpg
There! You've just used your homework assignment to perform photo editing on your own files. :)
To summarize the requirements of this lab:
- Your program must perform all of the image transformations listed above.
- Your program must ask the user for the name of the input and output files and the name of the transformation to make.
- You must complete the survey in the file README.md.
Once you are satisfied with your code, hand it in using git. Remember the add, commit, push development cycle. You can push as many times as you like, but only the most recent submission will be graded. You may want to run git status to confirm all modifications have been pushed.
It will be helpful to think about how the row and column indices in an image correspond to offsets into the array ppm. Consider the image below showing an image with width equal to three columns and height equal to two rows. The red, green, and blue values of each pixel are stored consecutively in the ppm array. All the pixels in the first row appear before all the pixels in the second row. It may be helpful to think of a function int getOffset(row, col, width, height) which computes the index into the ppm of the red value of the pixel at the given row and column for an image with a given width and height. Study the picture below and see if you can design this function. How does the index of the first element in the second row relate to the height and width of the image? How does the index of the third column relate to the index of the first column?

This lab write up is based off of Joshua Guerin and Debby Keen's NIFTY 2012 submission titled PPM Image Editor.