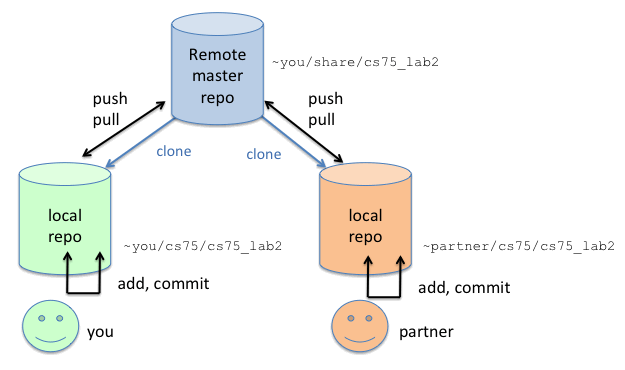
Set-up for Creating and Using a Git Remote Master Repo stored on the CS system
The first step to using git is for one of you to set up a remote bare master repository for your shared project. Next, you and your partner clone local copies of the repo into your own private subdirectories. Finally, you each commit changes to your local copies and push and pull changes to and from the remote master to share work.

0. First time users config settings
Prior to using git for the first time, rungit config --global user.email "username@cs.swarthmore.edu" git config --global user.name "Your Name"Replace the email and name strings with your email address and name. If you have not run these commands, then the very first git commit will fail and tell you to run them.
You can also configure your default editor for commit messages (set to vim, or emacs or ...):
git config --global core.editor "vim"
1. Setting up a remote master repository to share a CS course project
Only one of you or your partner should set up a master bare repository for your shared work.- The esay way: we have a script, gitcreate.sh that
you can run that will set up a new shared bare master repository for you:
$ gcreate.sh repo_name
This will set up a new git bare repository in ~/share/repo_name/ with permissions and acls set correctly.Here is an example run (what I'm typing is shown in bold):
$ gitcreate.sh cs75_lab2
Initialized empty git repository in /home/newhall/share/cs75_lab2/
Enter a space separated list of users: newhall knerr
These commands will be entered
setfacl -R -d -m user:newhall:rwX,user:knerr:rwX,user:newhall:rwX /home/newhall/share/cs75_lab2
setfacl -R -m user:newhall:rwX,user:knerr:rwX,user:newhall:rwX /home/newhall/share/cs75_lab2
Should I do this? (Y/n)Y
acls are set up
Repository creation successful
Central repository located in /home/newhall/share/cs75_lab2
Run git clone /home/newhall/share/cs75_lab2 to get a local copy of the repository
- Doing it yourself: otherwise, one of you can do the following
steps to set up a shared new bare git repository for your joint work
(this is basically what the gitcreate.sh script is doing for you):
- Create a new bare git repository for your project in
a directory that is accessible to the world. You want to
put this someplace that everyone can
access (your home directory is fine, or a shared subdirectory making sure
that permissions are set along the path to it so that it
is accessible to other users).
Here is an example where I'm creating a new git bare repository in ~newhall/shared/cs75_lab2 (note that I'm setting permissions on my shared subdirectory so that anyone can cd into it):
  # (1) create the directory for the new repository
  $ cd
  $ mkdir share
  $ chmod 755 share
  $ cd share
  $ mkdir cs75_lab2
  $ cd cs75_lab2

  # (2) run git init inside that directory:
  $ git init --bare
- Next, set acls on your bare repository so that only you and your
partner can access an modify its contents. To do this run
easyfacl. For example:
  # you can run easyfacl from anywhere, but I find running it from up
  # a directory makes entering the path name easier
  $ cd ..
  $ easyfacl
    Enter a space separated list of users: newhall knerr
    Enter a pathname (relative or full): cs75_lab2
    ...
note: any time you add a new git repository, you need to run easyfacl to re-set acls on it.
- Create a new bare git repository for your project in
a directory that is accessible to the world. You want to
put this someplace that everyone can
access (your home directory is fine, or a shared subdirectory making sure
that permissions are set along the path to it so that it
is accessible to other users).
At this point, you now have a master git repository for your project that only you and your partners can access. All changes, additions, deletions, to this project can be done with git commands that will push and pull changes from this remote master copy.
2. Cloning a private copy of the remote master repo
After creating the remote master copy of the repository, both you and your partners should clone a local working copy of the master repo into a private subdirectory of your home directories:$ cd ~/private $ mkdir cs75 $ cd cs75 $ git clone ~newhall/share/cs75_lab2 $ cd cs75_lab2 $ ls # FYI: you can look at the git config file to see where # the remote master repository is (to where pull and push go) $ cat cs75_lab2/.git/config
3. Use your git repo
Refer back to the main using git page for information about using git:- git commands
- troubleshooting errors with commands
- git tools
- links to other git resources