about PeerMon
PeerMon is a peer-to-peer resource monitoring system for general purpose Unix local area network (LAN) systems. PeerMon is designed to monitor system resources on a single LAN, but it also could be deployed on several LANs where some inter-LAN resource sharing is supported. General purpose LANs of workstations are systems where multiple machines are connected by a network. Each machine runs a stand-alone operating system and typically runs a network file system and may support a few other types of networked resource sharing. These types of systems are common at universities and other organizations where machines in offices and labs are connected to allow some system-wide resource sharing, but where most of a machine's resources are under the control of its local OS.Each node in the LAN runs a lightweight PeerMon daemon process that collects and exchanges information about system-wide resource usage. Applications that use PeerMon data interact with their local daemon to obtain system-wide resource data.
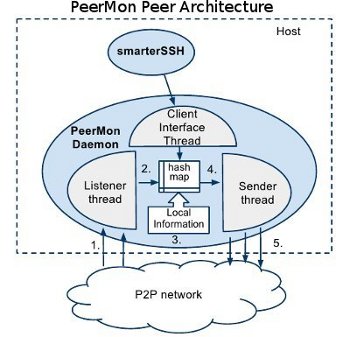
Each PeerMon daemon is a multithreaded process. One thread, the Sender thread,
periodially collects load information about its own node and sends to three
peers its own load information and load infomation it has about other nodes in
the system (stored in its hash map of node-load info data).
The Listener thread receives messages from other PeerMon peers containing
system-wide load information and updates hash map entries with any new data
it receives. Applications that use PeerMon data communicate with their
local PeerMon daemon using the Client Interface thread.
The Client Interface thread uses only local information in its own hash
map to provide system-wide load information to the client application program
(for example, to smarterSSH).
Its peer-to-peer design makes PeerMon a scalable and fault tolerant monitoring system for efficiently collecting system-wide resource usage information. Experiments evaluating PeerMon's performance show that it adds little additional overhead to the system and that it scales well to large-sized LANs. PeerMon was initially designed to be used by system services that provide load balancing and job placement, however, it can be easily extended to provide monitoring data for other system-wide services.
We implemented three tools (smarterSSH, autoMPIgen, and a dynamic DNS binding system) that use PeerMon data to pick "good" nodes for job or process placement in a LAN. Tools using PeerMon data for job placement can greatly improve the performance of applications running on general purpose LANs.
Our LISA'10 paper describes the design of peerMon in more detail and presents experimental results running and using PeerMon in our LAN.
People
- Tia Newhall
- Steve Dini'13
- Jānis Lībeks'10
- Ross Greenwood'11
- Jeff Knerr
Setup and Running PeerMon
Peermon is distributed both as a Debian module (.deb file) or a full source tree (a gzip'ed tar file). The Debian module includes the full PeerMon source, but also builds, configs, and installs PeerMon as part of unpacking the .deb file. If you start with the gzip'ed tar file then you can either do an automated install by running setup.py, or you can follow a few simple steps for building, configuring, and installing PeerMon.Once set-up, it is easy to run the peermon daemon and the client programs that use PeerMon data, including SmartherSSH and autoMPIGen. Command line options can be used to specify the runtime behavior of peermon and the client programs.
In addition, we provide several example system and run scripts that can be used to automatically start peermon on a system and keep it running.
Supported Platforms
We release a peermon debian package for amd64 platforms. We currently do not support other platforms, however peermon should build and run on all/most Linux-x86 and Linux-amd64 platforms. Peermon uses the Linux /proc file system to obtain usage statistics, so it would require some minor modifications to the source for porting to other Unix systems, like SPARC or BSDs. Porting to Windows systems would require a larger effort.Here is more detailed information about:
Building and Configuring PeerMon
PeerMon is implemented as a multithreaded C++ program. A makefile for Linux systems is included in the distribution. The installation directory is specified in the Makefile. The default installation directory is /usr/sbin/, to change this redefine INSTALL_DIR in the Makefile. Also, you may want to change the location for config files and remove the init.d scripts if you change the INSTALL_DIR. This can be done by modifying the the PEERMON_CONFIG_DIR and PEERMON_INITD_DIR definitions in the makefile. Their defaults are /etc/peermon and /etc/init.d.There are two ways to build and install PeerMon. The first is to follow the 4 build and config steps listed below, the second is to do an automated build from the .deb file (this will install in /usr/sbin).
Option 1: build, install, config from source
Unpack the peermon-1.1.tar.gz file to extract the source. The README file contains some directions, and the Makefile has some different configuration options for building peermon executables.Building PeerMon requires the GNU C++ compiler and Python be installed on your system.
Setting up PeerMon on your system should be pretty easy, consisting of just a few steps:
- make: As long as you have libraries installed in standard
locations on your system, running make should build the
peermon executable. (setup.py is just a wrapper around
make install).
- Either run and install a peermon P2P NW as a regular user:
in this mode, individual users can just start up their private peermon P2P
NW on some machines. This mode runs peermon with the -u option (see
the documentation below about -u option and the install.sh script).
OR install peermon on a system, and config to run at start-up by following these steps:
- create and install config files: on start-up peermon reads
a few hosts from a config file. The default location
for the config file is in /etc/peermon/machines.txt.
You can also run peermon with the -f command line option to specify a
different config file.
Example config files are in the utils/ subdirectory. You can edit these with your machine information, and then run the installation script setup.sh or run make install to install peermon executables and these config files on your system.
The contents of the config file, should be lines of the form IP:listen_portnum of a handful of other peerMon nodes in the system (we currently list 3 in our config file that is shared by every node). For example:
  130.58.68.76:1288
  130.58.68.165:1288
  130.58.68.160:1288
The listen_portnum should match the required port number, -p, command argument to peermon.As long as peermon is eventually started on at least one of the hosts listed in the config file, the peermon daemon started with this config file will be added to the P2P network and learn about all other nodes in the network after a few exchanges of messages. The other configuration file is optional and contains IP prefixes which determine the validity of the sender IP as well as the IP addresses in the data to be sent out by peermon. The default location for this file is in /etc/peermon/valid_ips.txt.
You can also run peermon with the -i command line argument to specify a different config file. An example of the contents of the valid_ips.txt file is:
	130.58.68
	256.256.256
This will tell peermon to accept only data coming from IP addresses conforming to this prefix and ignore any data it receives about a host whose IP does not conform to the prefix. The absence or emptiness of this file implies that peermon will accept and pass along data about any IP without restrictions. - create a peermon system user For peermon to run (as a daemon at start-up), it is necessary to have peermon system user. Run
sudo adduser --system peermon
Without this user account, peermon will not run (as a daemon)You can run peermon without the peermon user (see the -u option and the install.sh script documentation below)
- install executables Set the INSTALL_DIR in the Makefile to the directory into which you want to install peermon, autoMPIgen, and smarterSSH, and run make install. There is also a wrapper around this process called setup.py included in the installation directory. Running this will install all the necessary executables as well as setting up the necessary permissions to be able to run the executables. It also places the necessary files in the start-up code as well. Assuming that the INSTALL_DIR is in your path, you should be able to just type smarterSSH or autoMPIgen on the command line to run the executables
- create and install config files: on start-up peermon reads
a few hosts from a config file. The default location
for the config file is in /etc/peermon/machines.txt.
You can also run peermon with the -f command line option to specify a
different config file.
Option 2: installation from Debian package for AMD64 platforms
Note: this installation option is not available with the current release, so follow Option 1 above instead.For Linux/amd64 platforms, you can install the demonized version of peermon on your system using the debian package: peermon_1.1_amd64.deb. For other platforms, or for building a non-demonized version, use Option 1. To install using the Debian package, run: sudo dpkg -i peermon_1.1_amd64.deb.
This will install all binary, config files, and start-up files necessary to run the peermon daemon on your system. The dpkg -i will install all peermon executables in /usr/sbin, peermon config files in /etc/peermon, and peermon start scripts in /etc/init.d/.
There are two things you will need to change by hand on your system:
- The entries in the two installed config files in /etc/peermon/, machine.txt and valid_ips.txt, need to be replaced with real entries for your particular system (IP:listen_portnum of about 3 valid peermon peers in your NW, and a list of valid IP prefixes for your system).
- You will need to create a peermon user.
Example Run and Init Scripts
In the utils subdirectory are some example scripts for running and configuring PeerMon.- init.d-peermon.sh: -sample init.d script that can be renamed to /etc/init.d/peermon.sh and is used to start and stop the peermon daemon running on this machine. Saving it in that directory ensures that peermon is always started when the machine has just been turned on.
- peerhealth.sh: -sample script that can be run via root's cron and is used check if peermon is running on a particular node. If not, the script automatically starts peermon.
- machines.txt: -sample configuration file to be saved as /etc/peermon/machines.txt and has host address and port number entries for the 3 hosts to initially send peermon data out to.
- valid_ips.txt: -sample valid IPs configuration file. The edited version of this file should be stored in /etc/peermon/valid_ips.txt
- uninstall.sh: uninstall peermon on a system. Change INSTALL_DIR in this script if peermon is not installed in /usr/sbin.
- install.sh, startcommand,killall.sh, isup.sh:
example scripts to install a peermon P2P NW as any regular user
(using the -u command line option to run it as a regular user and
not as peermon user daemon process). You should specifiy -p and -l
in the command line (see startcommand) to not interfere with other
peermon P2P NWs running on the same machines. killall.sh and isup.sh
are example scripts to kill and check if peermon is still running.
These scripts require one file with a list of machines on which to
run (or kill) peermon. The startcommand script is an example
run command that uses the -u option (and also the -p and -l, and
the -f and -i options which require specifying machines.txt and
valid_ips.txt files). The startcommand script needs to be edited to
include the correct path and filenames for your run.
    # after editing startcommand and creating a file with a list of
    # a list of machines on which to run commands (machinefile), run these:
     ./install.sh machinefile your_user_name
     ./isup.sh machinefile your_user_name
     ./killall.sh machinefile your_user_name
Adding starting peermon to start-up code
On Unbutu or Debian, you can add a script in /etc/init.d/ to start/stop/restart the peermon daemon process. This is done automatically for you with the debian package install, the Makefile also has an install command that will install this for you. Otherwise, here are the steps:- Use or edit the example script in utils/init.d-peermon.sh, and then copy it to /etc/init.d/peermon.sh.
- Then add a symlink in one of the /etc/rcX.d/ directories to run this
script to start the peermon daemon when the node boots:
$ ln -s /etc/init.d/peermon.sh /etc/rc2.d/S99-peermon
Here is an example peermon.sh script (this example is also in utils/init.d-peermon.sh).
add a cron job to restart peermon as needed
If you want peermon to be persistent on your system, you can have a cron job that periodically runs a script on each node to check to see if peermon is still running, and if not restart it using the /etc/init.d/peermon.sh script:/etc/init.d/peermon.sh stop /etc/init.d/peermon.sh startIn utils/peerhealth.sh is an example script that can be run periodically as a cron job:
#! /bin/bash
#This script checks for if the peermon daemon is running and if not it restarts
#it. The script should be run from root's cron
if ! `ps -A | grep -q peermon`
then
/etc/init.d/peermon.sh stop
/etc/init.d/peermon.sh start
fi
Running PeerMon
The peermon executable takes several command line arguments. The -p portnum must be specified, the others are optional. The -p command line option specifies the port number on which peerMon daemons will listen for messages from peerMon daemons running on other hosts. portnum+1 will be used as the port number of the sender thread.peermon command line arguments:
     peermon -p portnum [-h] [-c] [-f configfile] [-l portnum] [-n secs] [-i ipconfigfile]
       -p  portnum:   use portnum as the listen port for peermon and portnum+1
                      as the send port
       -c:            run this peermon daemon in collector-only mode
       -f conf_file:  run w/conf_file instead of using the default config file
                      in /etc/peermon/machines.txt
       -i ip_file:    run w/ip_file instead of using the default
       -l portnum:    use portnum for client interface (default is port 1981)
       -n secs:       how often peermon daemon sends its info to peers (default 20)
       -u             run as a regular user daemon process started by any user
                      vs. as the peermon user daemon started at start-up.
                      This is a way to easily start and stop an instance of
                      a peermon P2P NW whenever by whomever.  You should use
                      the -p and -l options to not interfere with other
                      peermon networks running on same set of machines
       -h:            print out this help message
Running in collector-only mode specifies that the node is a consumer of
PeerMon resource data, but is not a provider of resources to other PeerMon
nodes. We use this on our DNS server to allow it to use PeerMon data to
choose the best nodes to dynamically bind names to, but to prevent other
PeerMon nodes from choosing our DNS server as a target for job placement.
PeerMon Clients
PeerMon provides a peer-to-peer data collection and distribution subsystem for usage information in a LAN. PeerMon clients run on individual nodes use the PeerMon client interface to interact with their local PeerMon daemon to obtain system-wide usage information. A client program can then use these data to perform load balancing, program distribution, or other system-wide services.With the peermon distribution, we include two client programs that use PeerMon data: smarterSSH and autoMPIgen. We also include directions for how to use the PeerMon client interface to enable dynamic DNS mapping that uses PeerMon data to pick the "best" nodes for ssh placement. In addition, we include a simple client example with the distribution that can be used as a starting point for implementing your own client programs that use PeerMon data.
smarterSSH and autoMPIgen
smarterSSH and autoMPIgen are tools that use PeerMon data to pick the best machines on which to either ssh into or run an MPI program.For the purpose of making it easier to create a client application like smarterSSH or autoMPIgen, we created an intermediate connection between peermon and the client application in the form of a library called peermonlib.py that is responsible for initiating contact with peermon and send all the data it knows about and then the client application can just use the data to perform its functionality. These are installed in /usr/sbin/ using the debian package install.
smarterSSH
connects to PeerMon via the library (peermonlib.py), obtains peerMon data, sorts it by different criteria (specified via command line arguments), and then ssh's into the best machine. The default sorting criterion is a combination of CPU load and free RAM space, but the user can specify different criteria via command line options. smarterSSH randomizes the order of machines that are equal according to the sorting criterion so that subsequent invocations better distribute ssh load across the best machines in the LAN.smarterSSH command line options:
         -n num    to select number of machines to print (default is 1)
	 -v        for full printout of stats for each machine listed
	 -I        to list machines by ip address instead of hostname
	 -c        to sort by CPU load, and -m to sort by free memory if neither is specified, a combination is used
	 -m        to order results by free memory  (default is combination CPU mem)
	 -r        to return a list of machines randomly selected (no ordering by usage)
	 -i or --info  just display results and exit
	 -h or --help  show this help menu and exit
	 -p port_num   to specify peerMon port number (default 1981)
The default port number of the peermon client thread is 1981. If you run
peermon with the -l flag to specify a different client port number, then
you also need to run smarterSSH (and autoMPIgen) with the -p option specifying
the client port number.
Some example smarterSSH command lines:
  # list top 20 machines
  smarterSSH -v -i -n 20

  # ssh into the top machine based on cpu utilization
  smarterSSH -c
autoMPIgen
autoMPIgen behaves much the same way as smarterSSH, except that instead of ssh'ing into the best node, it generates an MPI hostfile using PeerMon data to select the best nodes. Currently it generates hostfiles for OpenMPI.autoMPIgen command line options:
	 [hostfile] is the compulsory argument specifying the name of the output file.
	 -n num    to select number of machines to output.  Default is 1.
	 -v        a full printout of stats for each machine listed.
	 -c        to order results by CPU load
	 -m        to order results by free memory  (default is CPU and  mem)
	 -r        to return a list of machines randomly selected machines (no ordering by usage stats)
	 -s slots  list the specified number of slots with each host in the hostfile
	 -q        include the number of CPUs on a host as slots with each machine in hostfile
	           (-q and -s are incompatable)
	 -x        to interpret the -n num value as CPUs rather than nodes
	           (this option is only valid with both -q and -n)
	 -h or --help to see this help menu.
	 -p port_num  use port_num to connect to peerMon (default 1981)
	 -I           output IPs instead of hostnames
	 -i or --info display the results and exit
	              (no hostfile generated here)
Some example autoMPI commands:
  # create a host file named myhostfile, from 20 top machines
  autoMPIgen -n 20 myhostfile

  # create a host file named myhostfile, from 20 top machines ordered by cpu
  autoMPIgen -n 20 -c myhostfile

  # create a host file named myhostfile, from 20 top machines
  # list hosts by their IP, and for each entry include slot=4
  autoMPIgen -n 20 -I -s 4  mhostfile
Config for smarterSSH and autoMPIgen
The file, smarterSSH.py, has two config options that can be changed for any system: CPU_DELTA, MEM_DELTA. These values specify the precision for order results based on CPU load, free RAM, and the combination. The given values will likely work fine for most system, however, for systems with unusually small or large RAM sizes or for detecting higher precision changes in load, change these values.The combination of these DELTA values and the random ordering of "equally good node" results by smarterSSH and autoMPIgen, can result in many different targets each time they are run. For example, if there are currently 20 equally good nodes, then each time smarterSSH is called it will randomly return one of these 20 nodes. The idea is to ignore small differences in RAM or CPU node that do not represent real significant load differences and to help distribute smarterSSH and autoMPIgen load over more of these equally good nodes.
Dynamic DNS mapping using PeerMon data
Modifications can be made to BIND to incorporate PeerMon data into DNS name binding. This allows a virtual host name to be mapped to one of the set of "best" physical nodes where "best" nodes are selected based on system-wide load.Using PeerMon data to select a set of "best" nodes has several benefits over BIND's support for load distribution that selects a host to bind to using either round-robin or random selection from a fixed set of possible hosts. First, it allows for the "best" host to be selected based on current system resource load, thus adapting to dynamic changes in system resource usage and resulting in better load distribution. Second, it is resilient to nodes being unreachable due to temporary network partitioning, node failure, or to deliberate shut-down of nodes in order to save on energy consumption during times of low use. In BIND, if the selected host is not reachable, then ssh hangs. Using our system, unreachable or failed nodes will not be included in the set of "best" targets. When a node is reachable again, PeerMon will discover it and the node may make its way back into the set of "best" targets. An additional benefit for system administrators is less editing of the DNS data files. If a machine is taken out for service, it is automatically (within a minute or two) removed from the pool of best-available machines, requiring no manual editing of the DNS data files. When a machine is restarted, it will quickly be added back into the PeerMon network and will automatically be a candidate target for dynamic DNS binding.
setting up dynamic DNS binding using PeerMon data on Linux systems:
Adding support for dynamic DNS binding using PeerMon data is fairly easy if you have control over your own domain name server. In our department we run our own DNS server and control both the name-to-address and the reverse address-to-name mappings for our sub-domain (cs.swarthmore.edu) The following is a summary of the steps we took to add support for dynamic binding to nodes chosen using PeerMon data:- Run PeerMon on our domain name server in collector-only mode.
- Periodically (currently once per minute) update the resource records for our sub-domain so that one hostname (e.g. cslab.cs.swarthmore.edu) has n address records associated with it (we have n set to 5). These 5 machines are selected using data from the local PeerMon daemon.
- Use the round-robin feature of BIND 9 to rotate through the 5 addresses when queries for cslab.cs.swarthmore.edu are made
details:
- Run PeerMon on our domain name server in collector-only mode:
./peermon -p 2222 -c
You need to have peermon running on some of the regular nodes in your system in regular mode, and then start peermon on the DNS server in collector-only mode (using the -c command line option). Running in collector-only mode means that other peermon nodes will exclude the node from being a target of smarterSSH, autoMPIgen, or any other tool using PeerMon. - Periodically update the resource records
- Use round-robin feature of BIND9 to rotate through the records
For these two steps, first enable the dynamic update feature of BIND 9 by adding "allow-update" sub0statement to your DNS zone config file. For example:
 zone "cs.swarthmore.edu" {
   type master;
   file "cs.db";
   allow-update {127.0.0.1;130.58.68.10;};
 };
Next, write a script to update DNS records based on PeerMon data and add a cron job to run the script periodically. We run our script every minute. One way to do this is to write a script that:
- runs smarterSSH to output the IPs of the n currently best machines
(n is 5 in this example):
python smarterSSH -ips -n 5 > tempfile
- for each of the n machines in the list, generate a file of commands
for nsupdate, deleting the old records first, and then adding new A records.
An example resulting file might look like:
update delete cslab.cs.swarthmore.edu.
update add cslab.cs.swarthmore.edu. 30 IN A 130.58.68.41
update add cslab.cs.swarthmore.edu. 30 IN A 130.58.68.70
update add cslab.cs.swarthmore.edu. 30 IN A 130.58.68.162
update add cslab.cs.swarthmore.edu. 30 IN A 130.58.68.74
update add cslab.cs.swarthmore.edu. 30 IN A 130.58.68.148
- run nsupdate on the generated file to change the DNS records
After running nsupdate on the above file:
$ host cslab.cs.swarthmore.edu
cslab.cs.swarthmore.edu has address 130.58.68.70
cslab.cs.swarthmore.edu has address 130.58.68.74
cslab.cs.swarthmore.edu has address 130.58.68.148
cslab.cs.swarthmore.edu has address 130.58.68.162
cslab.cs.swarthmore.edu has address 130.58.68.41
- runs smarterSSH to output the IPs of the n currently best machines
(n is 5 in this example):
Some Issues:
To fully support dynamic DNS binding using PeerMon data there are few a couple things to check:- removing ssh warnings: every PeerMon daemon
must have the same ssh host key. Otherwise, when users
repeatedly ssh to cslab, each time getting a different machine
from the PeerMon list, ssh would warn them that the host
identification has changed for cslab.cs.swarthmore.edu.
To solve this problem, give all machines running PeerMon the same
ssh host key by distributing an ssh_known_hosts2 file that reflects
this fact.
- Hand edits to DNS files:
The changes to support dynamic DNS mapping using PeerMon data mean
that a program running on our DNS server updates the domain data files
every few minutes. A serial number in the domain data file is used
to signal the change in the zone's data, which means that the
serial number for the zone data is being changed with each dynamic update.
This poses no problem until we need to manually edit the domain data file
and our manual change to the serial number can interfere with the program's
change to it. To solve this problem, any time manual edits are necessary,
system administrators must first "freeze" the zone, then make manual
editing changes, and then "unfreeze" the zone.
BIND 9's rndc command makes this fairly easy:
 $ sudo rndc freeze
  (edit the data files here, being sure to update the serial number)
 $ sudo rndc thaw
Creating your own PeerMon client program
In the utils subdirectory is a file, client_template.py, which shows a simple example of how to build a PeerMon client program. Any Python client program in PeerMon can be easily built on top of the peermonlib.py interface. SmarterSSH and autoMPIgen, for example, use the peermonlib.py interface. You could also write a C or C++ client that connects to the peermon daemon, using TCP sockets, to obtain PeerMon data (see peermonlib.py for the format of the data returned from PeerMon).
The peermonlib.py interface
peermonlib.py is installed in the installation directory with peermon, smarterSSH and autoMPIgen.To use peermonlib:
- In your client.py file, add:
from peermonlib import PeermonLib
If you run your client in a directory different from the one in which peermonlib.py is installed, then you also need to add the directory containing peermonlib to the path before this line. For example:import sys sys.path.insert(2,"/usr/sbin") # add as 2nd element in my python library path
- To get data from the local peermon daemon (these steps need to be
repeated every time you want to get new data from the local daemon):
	lib = PeerMonLib()
	entries = lib.nodes_list
client_template.py
client_template.py is a template for writing any peermon client. You can use this as a staring point for writing your own. CLASSNAME, CLASSFUNCTION, and FUNCTION are place holders for your client-specific class and a sample function. You can try out a very simple example by replacing the place holders with class and function names, adding simple code (like a print statement) in CLASSFUNCTION, and trying to run it. The template has support for some of the same command line arguments as smarterSSH, so you can try running your example with different command line options (e.g. try -n 20 -v -i).Download
- Download at GitHub,
github.com/newhall/peermon,
(the Beta release of Peermon).
The distribution includes peermon, autoMPIgen, smarterSSH, and example config files and a simple client example from which you can build custom peermon clients. All documentation for building, installing, and using peermon is on this webpage.
- Our LISA'10 paper describes the design of peerMon in more detail and presents performance results of peerMon running our system