CS21 Lab4: CUDA Fire Simulator
You will complete this lab with your lab 4 partner.
Contents:
Programming in CUDAProject Details
Project Requirements
Useful Functions and Resources
Submission and Demo
- Both you and your partner should cd into your labs subdir:
- Get your LabO4 ssh-URL from the GitHub server for our class: CS87-s16
- On the CS system, cd into your cs87/labs subdirectory
- Clone a local copy of your shared repo in your private
cs87/labs subdirectory:
git clone [your_Lab04_URL]
Then cd into your Lab04-you-partner subdirectory.
cd cs87/labs
Makefile README.md firesimulator.cu inputfire.txt myopengllib.cu myopengllib.h
If this didn't work, or for more detailed instructions on git see: the Using Git page (follow the instructions for repos on Swarthmore's GitHub Enterprise server).
Getting Started
You need to set the following environment variables to compile cuda code (you can add these to the bottom of your ~/.bashrc file):
# cuda:
export CUDA_HOME=/usr/local/cuda-7.5
export LD_LIBRARY_PATH=${CUDA_HOME}/lib64
export PATH=${CUDA_HOME}/bin:${PATH}
I suggest starting by looking at and running two simple cuda examples:
cp -r ~newhall/public/cs87/cuda_example .The first testgrid.cu allows you to select one of three cuda kernels to run. You can use it to test different grid, block and thread layouts, and "see" how they are mapped onto the 2D array.
The second simple.cu shows an example of how to write a CUDA program that uses myopengllib to simultaneously animate the computation on the GPU. You will use this library in your lab solution.
The header file, myopengllib.h, has comments about how to use the library. simple.cu is an example program that uses the library to animate a simple cuda kernel where values in a 2-D grid are cyclically updated. Note how it registers and animation and clean-up functions.
There are other sources of CUDA examples that you can investigate. See the Useful Resources section below.
The Programming Model in CUDA
The CUDA programming model consists of a global shared memory and a set of multi-thread blocks that run in parallel. CUDA has very limited support for synchronization (only threads in the same thread block can synchronize their actions). As a result, CUDA programs are often written as purely parallel CUDA kernels that are run on the GPU, where code running on the CPU implements the synchronization steps: CUDA programs often have alternating steps of parallel execution on the GPU and sequential on the CPU.A typical CUDA program may look like:
- The initialization phase and GPU memory allocation and copy phase: CUDA memory allocated is allocated on the GPU by calling cudaMalloc. Often program data are initialized on the CPU in a CPU-side copy of the data in RAM, and then copied to the GPU using cudaMemcpy. GPU data can also be initialized on the GPU using a CUDA kernel, and then the cudaMemcpy does not need to be done. For example, initializing all elements in an array to 0 can be done very efficiently on the GPU.
- A main computation phase, that consists of one or more calls to cuda kernel functions. This could be a loop run on the CPU that makes calls to one or more CUDA kernels to perform sub-steps of the larger computation. Because there is almost no support for GPU thread synchronization, CUDA kernels usually implement the parallel parts of the computation and the CPU side the synchronization events. An embarrassingly parallel application could run as a single CUDA kernel call.
- There may be a sequential output phase where data are copied from the GPU to the CPU, using cudaMemcpy, and output in some form.
- A clean-up phase where CUDA and CPU memory is freed. cudaFree is used to free GPU memory allocated with cudaMalloc. Be sure to call cudaFree in any error handling code that cleans-up state and exits.
GPU functions in CUDA
__global__ functions are CUDA kernel functions: functions that are called from the CPU and run on the GPU. They are invoked using this syntax:
my_kernel_func<<< blocks, threads >>>(args ...);
__device__ functions are those that can be called only from other
__device__ functions or from __global__ functions.
They are for good modular code design of the GPU-side code. They are called using
a similar syntax as any C function call. For example:
__global__  my_kernel_function(int a, int *dev_array) {
  int offset = blockIdx.x + blockIdx.y*gridDim.y;

  int max = findmax(a, dev_array[offset]);
  ...

}
__device__ findmax(int a, int b) {
  if(a > b) {
    return a;
  }
  return b;
}
Memory in CUDA
GPU memory needs to be explicitly allocated (cudaMalloc), if initial values for data are on CPU, then these need to be copied to GPU side data (cudaMemcpy), and explicitly freed (cudaFree). When you program in CUDA you need to think carefully about what is running on the CPU on data stored in RAM, and what is running on the GPU on data stored on the GPU. Memory allocated on the GPU (via cudaMalloc) stays on the GPU between kernel calls. If the CPU wants intermediate or final results, they have to be explicitly copied from the GPU to CPU.In CUDA all arrays are 1-dimensional, so each parallel thread's location in the multi-dimensional thread blocks specifying the parallelism, needs to be explicitly mapped onto offsets into CUDA 1-dimensional arrays. Often times there is not a perfect 1-1 thread to data mapping and the programmer needs to handle this case to not try to access invalid memory locations beyond the bounds of an array (when there are more threads than data elements), or to ensure that every data element is processed (when there are fewer threads than data elements).
For this lab, you can assume that if you use a 2-D layout of blocks
(dim3 blocks(DIM,DIM)) that there are enough GPU threads to each handle a
single element in a 512x512 array.
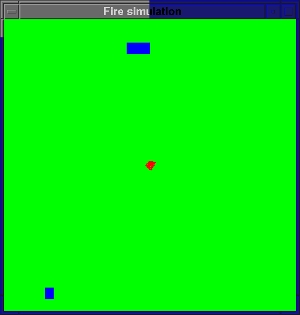
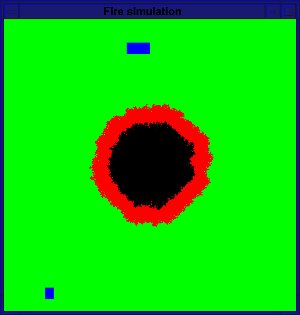
The forest fire simulator is a discrete event simulator of a 2-dimensional non-tours world, where each cell is either:
- part of a LAKE
- part of a forest that is UNBURNED
- part of a forest that is BURNING
- part of a forest that has already BURNED
In addition to a cell being in one of these different states, also associated with each cell is its temperature. A cell's temperature range depends on its state:
- 60 degrees for UNBURNED forest cells
- 300 to 1000 to 60 for a BURNING forest cell. A burning cell goes through increasing and decreasing temperatures phases. It starts at the ignition temperature of 300 degrees and increase up to a max of 1000 degrees. Once it reaches 1000 degrees its temperature starts decreasing back down to 60 degrees, at which point it becomes BURNED.
- X degrees for a BURNED cell: you can pick a temperature, but pick one that no UNBURNED or BURNING forest cell can ever be.
- Y degrees for a LAKE cell: you can pick a temperature, but pick one that no forest cell can be.
Your simulator should take the following command line arguments (all are optional arguments):
./firesimulator {-i iters -d step -p prob | -f filename}
 -i iters     number of iterations to run
 -d step      rate at which a burning cell's temp increases or decrease each step
 -p prob      probability a cell will catch fire if one of its neighbors is burning
 -f filename  read in configuration info from a file
Your program should using default values for any of values not given as command line arguments. Use 1,000 iterations, a step size of 20, and a probability of 0.2 as the default values.
Options -i, -d and -p are not compatible with -f. The file format is discussed below.
Initialize your world to some default configuration (unless the -f command line is given). The default should start a fire in the center of the world (just a single cell...like a lightning strike). It should also contain a couple lakes (contiguous regions of some size of lake cells).
After simulating the given number of steps your program should print out the cumulative GPU run time and exit. At each time step, a cell's state and/or temperature may change according to these rules:
- if a cell is a LAKE, it stays a LAKE
- if a cell is BURNED, it stays BURNED forever
- if a cell is UNBURNED, then it either starts on fire or stays UNBURNED.
To decide if an UNBURNED cell starts on fire:
- look at the the state of its immediate neighbors to the north, south, east and west. The world is not a torus, so each cell has up to 4 neighbors, edge cells have only 2 or 3 neighbors.
- if at least one neighboring cell is on fire, then the cell will catch fire with a probability passed in on the command line (or use 10% as the default probability).
- if a cell is BURNING, then it burns at a constant rate for some number
of time steps. However, its temperature first increases from 300 (the
fire igniting temp) up to 1000 degrees, and then it decreases from 1000 back
down to 60 degrees, at which point it becomes a BURNED cell.
The rate at which its temperature increases or decreases is given by a command line argument -d, or use a default value of 20.
A BURNING cell's state may change based on its new temperature: if its new temperature is <= 60, then this cell is now done burning and its state is now BURNED. Its temperature is set to the BURNED temperature value that you use.

Input file format
If run with an input file (the -f command line option), the program configuration values are all read in from the file. The file's format should be:line 1: number of iterations line 2: step size line 3: probability line 4: the lightning strike cell (its (i,j) coordinates) line 5: number of lakes line 6-numlakes+6: lines of (i,j) coordinate pairs of the upper left corner and lower right corner of each rectangular lakeThe lake coordinates are given in terms of the 2-D array of cell values that you initialize on the CPU. All cells specified in that rectangle should be lake cells, all others should be forest cells. For example:
800
40
0.3
250 400
2
20 30 50 70
100 60 120 110
This will run a simulation for 800 iterations, with a temperature step size of a 40 degree increase or decrease, and with a probability of 30%. It will start with an initial world containing 2 lakes one with upper left corner at (20,30) and lower right at (50,70), the other with upper left corner at (100,60) and lower right at (120, 110). All other cells will be UNBURNED forest cells, except cell (250,400) which will start as BURNING. It is fine if the lakes overlap; the lakes in the world from my example simulation would look less rectangular if I overlapped several lake rectangles.
- The size of the 2D world grid should be compiled into your program (i.e. you do not need to dynamically allocate space for the CPU-side grid). Instead, just statically declared 2 dimensional array of 512x512 int values on the CPU side that you use to initialize to the starting point values for your fire simulator. You should, of course, use a constant instead of 512 in your code so you can easily try other size worlds. Define and use a constant for the dimension of the world N (512) so that you can easily try other sizes
- The 2D forest you are simulating is NOT a torus; there is no wrap-around for neighbors on edge points.
- Each cell's value changes based on its current state, and possibly the state of its up to 4 neighboring cells (north, south, east, and west).
- Your program should take optional command line arguments for
the number of iterations to run the simulation, the probability a
cell catches fire if one or more of its neighbors are on fires, and
the rate at which a cell on fire's temperature increases or decreases
each time-step. For example, to run for 800 time steps, using
a probability of 20% and a temperature step of 50 do:
./firesimulator -i 800 -p 0.2 -d 50Because all of these arguments are optional, you should use default values of 1000 time steps, 10%, and 20 degrees for these values. - Your program should also support an optional command line argument for
reading in world configuration information from a file (-f is not
compatible with -i, -p or -d).
./firesimulator -f infile - Your program should contain timers to time the GPU parts of the computation and output the total time after all iterations have been complete.
- At each step, you should color the display pixels based on each cell's state (or temperature). I'd recommend starting with something simple like green for UNBURNED, red for BURNING, black for BURNED, and blue for LAKE. You are welcome to try something more complicated based on actual temperature, but this is not required.
- After the specified number of iterations your program should print out the total CUDA kernel time, and should exit (just call exit(0));
- You must use a 2-D grid of blocks layout on the GPU to match
the 2-D array that is being modeled:
dim3 blocks(DIM, DIM, 1);
note: A 1-D grid of 512x512 blocks is too big for most of our graphics cards. If you don't use a 2-D grid, you program will not work and you will see some very strange behavior. To see the graphics card specs our machines look at lab machine specs. - You should run your kernels as DIMxDIM blocks, and each block
should have some number of threads:
dim3 blocks_grid(DIM,DIM,1); // a 2D array of blocks makes most sense here
dim3 threads_block(x,y,z);  // you decide, but do more than (1,1,1)
my_kernel_func<<< blocks_grid, threads_block >>>(args ...);
You can start with a threads/block as (1,1,1) but then try to more. See my example cuda program testgrid.cu for some examples. You can try different layouts in that program and see how they work. - Your program should use myopengllib to visualize your simulation as it runs on the GPU. See my comments in myopengllib.h and simple.cu for information about how to use this library.
- Information about how to use my simple GPU animation library to
simultaneously visualize your fire simulator as it runs is described
in the comments in the library .h file and in the simple example
program, simple.cu, that uses it. Copy over this code, examine it,
and run it to see what it is doing.
cp -r ~newhall/public/cs87/cuda_example .
- Read about CUDA programming. We have a copy of "CUDA by Example"
in the main lab, which is an excellent reference.
- You can look over and try running the CUDA 7.5 example programs
located here:
/usr/local/cuda-7.5-samples/NVIDIA_CUDA-7.5_Samples/.
Just cd into subdirectories here, look at the code and try running the binaries to see what they do. Some of these examples use features of CUDA that you are well beyond what you need to use in this lab, so don't get too bogged down in slogging through them. - Nvidia's Cuda Developer Documentation there is a CUDA C Programming Guide off this page
- lab machine graphics card specs
- run deviceQuery to get CUDA stats about a GPU on
particular machine. It will list the limits on block and thread
size, and the GPU memory size among other information.
- timing CUDA code: to time the GPU part of your program's
execution, you need to create start and stop variables of type
cudaEvent_t, start them, stop them, and compute the elapsed time
using their values. To do this you will need to use functions
cudaEventCreate, cudaEventRecord,
cudaEventSynchronize, cudaEventElapsedTime, and cudaEventDestroy.
- Random numbers in CUDA
Random number generators are inherently sequential: they generate
a sequence of pseudo random values. It is much more complicated
to generate pseudo random sequences in parallel.
Depending on how your program wants to use random values, you may need
to create separate random state for each thread that each thread
uses to generate its own random sequence. Seeding each thread's
state differently will ensure that threads are not generating identical
random sequences.
The cuRAND library provides an interface for initializing random number generator state, and using that state to generate random number sequences. The following are the steps necessary for using cuRAND to generate random numbers in your program (you will use these to calculate the chance that a cell will catch fire if one or more of its neighbors is on fire):
- include curand headers
#include <curand_kernel.h>
#include <curand.h>
- allocate curandState for every CUDA thread:
curandState *dev_random; HANDLE_ERROR(cudaMalloc((void**)&dev_random, sizeof(curandState)*N*N), "malloc dev_random") ; - write a CUDA kernel to initialize the random state (each thread will
initialize its own state on the GPU):
// CUDA kernel to initialize NxN array of curandState, each // thread will use its own curandState to generate its own // random number sequence __global__ void init_rand(curandState *rand_state) { int row, col, offset; row = blockIdx.x; col = blockIdx.y; offset = col + row*gridDim.x; if(row < N && col < N) { curand_init(hash(offset), 0, 0, &(rand_state[offset])); } } // a hash function for 32 bit ints // (from http://www.concentric.net/~ttwang/tech/inthash.htm) __device__ unsigned int hash(unsigned int a) { a = (a+0x7ed55d16) + (a<<12); a = (a^0xc761c23c) ^ (a>>19); a = (a+0x165667b1) + (a<<5); a = (a+0xd3a2646c) ^ (a<<9); a = (a+0xfd7046c5) + (a<<3); a = (a^0xb55a4f09) ^ (a>>16); return a; } - Call init_rand before calling any cuRAND library functions that
use curandState:
// this example is invoking it with 1 thread per block:
init_rand<<<blocks,1>>>(dev_random)
- Now CUDA threads can generate random numbers on the GPU using there
own initialized state:
__global__ void  use_rand_kernel(curandState *rand_state, float prob){

 int offset = ... // compute offset base on this thread's position
                  // in the parallelization
// get a random value uniformly distributed between 0.0 and 1.0
 val = curand_uniform(&(rand_state[offset]));
- include curand headers
From one of your local repos (in your ~you/cs87/labs/Lab04-partner1-partner2 subdirectory)
git  *.cu
git commit
git push
If you have git problems, take a look at the "Troubleshooting" section of the Using git page.
Demo
You and your partner will sign up for a 15 minute demo slot (outside my door) to demo your fire simulator. Think about, and practice, different scenarios to demonstrate both correctness and error handling.If you implement some extensions to the basic simulator, please do so in a separate .cu file and build a separate binary so that I can still easily test your solution to the required parts of the lab assignment.
Here are a few suggestions for some things to try to improve the simulation or the performance (you are also welcome to come up with your own ideas for extensions):
- you could add wind direction and speed to your world data and this information in combination with neighbor's state will determine if a cell catches fire at each step. For example, if a cell is up-wind from a neighbor on fire, its chances of catching fire will be much less than if it id down-wind from a neighbor on fire.
- You could add elevation data to each cell, and use a cell's elevation in combination with other data in determining its likelihood of catching fire. Fire might be more likely to move up in elevation than down...I don't know if this is true, but it seems plausible. If you add elevation data, you should color UNBURNED cells differently based on their elevation so you can "see" the elevation data.
- You could populate the area with different types of UNBURNED forest vegetation, associating with each cell its vegetation type. This can be used in combination with other data in determining how likely a cell is to catch fire, and its burn rate and max temp. For example, prairie may be more likely to catch fire, than pine forest, than deciduous forest, than marsh. Again, you should color different types of vegetation differently so that you can see the different types.
- You could model more realistic burning functions (they are likely not linear in real life).
- Try out different parallelizations (different grid, block, and thread layouts), and see if some lead to faster simulations.
- Try larger world sizes that require breaking the parallelization up
more into blocks of thread blocks and require each thread mapping to
more than a single grid cell. See how big you can go (you may want to
think about adding a command line option for the size and some dynamic
memory allocation to more easily test this).
- Try implement a different program in cuda that uses the gpu animation library. I suggest trying out a parallel mandelbrot or julia set.