A device driver implements an interface for managing a (typically) physical device. Every device driver is written to conform to the kernel's device driver interface. When the kernel receives an I/O requests on the device it will invoke the appropriate driver function to perform the I/O operation. Device driver functions are registered with the kernel when the driver is loaded into the kernel.
You will write the character device driver for a mailbox pseudo-device (do not implement it as block device driver), and you will use blocking rather than a polling interface for reads and writes to your mailbox devices.
The mailbox device driver code will be written as a loadable kernel module (lkm) that is written and compiled into a .ko file that is then loaded into the kernel at runtime by calling insmod; you do not need to modify, rebuild or reboot the kernel to implement, load, or run your device driver.
To use your pseudo-device, user-level programs will open, read, write, and close special files in /dev corresponding to your mailbox devices. You will create 8 special files in /dev. Odd numbered devices will be read-only, the other 4 will be write-only; with the 8 you will implement 4 mailbox pseudo-devices (e.g. 0 is the write end and 1 is the read end of the same mailbox). Devices have a major number and a minor number. All devices with the same major number use the same device driver code; driver code is associated with /dev special files by creating /dev special files with the same major device number that is used to register its device driver code. Each of your mailbox will have a buffer of 32 bytes. A Writer process can write up to 32 bytes before it blocks waiting for the reader process to read data from the mailbox. Reader processes will block if there is not enough data in the mailbox to satisfy the read request. You need to use wait queues to block and unblock processes on mailbox.
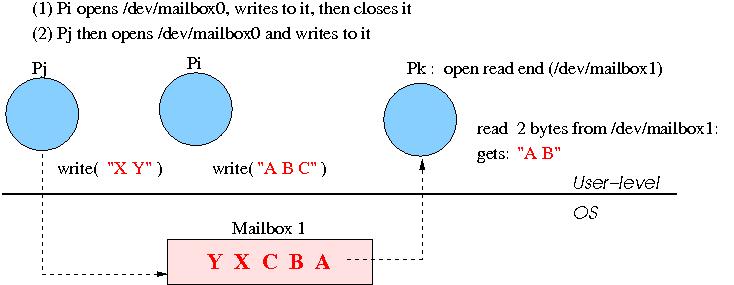
An Example: in the figure below, process Pi has opened the write end of a mailbox device and Pk has opened the read end of the same mailbox device. Pi writes "ABC" to the mailbox and closes its end. Pj then opens the write end and writes "XY". If Pk reads two bytes from the mailbox, it will read "AB", and only three bytes will remain in the mailbox "CXY". If Pj makes a subsequent request to read 4 bytes, Pj will read "CXY" out of the mailbox, and then will block until at least one more byte has been written to the mailbox. Pk does not return the result to the caller until all bytes of the read request have been read out of the mailbox (a call to read 4 bytes on a mailbox blocks until all 4 bytes have been read, even though the kernel-level implementation may read a byte and block several times).
% vi /boot/grub/grub.cfg

set default="0"
...

### BEGIN /etc/grub.d/10_linux ###
menuentry 'Debian GNU/Linux, with Linux 2.6.32.44-lab3' --class debian --class gnu-linux --class gnu --class os {
...

menuentry 'Debian GNU/Linux, with Linux 2.6.32.44-lab3 (recovery mode)' --class debian --class gnu-linux --class gnu --class os {
...

menuentry 'Debian GNU/Linux, with Linux 2.6.32.44-lab2' --class debian --class gnu-linux --class gnu --class os {
...
menuentry 'Debian GNU/Linux, with Linux 2.6.32.44-lab2 (recovery mode)' --class debian --class gnu-linux --class gnu --class os {
...
menuentry 'Debian GNU/Linux, with Linux 2.6.32.44-cs45start' --class debian --class gnu-linux --class gnu --class os {
...
In the above list, since the kernel 2.6.32.44-cs45start is the 4th entry
(counting from 0), I'll set default to 4:
set default="4"Then run sync; sync; reboot and the 2.6.32.44-cs45start kernel should be the default (and don't run update-grub or default will be set back to 0.)
Run uname -a to see that the right version of the kernel booted, and if not, edit grub.cfg and try again
scp -r user_name@172.20.0.1:/home/newhall/public/cs45/lab4 .
As a regular user on your qemu machine, build the hello1 module you copied over in the modules subdirectory (you can do this as root, but it is always good practice to avoid doing anything as root that you can do as a regular user...it will save you from doing really bad things like accidentally deleting system files):
	$ cp Makefile_hello1 Makefile
	$ make
	$ ls
	  hello1.ko
As root, try inserting and removing the hello kernel module:
	$ su
	$ insmod hello1.ko    # insert the hello module, has printk output
	$ lsmod               # list all loaded kernel modules
	$ rmmod hello         # remove the hello module, has printk output
Also, you need to re-run the mkdevs script after each reboot to recreate the 8 /dev mailbox files.
For this lab you will implement your device driver as an lkm. Grab the starting point code for lab 5 that contains an example of how to register a character device driver with the kernel. You need to implement read, write, open, and release (close) routines as well as complete the mailbox_init and mailbox_cleanup routines that are called when your modules is loaded/unloaded in the kernel. User-level processes will trigger your device driver code by opening, reading, writing, and closing "mailboxi" device files in /dev.
I suggest implementing this assignment incrementally. For example, first, try loading and unloading a simple lkm. Next, try to implement just the open and close parts of your mailbox devices, once you get those to work, then add read and write without blocking, then add in blocking.
Mailbox Contents:
0: abcdexxxxxxxxxxAAAAAAAAAAAAAAAAA
1: ssssssssssssssssssssrrrrrrrrrrrr
2: aa345679aaaaaaaaaaaaaaaaaaaaaaaa
3: AAAAAAAAAAAAAAAAAAAAAAAAAAAAAAAA
And remember these are just buffers of char values, so you cannot print out the contents as a string (there is no terminating '\0'), instead you have to print out each char one at a time.
As root, run insmod to load your lkm, rmmod
to unload it, and lsmod to list all kernel modules.
The function insmod invokes your mailbox_init
function and rmmod invokes your mailbox_cleanup
function.
note: rmmod is a bit flaky, so if it fails you will need to reboot the kernel to remove your lkm.
You will likely need to included the following headers in your lkm:
 linux/kernel.h
 linux/module.h	  # lkm types/function prototypes
 linux/init.h     # some useful macros
 linux/fs.h       # file_operations type for device driver
 linux/wait.h     # wait queue types/function prototypes
 linux/list.h     # list types/function prototypes
 asm/uaccess.h    # useful functions
 linux/cdev.h     # character device interface functions
 asm/current.h
 linux/sched.h
With the starting point code is a script, mkdevs, that will create all
the device files in /dev. Run this script as root after each reboot.
Here is what the script looks like:
If you do ls -l on these files, you will see information for the device:
Also, refer to struct defs and function prototypes in version 2.6.32.44 of the linux,
as some types may differ from the version of linux used in this documentation.
Details
mknod  --mode=666 /dev/mailbox0 c 166 0
mknod  --mode=666 /dev/mailbox1 c 166 1
mknod  --mode=666 /dev/mailbox2 c 166 2
mknod  --mode=666 /dev/mailbox3 c 166 3
mknod  --mode=666 /dev/mailbox4 c 166 4
mknod  --mode=666 /dev/mailbox5 c 166 5
mknod  --mode=666 /dev/mailbox6 c 166 6
mknod  --mode=666 /dev/mailbox7 c 166 7
ls -l /dev/mail*
The script creates device files in /dev/. At reboot, these files are removed.
You can add to the file /etc/rc.local the 8 mknod commands above, and then
on re-boot the mailbox device files will be re-created "automatically".
#    file_permission  device_file_name          char_dev   major# minor#
mknod --mode=666     /dev/mailbox7                   c      166       7
rmmod command invokes
mailbox_cleanup that unloads your device driver
code from the kernel and unregisters the drivers from the mailbox
devices by calling cdev_del.
rmmod should not succeeded unless all
mailbox devices are closed.
printk("Device %d:%d\n",inode->i_rdev >> 8, inode->i_rdev & 0xff);
User-level test program
Use the system calls open, close, read, write, ioctl, for interacting with
your /dev/mailboxi files. Don't use fopen, etc.
Tips for getting started
write to a mailbox; the
write may overwrite bytes not yet read by the reader process.
Useful Documentation Links
Hand in
Create a single tar file with the following and submit it using cs45handin:
Demo
After submitting your lab, you and your partner will sign-up for a
30 minute demo slot. You should demonstrate that your device driver
is correct and robust. I will definitely want to see how you handle
reader and writer blocking. You will want to run a version with
debugging output that prints out the state of your mailbox devices after open,
close, read and write operations so that you can more easily demonstrate that
your code works.