S3P Lab5: Simulating Robots
- Practice pair programming
- Learn how to control a simulated robot
Real, physical robots are difficult to deal with. They have a limited battery life, and can become easily damaged. When researchers want to experiment with robots, they often start the process by working in simulation. Using a simulator allows you to easily test out ideas. Once a working prototype has been created through simulation, then the experiment can be ported to a physical robot. Because our time is limited, we will focus solely on simulation. We will be using a simulator called Jyro, which was built specifically to run in Jupyter Notebooks.
Open a new terminal window and type the following to begin:
cd s3p
source /usr/swat/bin/s3penv
jupyter notebook
Create a new Python3 notebook and name it RobotTest.
The first step to using simulated robots is to import the Jyro simulator. We will also need to use the quantity pi, so let's import that as well. In the first cell of the notebook type the following to import the simulator:
  from jyro.simulator import *
  from math import pi
In order to use the simulator, you need to define a world and a robot to act in that world.
First we will define a very simple world that is enclosed in a 4x4 box (the origin is at the bottom left corner). It contains some colored boxes and a light source. Copy and paste the following code into the next cell of your notebook.
def make_world(physics):
    # first create the bounding box, then the inner colored boxes
    physics.addBox(0, 0, 4, 4, fill="backgroundgreen", wallcolor="gray")
    physics.addBox(0, 0, 0.5, 0.5, fill="blue", wallcolor="blue")
    physics.addBox(0, 3.5, 0.5, 4, fill="red", wallcolor="red")
    physics.addBox(3.5, 3.5, 4, 4, fill="orange", wallcolor="orange")
    physics.addBox(3.5, 0, 4, 0.5, fill="purple", wallcolor="purple")
    physics.addLight(2, 3.5, 1.0) #paramters are x, y, brightness
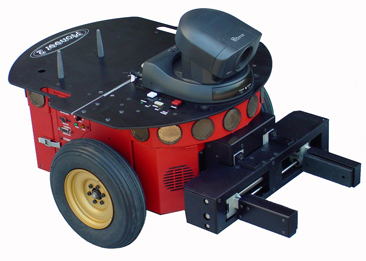
Next we will define a robot. Our simulated robot will be based on an actual real-world robot called a Pioneer (pictured below). It has 16 sonar sensors encircling its base. These are used to estimate the distance to surrounding obstacles. It has a camera to capture images of the world. It can also be equipped with a simple gripper mechanism on its front to pick up small objects.
Copy and paste the following code into the next cell of your notebook. It will define a simulated Pioneer robot with a camera, sonars, and light sensors.
def make_robot():
    #paremeters are name, x, y, heading (in radians)
    robot = Pioneer("Pioneer", 2, 1, 0)
    robot.addDevice(Camera())
    robot.addDevice(Pioneer16Sonars())
    #parameter defines max range of light sensor in meters
    light_sensors = PioneerFrontLightSensors(3)
    robot.addDevice(light_sensors)
    return robot
Now that we have defined functions to make a world and to make a robot, we have to call them. Copy and paste the following code into the next cell of your notebook. This should bring up a visual simulator as shown below.
robot = make_robot()
vsim = VSimulator(robot, make_world)
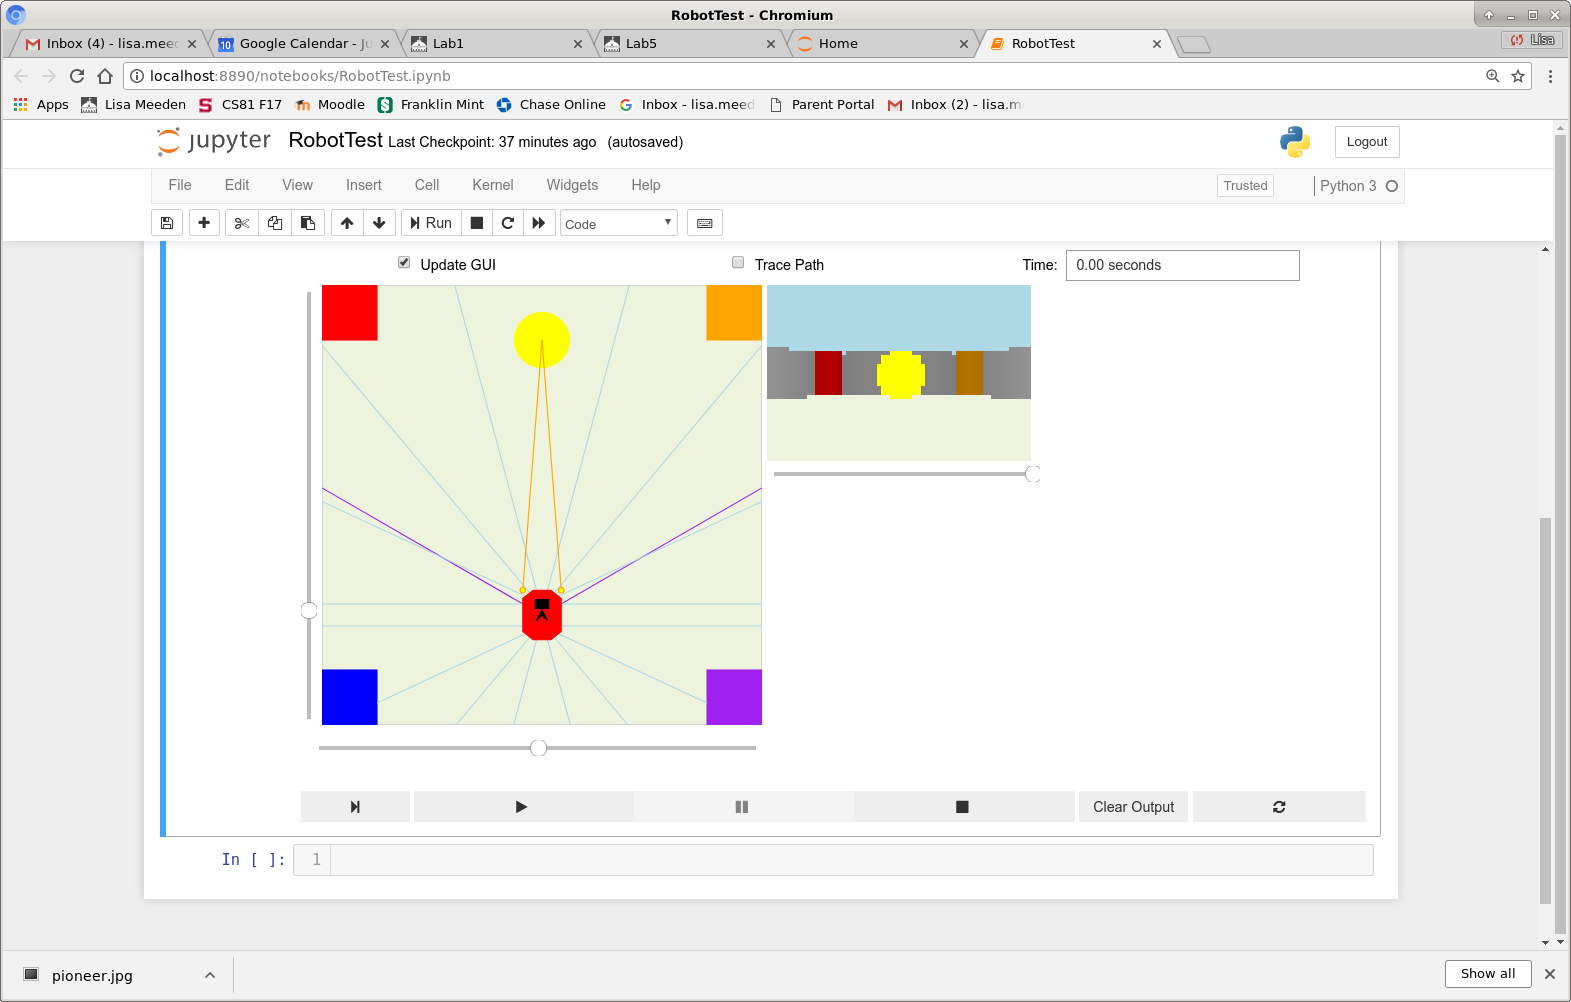
The simulator provides a top-down view of the world and robot, along with an image from the robot's camera. Try using the sliders to manipulate the robot's x, y location. Notice that the camera image changes based on the robot's new location. Press the play button (the small triangle) so that when we move the robot in subsequent cells, it's location will be updated.
You can get the robot's current (x, y, heading) by use the getPose() method.
robot.getPose()The robot's heading is in radians. Headings for robots in Jyro are in the range [0, 2*pi], where:
- north is 0
- west is 0.5*pi
- south is pi
- east is 1.5*pi
You can place the robot in a particular position using the robot.setPose(x, y, heading) method. Try setting the in new x, y positions with different headings.
Light Sensors
The robot is equipped with two light sensors positioned on the front of the robot. These are depicted as small yellow circles on the left and right front of the robot. When a light sensor has a clear view of a light source, an orange line will emanate from the sensor to the source. When a light sensor is blocked, a purple line is drawn between the light source and the obstacle. These sensors return values in the range [0.0, 1.0], where 1.0 indicates a maximum light reading and 0.0 indicates no light sensed. Use the simulator's sliders to move the robot to different locations in the world and observe how the light sensor data changes when you get the sensor readings using the code below.
robot["light"].getData()
Sonar Sensors
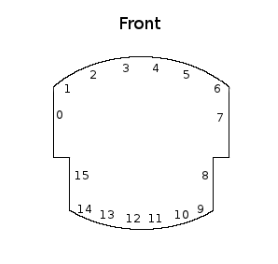
The robot is equipped with 16 sonar sensors positioned around its perimeter (numbered as shown below). These sensors return values in the range [0.0, maxRange], where maxRange depends on the size of the world. Each sonar measures the distance to an obstacle. Small values, close to 0.0, indicate that an obstacle is very near. Larger values indicate that there is open space at that angle relative to the robot. The blue lines emanating from the robot in the simulator represent its sonar sensors. Observe how these sonar readings vary, using the code given below, as you move the robot around in the world.
robot["sonar"].getData()
Camera Sensor
The robot is equipped with a camera that is positioned on the front of the robot and is depected as a black rectangle on the simulated robot. The purple lines emanating from the robot show the camera's viewing range. The camera grabs images that are 60 x 40 pixels. The camera image is automatically displayed by the visual simulator, but you can also use the command given below to grab an image.
robot["camera"].getImage()
You control the robot's movement by telling it how fast to translate (either forward or backwards) and how fast to rotate (either right or left). The translation amount ranges from [-1.0, 1.0], where -1.0 indicates full backwards, and 1.0 indicates full forwards. The rotation amount ranges from [-1.0, 1.0], where -1.0 indicates full right rotation, and 1.0 indicates full left rotation.
Insert a cell just below the visual simulator in your notebook. In that cell try several different movement commands (such as those shown below), one at a time. Remember to re-execute the cell using Shift-Enter each time you change the move command. The simulator will repeatedly execute the last move command given to the robot. You can press the Stop button (small square) on the simulator and the robot will halt and return to the starting location. Make sure the Play button is pressed (triangle) to see the robot move.
robot.move(-1, 0)    # straight back
robot.move(1, 0)     # straight forward
robot.move(0.3, 0.3) # slow forward, left arc
robot.move(0, -1.0)  # turning right in place
Stall Sensor
Every Jyro robot is automatically equipped with a stall sensor; you don't need to explicitly add this sensor when you define a robot. The stall sensor returns a 1.0 when the robot is trying to move, but it can't, otherwise it returns 0.0. Try to get the robot stuck by moving it toward a wall. Then test that the stall sensor returns 1 using the following code to look at the current stall sensor value:
robot.stall
You can create a robot brain by defining a function that takes the robot as a parameter, checks the current sensor readings, and executes a movement. The brain will be repeatedly called by the simulator to create continuous behavior. For example, suppose we wanted to create a brain that would simply wander around and avoid hitting any obstacle.
def avoidBrain(robot):
    sonars = robot["sonar"].getData()
    front = min(sonars[1:7])  # look at only the front sonars
    if front < 0.5:           # check for an obstacle
        robot.move(0.0, -1.0) # stop and turn right
    else:
        robot.move(1.0, 0)    # otherwise go straight

robot.brain = avoidBrain
When you press the Play button on the simulator, this brain will execute. When you press the Stop button, the brain will stop and the robot will return to the starting point.
Modify this brain so that it works differently. For example, you could avoid obstacles sooner, or you could turn left instead of right, or you could you choose which direction to turn based on which side of the robot is closer to the obstacle. After each change remember to execute the cell and then press the Play button to test the brain.
Once you are done exploring Jyro save your notebook.