CS81 Lab2: Building a simulator

As you saw in the last lab, working with physical robots in the real world is challenging. There are many issues that you must deal with such as maintaining battery power and handling the variability of sensors. In order to explore adaptive robots, we will run experiments that last much longer than the battery life of a robot and we want to avoid damaging the robot as it explores how it is capable of moving in the world. Therefore it is common practice in the field to explore adaptive control mechanisms for robots in simulation first, and then, once they prove successful, port them to physical robots.
In this lab we will create our own basic simulator from scratch. A key feature of our simulator is that it will allow us to run it with the graphics turned off, significantly speeding up the computation time. Constructing it in this way will make it a bit more difficult to implement, but will be extremely useful when we run evolution experiments later.
Go through the following steps to setup your directory for this lab.
- First you need to run
setup81to create a git repository for the lab.If you want to work alone do:
setup81 labs/02 none
If you want to work with a partner, then one of you needs to run the following while the other one waits until it finishes.setup81 labs/02 partnerUsername
Once the script finishes, the other partner should run it on their account. - For the next step only one partner should copy over the
starting point code.
cd ~/cs81/labs/02
cp -r ~meeden/public/cs81/labs/02/* ./
This will copy over two files called testGraphics.py and simulator.py. - Whether you are working alone or with a partner, you should now add
all of the files to your git repo, commit, and push them as shown below.
git add *
git commit -m "lab2 start"
git push
- If you are working with a partner, your partner can now pull the
changes in.
cd ~/cs81/labs/02
git pull
We will write our simulator in Python using the Zelle graphics library, which was introduced in cs21. If you didn't take cs21 or need to refresh your memory, take a few minutes to explore this graphics library. Open the file testGraphics.py, look over the code, and then execute it. Try adding another circle of a different size and color to the program. Next try adding a line. Once you understand the basics of the graphics library you can move on to building the simulator.
Open the file simulator.py; you'll notice that I have provided you with starting point code for several classes. I have stubbed in some methods for you, which you should implement. Feel free to include additional helper methods as needed. A short description of each class is provided below along with a summary of the class variables you will need.
- World: A world is defined as a box of a given width and height in which agents can interact. A world maintains a list of the agents that exist within it. On every time step, a world will ask each agent's brain to execute one action. When graphics are turned on, a world will be viewable as a GraphWin object, and the agents will be viewable as Circle objects within it. Also when graphics are turned on, a world uses a delay variable to set the amount of time to sleep between steps, allowing the agents' movements to be visible.
- Agent: An agent exists in a particular world, has a unique name stored as a string, and maintains it's current location (x, y) and heading. Headings are in degrees, where 0=East, 90=South, 180=West, and -90=North, and must be in the range [-180, 180]. Agents move when given a translation and rotation amount, each of which must be in the range [-1.0, 1.0]. A positive translation amount will move the agent forward, whereas a negative amount will move it backward. A positive rotation amount will turn the agent right, whereas a negative amount will turn the agent left. An agent's size, translation speed, and rotation speed are additional parameters. An agent can sense when it is stalled, and can detect the distance to a wall ahead.
- VisibleAgent: A visible agent is associated with a given agent object and has a particular color. It is depicted as a Circle object (positioned at the agent's current x, y location), containing a smaller Circle object as its "eye" (positioned at the agent's current heading).
- Brain: A brain is associated with a particular agent and must have a selectAction method that returns a translation and rotation command. Some simple example brains have been provided.
| Class varaible | Type | Description |
| name | string | name of the world |
| width | integer | maximum x dimension |
| height | integer | maximum y dimension |
| window | GraphWin object | None or visible window depicting world |
| agents | list | Agent objects contained in the world |
| delay | float | seconds to sleep between time steps of visible world |
| Class varaible | Type | Description |
| world | World object | world in which the agent is located |
| name | string | unique name for the agent |
| x | float | x coordinate of agent's position in world |
| y | float | y coordinate of agent's position in world |
| heading | float | degree of agent's heading in world |
| radius | float | determines size of agent's body |
| tSpeed | int | maximum number of pixels agent can translate in one step |
| rSpeed | int | maximum number of degrees agent can rotate in one step |
| stall | int | 1 when robot is contacting a wall, 0 otherwise |
| brain | Brain object | brain that controls agent's actions |
| visibleBody | VisibleAgent object | None or visible version of the agent |
| Class varaible | Type | Description |
| agent | Agent object | associated agent |
| color | string | agent's visible color when drawn |
| torso | Circle object | body of visible agent |
| eye | Circle object | eye of visible agent |
| Class varaible | Type | Description |
| agent | Agent object | associated agent |
You should develop your code incrementally. Start by ignoring the graphical aspects of the simulator. Instead focus on getting the internal mechanisms functioning correctly.
Begin by implementing the constructor of the World class, but leave the other methods for later. Even though the World class is not complete, create a main program to test that your constructor works correctly and that you can print a world's width and height.
Next, work on the Agent class, starting with its constructor and then focusing on the methods that move the robot in the world (update, translate, rotate). Check out the section about geometry to help you implement translate. Also implement the getStatus method to get a summary of an agent's x, y, and heading. Update your main program to test that your movement commands are updating the robot's location and heading correctly. Don't worry about keeping your robot in the world or calculating sensor values yet.
Then, work on the VisibleAgent class and go back and finish the World class. Seeing a graphical representation of your robot will make it easier to debug.
Go back and complete the rest of the Agent class, including the checkStall and computeDistanceToWall methods.
Once your simulator is fully implemented build some additional brains. Create a brain that causes the agent to move in a spiral motion. Create a brain that uses the distance to a wall, rather than stall, to avoid walls.
Enhancements: If you'd like (this is not required), implement aditional functionality into your simulator. Currently, the simulator does not detect when two agents are in contact, allowing agents to pass through each other. Add the ability to detect collisions between agents, having the stall sensor be triggered.
In order to simulate robots we'll need to review some geometry. In the picture shown below, the agent is positioned at location (100, 120) with a heading of -45. A ray has been drawn from the center of the agent's body at the angle of the its current heading.
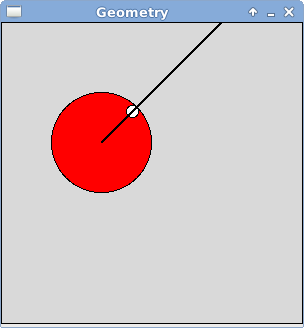
The unit vector v for this ray can be computed as:
v = ( cos(radians(heading)), sin(radians(heading)) )We can use this unit vector to solve key aspects of our simulation:
- To implement the translate method of
the Agent
dx = amt * cos(radians(heading))
dy = amt * sin(radians(heading))
x = x + dx
y = y + dy
- To find the initial position of the eye on the VisibleAgent
In the constructor of the VisibleAgent, create the eye at the center point of the agent. Then move the eye a distance equal to the body radius minus the eye radius along the unit vector:
amt = bodyRadius - eyeRadius
dx = amt * cos(radians(heading))
dy = amt * sin(radians(heading))
move the eye dx, dy
- In the rotate method of the VisibleAgent
angle = amount to rotate
dx = difference in the x coordinates of the eye and the body
dy = difference in the y coordinates of the eye and the body
mx = dx * (cos(radians(angle))-1) - dy * sin(radians(angle))
my = dx * sin(radians(angle)) + dy * (cos(radians(angle))-1)
move the eye mx, my
- In the computeDistanceToWall method of the Agent
Conceptually we need to walk along the ray (shown in the picture above), for an unknown time t until we contact a wall. Once we find the point of contact, then we can calculate the distance from our current location. Because our world is an open box, the only walls the agent can encounter are the boundaries of the world, to the east, south, west, and north. Depending on the agent's heading we will need to check two of these directions and return the minimum distance found.
if heading is between -90 and 0
   return min(checkNorth, checkEast)
if heading is between 0 and 90
   return min(checkEast, checkSouth)
if heading is between 90 and 180
   return min(checkSouth, checkWest)
if heading is between -180 and -90
   return min(checkWest, checkNorth)
Write four helper methods to check the four directions using the pseudocode given below and assuming the following:
- (x0, y0) is the agent's current location
- (vx, vy) is the unit vector, as calculated above
- (cx, cy) is the point of contact we are trying to find
- distance((x0, y0), (cx, cy)) - agentRadius is the distance to the wall
checkEast (we know cx is width)
   if vx == 0: return maxint
   t = (width - x0)/vx
   cy = y0 + (vy * t)
   pointOfContact is (width, cy)
   return distance to wall

checkSouth (we know cy is height)
   if vy == 0: return maxint
   t = (height - y0)/vy
   cx = x0 + (vx * t)
   pointOfContact is (cx, height)
   return distance to wall

checkWest (we know cx is 0)
   if vx == 0: return maxint
   t = (0 - x0)/vx
   cy = y0 + (vy * t)
   pointOfContact is (0, cy)
   return distance to wall

checkNorth (we know cy is 0)
   if vy == 0: return maxint
   t = (0 - y0)/vy
   cx = x0 + (vx * t)
   pointOfContact is (cx, 0)
   return distance to wall
When you are completely done, be sure that you have pushed all of your changes to the repo. Use the git status command to verify this. If there are uncommitted changes, be sure to do another add, commit, and push cycle.