Lab 10: Cell and Grid Classes for 2D Simulations
Run update21b which will create the cs21b/labs/10
directory. Move down to this directory and edit the file
grid.py to implement your solution. You will be defining two
new classes within this file.
For this assignment, you will write two classes, called Cell and Grid, that are designed to be used by programs that implement time-step simulations of some phenomena on a simplified two-dimensional world. Examples of such simulations include modeling heat dissipation over a sheet of metal, an insect infestation on a crop of wheat, or climate modeling. In these type of simulations, the world is broken up into a grid of cells, where each cell summarizes the information for its small part of the world. At each discrete time step, a cell's value changes based on some function that involves its neighboring cells' values. So for example, in the insect model, if one cell is infested, it is likely that in a few time steps it's neighboring cells will also become infested.
In the next lab assignment, you will use the Cell
and Grid classes to implement a 2D simulation program.
In this lab, you will use the graphics library to draw the
world represented by a Grid object that contains a list of
lists of Cell objects. For our implementation a
Cell can have one of two values (True or False) and you will
color cells differently based on their current value. Once you have
the Cell and Grid classes implemented you will write
a program that uses mouse clicks to draw a pixelated picture within a
grid.
Create this class in the grid.py file. The Cell class represents 1 square unit in a 2D grid in the Graphics window. A Cell contains the following data:
- x and y position in the 2D grid
- current value (True or False)
- value for the next time step (True or False)
- Rectangle object representing the cell in the graphics window
A Cell has the following methods:
- __init__: the constructor takes as parameters the location of the cell as x, y, and an initial value. It creates a new Rectangle object with the lower left corner at point (x, y) and the upper right corner at point (x+1, y+1). It should also fill the rectangle with the appropriate color based on its initial value.
- getX: returns value of x.
- getY: returns the value of y.
- getValue: returns the current value stored at the cell.
- getRectangle: returns the rectangle repesenting the cell.
- setNextValue: set the cell's next value to a new value passed in as a parameter.
- setColor: if the cell's current value is True, then it fills the cell's rectangle with one color, otherwise it fills it with another color.
- update: changes a cell's value to its next value and updates its color.
Once you have written your Cell class, test it with the following main program:
def main():
    w = GraphWin("Cells", 500, 500)
    w.setCoords(0, 0, 5, 5)
    c1 = Cell(0, 0, True)
    c1.getRectangle().draw(w)
    c2 = Cell(0, 4, True)
    c2.getRectangle().draw(w)
    c3 = Cell(2, 2, False)
    c3.getRectangle().draw(w)
    w.getMouse()
    w.close()
This program creates a graphics window and then resets the
coordinates of the window so that the lower left corner is (0,0) and
the upper right corner is at (5, 5). By doing this, we have modified
the scale of what will be drawn. A rectangle that is 1 unit wide will
take up a fifth of the graphics window.
This program should draw three cells, two are that "on" (they store
True) and one that is "off" (it stores False). The two "on" cells
will be at the lower left and upper left corners of the window. The
one "off" cell will be at the center of the window.
Create this class in the same file, grid.py. The Grid class is used to represent the 2D simulated world. It contains the following data:
- the width and height of the grid (which is not the same as the width and the height of the graphics window)
- a GraphWin object
- a list of lists of Cell objects
The outer list will be indexed by x. The inner lists will be indexed by y. To construct this list, start with an empty list, create an inner list for each column of the grid, and append them on to the outer list. For example in a 3 by 3 grid the first inner list should contain cells for (0,0), (0,1), and (0,2). The next inner list should contain cells for (1,0), (1,1), and (1,2). And so on.
The Grid has the following methods:
- __init__: the constructor takes the width and height of the grid as parameters. It first makes a graphics window of a size 500 by 500. Next, it uses the setCoords method of GraphWin to make a grid of size width by height within the window. It also creates a list of lists of Cell objects and draws each one in the graphics window. You can use the cell's getRectangle method to get the Rectangle object associated with the cell so that you can invoke its draw method, as was done in the testing program above.
- getWidth: returns the width of the grid.
- getHeight: returns the height of the grid.
- getWindow: returns the graphics window in which the grid is drawn.
- getValue: takes x and y as parameters and returns the value of the cell at (x, y).
- setNextValue: takes x, y, and a new value as parameters and sets the next value of the cell at (x, y) .
- update: simulates a time step by updating every cell in the grid to its next value.
- clear: sets the next value of every cell in the grid to False and then updates the grid.
- toggle: The user will click somewhere in the grid to indicate which cell they would like to toggle. You will send the point generated by their mouse click as a parameter to this method. This should cause the cell's value and color to change. For example, if the user clicked a point (2.3, 1.7), you would want to modify the cell at location (2,1) in the grid.
Modify the main in your grid.py file so that it will:
- Create a Grid object.
- Use a for loop to draw a line in the graphics window using the setNextValue method to designate the next values of appropriate cells to True
- Use the grid's update method to change the values and the colors of the cells.
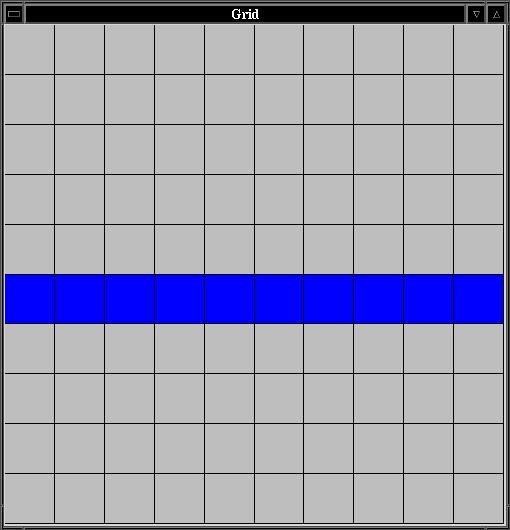
For example, here is a 10 by 10 grid with a horizontal line:
Once you are convinced that your classes are working correctly you
can move on to the next step.
Now we'd like to test the Grid and Cell classes by allowing the user of our program to draw a picture on the grid by clicking on cells to change their colors. We need a way for the user to be able to indicate that they are done with their picture. We can't use a mouse click because we will be using mouse clicks for drawing. It would be nice, for example, if they could press the 'q' key on the keyboard to signal that they are ready to quit.
Recall that their are two ways to get mouse clicks from within a graphics window:
- window.getMouse() suspends the program and waits until the mouse is clicked returning the point clicked.
- window.checkMouse() continues executing the program and returns a point whenever the mouse is clicked, otherwise it returns None.
- window.getKey() suspends the program and waits until a key is pressed, returns a string representing the key.
- window.checkKey() continues executing the program and returns a string representing the key whenever a key is pressed, otherwise returns None.
Create a little test program called testKeys.py, as shown below, to try out using the checkKey() method:
from graphics import *

def main():
    w = GraphWin("Testing key presses", 500, 500)
    intro = Text(Point(250,250), "Press any key, or q to quit")
    intro.draw(w)
    result = Text(Point(250,275), "")
    result.draw(w)
    while True:
        key = w.checkKey()
        if key != None:
            result.setText("you pressed %s" % key)
        if key == 'q':
            break
    w.close()

main()
Once you understand how this works, you can move on to incorporating
the use of the checkKey() method into your final main
program.
The final version of your main program should use a while loop to continually:
- Check if the 'q' key has been pressed. When pressed, this indicates that the user is ready to quit the program.
- Check if the mouse has been clicked in the grid. When clicked, this indicates that you should toggle the appropriate cell.
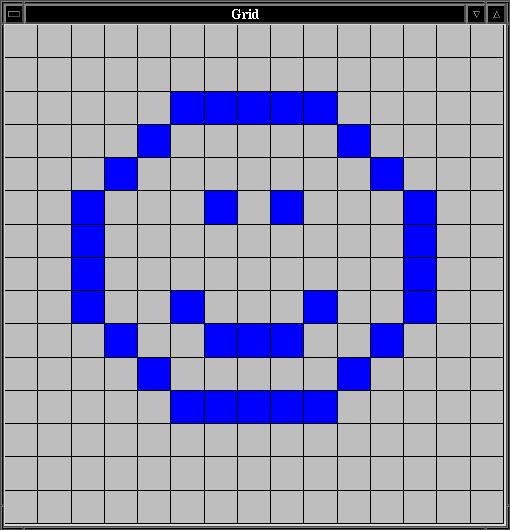
For example here is a 15 by 15 grid that was drawn on with mouse clicks:
Once you are satisfied with your program, hand it in by typing handin21b in a terminal window.