CS21B Lab5: Evolving Faces
You will use the program you created last week as a starting point for this week's lab. Recall that we represented a genotype as a list of integers defining the size, location, and color of facial features. Then we used the graphics library to map each genotype into a phenotype, which was represented as a list of circle and oval objects.
The process of evolution will begin with a population of random face genotypes. Each face will be scored based on a fitness measure. Only the fittest one will survive to reproduce. The fittest face will be mutated multiple times to create the next generation. This process will be repeated for a number of generations.
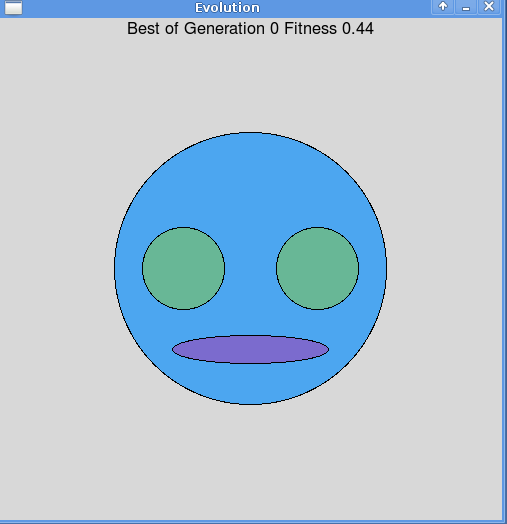
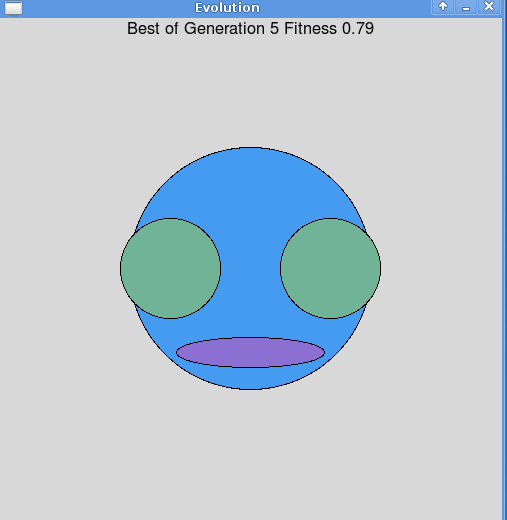
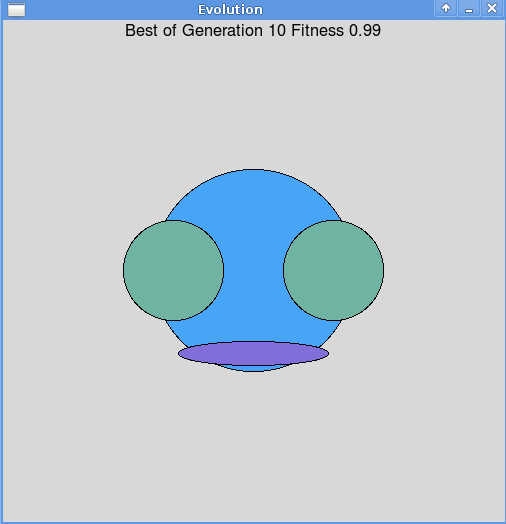
For example, these faces resulted when the fitness function was based on maximizing the eye size and eye offset from the center of the face, while also minimizing the size of the head.
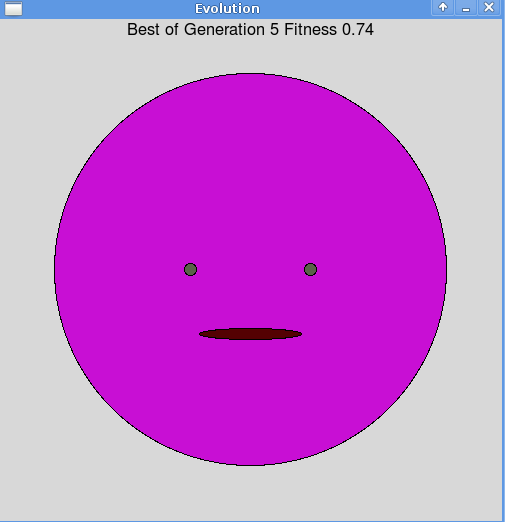
However, using another fitness function leads to a very different result. These faces resulted when the fitness function was based on minimizing the eye and mouth size, while also maximizing the size of the head.


We will represent a population as a list of genotypes, and each genotype is a list of integers. Before getting started here is a quick reminder on how you can use lists in python.
To do some operation on each item in a list named ls:
for i in range(len(ls)):
    # perform operation on ls[i]
To accumulate a list named ls of size n:
ls = []
for i in range(n):
    ls.append( itemToAdd )
A skeleton version of the program evolveFaces.py will appear in your cs21b/lab/05/ directory when you run update21b in a terminal window. The program handin21b will only submit files in this directory.
Change directories to get to the current lab directory:
cd cs21b/labs/05
Copy last week's lab into this directory so that you can easily cut and paste code from your faceMaker.py file into your evolveFaces.py file.
cp ../04/faceMaker.py .
Edit the file evolveFaces.py. Notice that at the top it
contains the start of the definitions of the functions that you will
need to write. At the bottom it also contains some functions that
have already been written. You will construct your final solution by
combining both the functions that you write with the functions that
have already been written.
Write the function createGenotype() that generates and returns a random genotype based on the limits given in the lists low and high. You should be able to take code from last week's lab to accomplish this.
In the main function, create several sample genotypes
using your createGenotype function and print them so that you
can verify that they are the correct length and hold appropriate
values.
Write the function createPhenotype(genotype, center) that takes a genotype, which is a list of integers, and a center point. It creates the graphical objects that correspond to the given genotype (the head, eyes, and mouth) and whose locations are based on the given center point. It returns a list of the graphical objects. You should be able to take code from last week's lab and adjust it to accomplish this. Last week we assumed that the face would always be located at position (250,250). For this function, you will locate the face at the center point given as a parameter.
We have to write the next function in order to test this one.
Write the function drawFace(phenotype, window) that takes a phenotype and a graphical window as input and draws each feature of the phenotype in the window. You should have code from last week's lab to accomplish this. Do not include a call to getMouse here, since this will be used by other functions later.
Also write the function undrawFace(phenotype) that takes a phenotype as input and undraws each feature. Again, you should have code from last week's lab to accomplish this.
Using these functions you can test the createPhenotype function. In the main program do the following:
- Create a graphical window of size 500 by 500 called Evolution.
- Using the function createGenotype, make a genotype and save it in variable.
- Using the function createPhenotype, make a phenotype based on the genotype at Point(250, 250) and save it in a variable.
- Using the function drawFace, draw the phenotype in the graphics window.
- Wait for a mouse click.
- Using the function undrawFace, undraw the phenotype.
You have now re-implemented and modularized all of last week's lab
as functions. Notice how much shorter and clearer the main
program of evolveFaces.py is when compared to the
main program of faceMaker.py.
Write the function fitness(genotype) that takes a genotype and returns a float score between 0.0 and 1.0 representing its fitness, where higher scores equate with better fitness.
Suppose our creatures (which just have faces) live in a dark and narrow environment. We might suppose that they would evolve large, wide eyes and small heads. Under these conditions, the maximum possible fitness would be based on the formula:
maxScore = maxEyeRadius * maxEyeOffset * (maxHeadRadius - minHeadRadius)Thus, a particular genotype's fitness would be based on the formula:
fitness = (eyeRadius * eyeOffset * (maxHeadRadius - headRadius))/float(maxScore)
Recall that eye size and offset are defined by positions 4 and 5 of the genotype. Head size is defined by position 0 of the genotype. The maximum and minimum values allowed are defined by the lists low and high. Re-write the above formulas to calculate the fitness of the given genotype using the appropriate variables.
To test this function, print the fitness of the genotype you create
in the main program. Try this several times. Faces with
larger, wider set eyes, and smaller heads should result in higher
fitness scores.
Write the function mutate(genotype) that takes a genotype as input and returns a mutated copy of that genotype. Recall that to make a copy of a list named ls you would do ls[:].
For each position in the copied genotype, add a random integer between -5 and +5 to the integer stored at that position. You'll need to check that the resulting values remain within the limits defined by the lists low and high. If a value in the mutated genotype goes above the high limit, then set it equal to the high limit. Similarly, if a value in the mutated genotype goes below the low limit, then set it equal to the low limit.
To test this function, add the following to the end of your current main program:
- Using the function mutate, make a mutation of the genotype that you created previously, and save it in a variable.
- Using the function createPhenotype, make the phenotype for the mutated genotype centered at Point(250,250), and save it in a variable.
- Using the function drawFace, draw the phenotype of the mutation in the graphics window.
- Wait for a mouse click.
You should see that the mutated face looks very similar to the
original face, but with slight modifications to the size and color of
various features.
At the bottom of the file evolvingFaces.py is a collection of functions that implement the evolutionary process. These include:
- initializePopulation
- findFittest
- drawFittest
- nextGeneration
You now have all of the building blocks you need to create your program for evolving faces. It is time to put it all together in the main program (you can comment out your previous test code). Use the following pseudocode as your guide. You can read about Text objects at Notes on the graphics library.
print an introduction about your program
ask the user to input the desired population size and number of generations
create a graphics window that is 500 by 500 called Evolution
create and draw a Text object centered at the top of the window for displaying messages
create an initial population and store it in a variable called pop
loop for the desired number of generations
   find the fittest genotype of the population
   draw the fittest genotype
   create the next generation and store it in the pop variable
Remember to continue to incrementally test your program. Implement
a little bit of this pseudocode at a time.
Once you are satisfied with your program, hand it in by typing handin21b in a terminal window.