CS 43 Lab 7: Building a Router
Due: Sunday, December 17, Noon
Handy references:
- This fancy flowchart (open/libre office format). Also available as a PDF.
- Network Sorcery protocol details.
- The IP header format
- The ARP header format
- The ICMP header format
- This assignment is a modified version of this one. That version has some additional information, but note that the template code it provides is not compatible with our mininet version.
- mininet documentation
Lab Audio
For this lab, you will implement a fully functional Internet router that routes real network traffic. The goal is to give you hands-on experience as to how a router really works. Your router will receive raw Ethernet frames. It will process the packets just like a real router, then forward them to the correct outgoing interface. Your job is to create the forwarding logic so packets go to the correct interface.
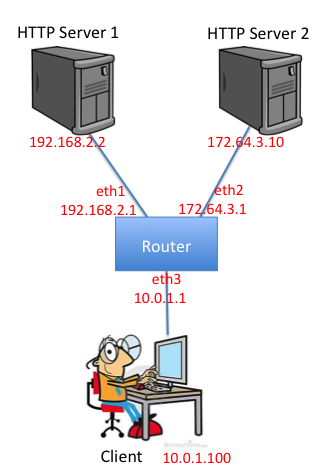
Your router will route real packets from a emulated host (client) to two emulated application servers (HTTP servers 1 and 2) sitting behind your router, each on a different network. The application servers are each running an HTTP server. When you have finished the forwarding path of your router, you should be able to access these servers using regular client software. Additionally, you should be able to ping and traceroute to and through a functioning Internet router. The emulated topology is depicted below:
Requirements
You will be responsible for implementing important elements of several subsystems within the router. The majority of the code which makes the router work, including the routing tables, is provided for you. The functionality should be the same as the provided sr_solution. All code must be added to sr_router.c and sr_router.h. You are responsible for implementing (not necessarily in this order!):
- sr_handlepacket(): parse the provided ethernet frame, verify that it is valid and to this interface, and call handle_ip() or handle_arp() as needed.
- handle_arp(): handle incoming ARP requests by sending a reply if necessary.
- handle_ip(): verify the validity of the IP header, handle packets destined for the router (only ICMP Ping must be handled, all data packets should receive an error response), and forward/drop packets NOT addressed to this router as appropriate.
- rtable_find_route(): find the best route in the routing table, and return a pointer to that element in the linked list of routing table entries.
- router_queue_ethernet_frame(): craft an outgoing ethernet packet based on the given payload, source, and destination, and send it out via sr_send_packet.
- ip_send_packet_from(): allocate a new IP packet, set its headers and payload correctly, and call router_send_ethernet_frame to send it along.
- icmp_send(): allocate, fill, and send a new ICMP packet using network_send_packet or network_send_packet_from. If the src ip is null, you can use network_send_packet to set the src ip based on the routing decision for the destination.
- handle_arpreq(): for packets waiting on an arp request, first check whether they've been waiting so long as to timeout. If so, send an icmp host unreachable packet to the source(es), and clear the request from the arp cache; if not, send a new arp request and update the valid time and send times.
- Pinging from the client to any of the router's interfaces (192.168.2.1, 172.64.3.1, 10.0.1.1).
- Tracerouting from the client to any of the router's interfaces.
- Pinging from the client to both of the HTTP servers (192.168.2.2, 172.64.3.10).
- Tracerouting from the client to both of the HTTP servers.
- Downloading a file using HTTP from both of the servers.
You may make the following simplifying assumptions:
- You don't need to worry about IP options, they won't be used.
- You don't need to worry about IP fragmentation.
- You only need to handle IPv4 (no IPv6).
- When it comes to packets addressed to your router, you only need to handle ICMP Ping messages. For anything else, you may reply with an 'ICMP Protocol Unreachable' message.
- For ARP, all packets will be for the Ethernet hardware type and IP protocol type, and you don't need to handle anything other than ARP requests and ARP replies.
Environment
For this lab, we'll be using mininet again, only this time, our topology will be a bit more complex than before. To set up a mininet virtual machine, refer to the environment section of lab 5. Rather than running mn directly, this time we'll use some scripts to make launching it easier.
ssh -Y localhost -p 22222 -l mininet
Before you get started, you'll need to run a script that will prepare your environment and install a few packages:
./config.sh
You should only need to run config.sh once for your VM, but it won't hurt to execute it multiple times.
From there, you can launch mininet using another script:
./run_mininet.sh
Keep the mininet terminal open and running in the foreground (don't do ctrl-z). This should also pop-up a terminal for executing commands at the client (10.0.1.100 in the image above). In a second terminal window, execute the router code. I've provided a reference implementation named 'sr_solution', which you can execute now. You will, of course, eventually want to execute your own version, which will be named 'sr' (built from the 'router' directory).:
./sr_solutionOR
./router/sr
Grading Rubric
This assignment is worth seven points.
- 1 - Router responds to ARP requests that query its own interfaces.
- 1 - Router responds to ICMP echo messages with ICMP echo replies.
- 1 - Router sends back ICMP "protocol unreachable" upon receiving any IP packets that are destined for the router that are not ICMP echo.
- 1 - The client is able to ping and traceroute through the router to either server.
- 1 - The client is able to download files from both servers via HTTP.
- 1 - Router sends ICMP "destination unreachable" messages for destinations that do not send ARP replies.
Tips
- START EARLY! The earlier you start, the sooner you can ask questions if you get stuck. Test your code in small increments. It's much easier to localize a bug when you've only changed a few lines.
- You can log the packets received and generated by your SR program by using
the "-l" parameter. The file will be in pcap format, i.e., you can use
wireshark or tcpdump to read it:
./sr -l logname.pcap
- You can also use mininet to monitor the traffic that goes in and out of the
emulated nodes, i.e., router, server1 and server2. Take server1 as an example,
to see the packets in and out of it, go to the mininet CLI:
mininet> server1 sudo tcpdump -n -i server1-eth0
or you can bring up a terminal inside server1 with:mininet> xterm server1
and then run whatever you like (e.g., wireshark) inside the newly popped-up xterm. - Within the sr framework you will be dealing directly with raw Ethernet packets. There is some code in sr_protocols.h that you may use to manipulate headers, or you may prefer to write your own or use standard system includes.
- There are also some debugging functions provided in sr_utils.c, like:
print_hdrs(uint8_t *buf, uint32_t length)
- Prints out all possible headers starting from the Ethernet header in the packet.print_addr_ip_int(uint32_t ip)
- Prints out a formatted IP address from a uint32_t. Make sure you are passing the IP address in the correct byte ordering.
- Because you have root account access on your VM, you will have the necessary permissions to run Wireshark. You may find that to be useful while debugging!
If you have any questions about the lab requirements or specification, please post on Piazza.
Submitting
Please remove any debugging output prior to submitting.
To submit your code, simply commit your changes locally using git add and git commit. Then run git push while in your lab directory.