CS21 Lab 9: Dragons, Snow, and Spikes
(Disclaimer: this lab has nothing to do with Game of Thrones)
Run update21 to create the cs21/labs/09 directory. Then cd into your cs21/labs/09 directory and create the python programs for lab 09 in this directory.
For this lab we will write a few programs that demonstrate the power of recursion. Using recursion often makes code more concise/readable, and that is the case with the programs for this lab. These programs will be short, but potent, as well as tricky to get right.
Our goal is to draw fractals in a Zelle graphic window. Fractals are geometric patterns whose component pieces are smaller versions of the original pattern. You can "zoom in" on a fractal and what you see will look like the original image. Since these graphics are made up of scaled-down versions of themselves, it is natural to draw them using recursion.
We will use "turtle graphics" to help us draw fractals. Turtle graphics were popularized through Logo, an educational programming language developed in the 1960's. The idea is that your lines are produced by a "turtle" who walks around a window, leaving a line to mark its path. At any time in the execution of a turtle graphics program, the turtle will have an (x,y) position in the window, and an orientation (0 to 360 degrees). You can instruct the turtle to go forward a certain distance or to turn a certain number of degrees. We can also tell the turtle to "jump" to a particular (x,y) location without leaving a line along its path. Even with only this simple set of instructions (turn, go forward, jump) it is possible to create intricate graphics.
We have provided a turtlegraphics.py module with a Turtle class (or object) for you to use. This link shows an example of how you could use turtle graphics from the python shell to draw a square. The turtle is represented as a green arrow that points in the direction of the turtle's current orientation. This link contains a description of all the methods avaiable to Turtle objects. In it, we also highlight the methods you are most likely to need for this lab.
Because recursion and turtle graphics still may be feeling new to you, we are going to take you through an example program, spikes.py, which produces recursive graphics using the turtlegraphics module. At the end of this section we link to the full code for this program. We recommend that you attempt the program on your own before you look at the solution, but you do not need to submit anything for this section nor will you be graded on this section. Understanding this program will help you with the next two programs, which are graded.
This video shows the program in action:
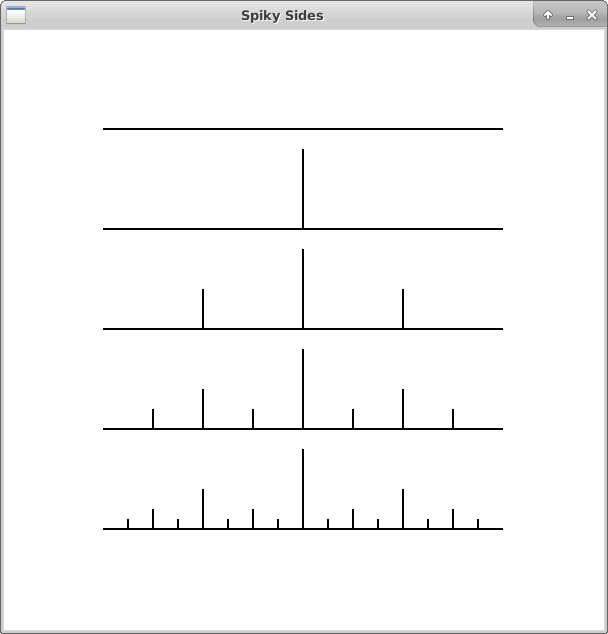
Each side of these spiky squares is a fractal that looks like the markings on a ruler. The image below shows spiky sides of varying recursion depths, from 0 at the top of the window down to 4 at the bottom. Each half of a spiky side looks like a scaled down version of the previous spiky side.
Before we try to draw the entire spiky square, let's focus on writing a recursive function that draws just one of the spiky sides. This function will have the following signature: spikes(turtle, depth, distance). The parameter turtle is a Turtle object, depth is the depth of the recursion, and distance is the distance from the point where the spiky side starts to the point where it ends.
Each half of a spiky side is itself a spiky side that covers half the distance (distance/2) and has smaller depth (depth - 1). This gives us a clue as to how we can use recursion to draw a spiky side:
def spikes(turtle, depth, distance):
    # 1. Draw a spiky side with the turtle, depth-1, and distance/2
    # 2. Turn the turtle to draw a spike, where the length of the spike is
         some fraction of the distance
    # 3. Move the turtle back to the base of the spike and reorient it for step 4:
    # 4. Draw another spiky side with the same turtle, depth-1, and distance/2
Once we have this spikes function working we can use it in main() to create a square with four spiky sides. Below is a link to our spikes.py code. Try the program for yourself before you look at our solution.
Your second program should produce a Koch snowflake, as in this video:
The Koch snowflakes seen in the video are made up of three recursive Koch curves defining the sides of an equilateral triangle. Below is an image showing six Koch curves of increasing recursion depths.
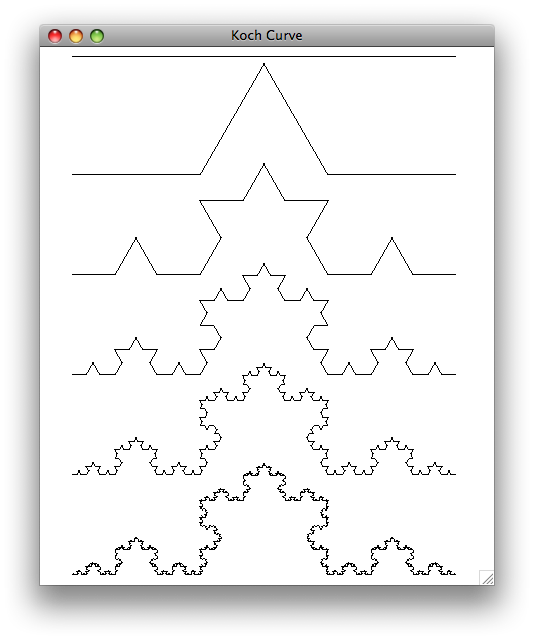
The Koch curve of depth 0 is, as with spiky sides, just a straight line. A depth 1 Koch curve is a line segment "interrupted" by two sides of an equilateral triangle. Said differently, the curve is created by starting with a line segment, breaking it into thirds, and replacing the middle third with an equilateral triangle that has no base. So in the end a depth 1 Koch curve is made up of four equal-length segments. For a depth d Koch curve, we replace each of these four segments with a scaled-down Koch curve of depth d-1.
The heart of your program should be a function with the signature koch(turtle, depth, distance). This function will be similar to the spike(turtle, depth, distance) function we saw in the warmup, except it will need to call itself four times, with the turtle rotating between the calls. Remember that all the angles in an equilateral triangle are 60 degrees.
You should get the recursion depth from raw_input and then, after validating the input, display a Koch snowflake of the specified depth. Once the program is done you should call turtle.getDistance() and print the value returned to find out how far the turtle has traveled. Notice how quickly the distance increases as the recursion depth increases. Because the distance does increase quickly, you may want to turn off the turtle animation for higher-depth fractals. You can do this with turtle.animate(False). You might also ask the user to specify whether they want to see the animation or not, as in the sample runs above. If you want to fill in the snowflake with a particular color, use the turtle.getPolygon() method to get the Zelle graphics Polygon defined by the Turtle's journey. Put your code in a file called snowflake.py.
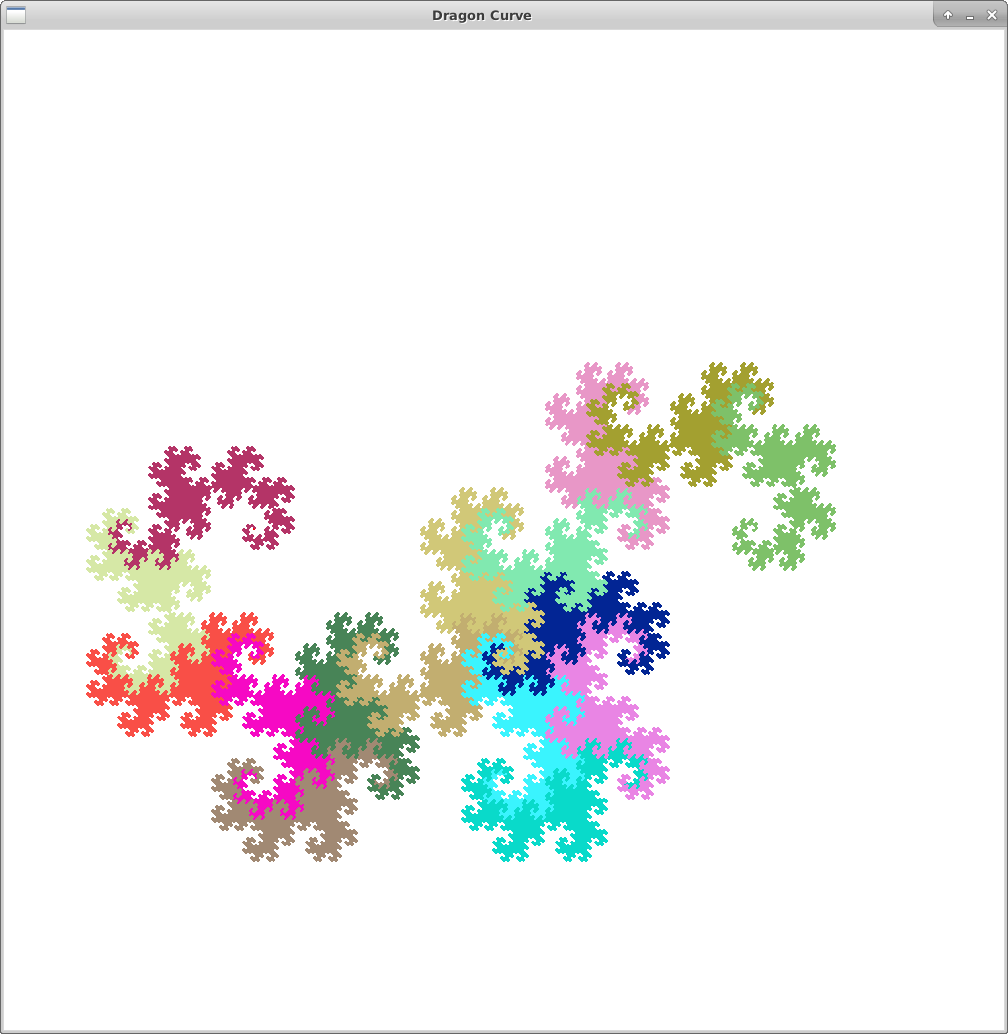
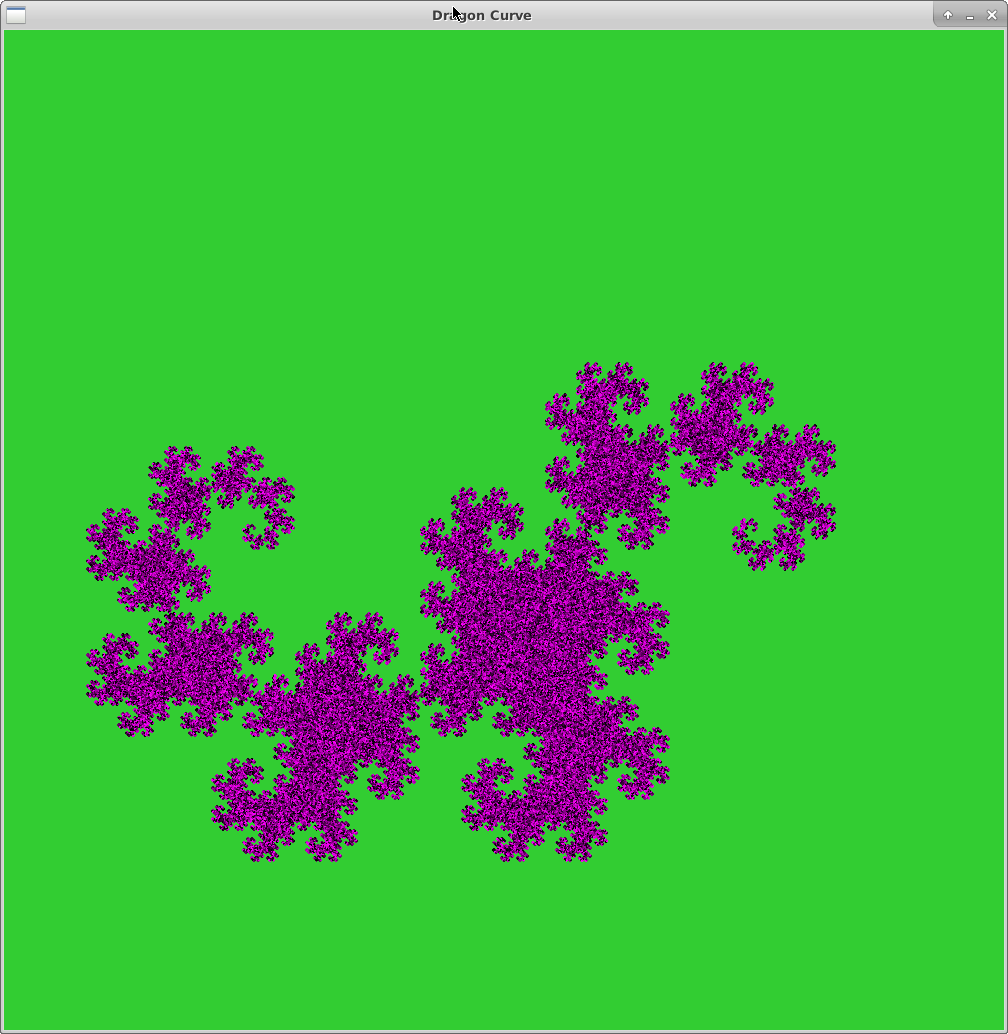
For this program, dragon.py, we would like you to create a dragon curve:
When the turtle follows the dragon curve it repeatedly moves forward by some distance, makes a 90-degree turn to the left or to the right, and then moves forward by the same distance. It turns out we can define a dragon curve by the sequence of left and right turns that our turtle has to make. Moreover, we can use recursion to generate this list of turns.
Write a recursive function turns(depth) which returns the list of "L"s and "R"s for a dragon curve of the specified depth. Here's what your function should return for the first few depths:
turns(0) -> []                # No turns, so just a straight line
turns(1) -> ["L"]             # Turn left once
turns(2) -> ["L", "L", "R"]   # Turn left, turn left, turn right
turns(3) -> ["L", "L", "R", "L", "L", "R", "R"]
turns(4) -> ["L", "L", "R", "L", "L", "R", "R", "L", "L", "L", "R", "R", "L", "R", "R"]
Each turn list is comprised of the previous turn list, plus an "L", plus the previous turn list again after it has been reversed and flipped. This suggests a way of using recursion (plus reversing, flipping, and concatenating lists) to implement turns(depth). By "reversing" we mean reversing the order of the items in the list, and by "flipping" we mean that the "L"s become "R"s and the "R"s become "L"s. For example to go from depth 2 to depth 3 we take the depth 2 turn list ["L", "L", "R"], then we reverse its order to get ["R", "L", "L"] and then we flip the lefts and rights to get ["L", "R", "R"]. So the depth 3 turn list is the depth 2 list, plus an "L", plus ["L", "R", "R"].
Once you have turns working, write another function in which the turtle uses a turn list as "directions" for how to get across the graphics window while tracing a dragon curve. So if the turtle sees an "L" it should turn 90 degrees left, and if the turtle sees an "R" it should turn 90 degrees right. In between each turn, the turtle should advance by the same distance. It's a pretty, yet convoluted, set of directions for getting from A to B.
Tips
- If you want your dragon curve to start at the left side of the screen and end at the right, as it does in the video, then you might want to do these two additional things:
- Before the turtle starts going forward or following turns, give it an initial right turn of 45*depth degrees. Do this just once at the beginning of the turtle's journey.
- If the straight-line distance between your start and end points is dist, then each segment of your dragon curve should have length dist/(sqrt(2.0)**depth). This follows from the fact that the sides of a 45-45-90 right triangle are in the ratio 1-1-sqrt(2.0). You can import sqrt form the math module.
- You can implement recursive functions like recursiveReverse and recursiveFlip to do the reversing and flipping steps, but this is not required. Note that if you do implement these functions recursively, you may reach Python's recursion limit for higher-depth dragon curves. This will result in an error. The only function that must be recursive is turns.
Extra Challenge - Adding Color
This does not affect your grade, so please only attempt it completing the rest of your lab
Use the turtle.setColor(color) method to color your dragon curves in an interesting way. Think about when you need to call this method in order to get the coloring scheme you want. Here are some examples:
This does not affect your grade, so please only attempt it completing the rest of your lab
If you're feeling inspired, create a fractal graphic of your own design using turtle graphics, regular Zelle graphics, or a combination of the two. Put your code in a file called freestyle.py. We would love to see what you come up with!
Submit snowflake.py and dragon.py by running handin21.