CS88 Lab 5: Network Security: Packet Sniffing
Lab Due Date: Tuesday, April 16th, 11:59 PM
Lab 5 Goals
-
Learn how packet sniffing and packet spoofing tools work
-
Use the socket API to spoof packets
-
Manipulate packets using the C pcap library and Scapy in Python
Overview
This lab is built on the SEED Labs for Security Education project by Prof. Wenliang Du, at Syracuse University. Images and network terminology based on Computer Networking a Top-Down Approach by Profs. Kurose and Ross.
In this lab we will inspect packets over the network, and strip away each layer and its associated header data, to see how packets are sent, received, sniffed and spoofed!
Layering and Protocols
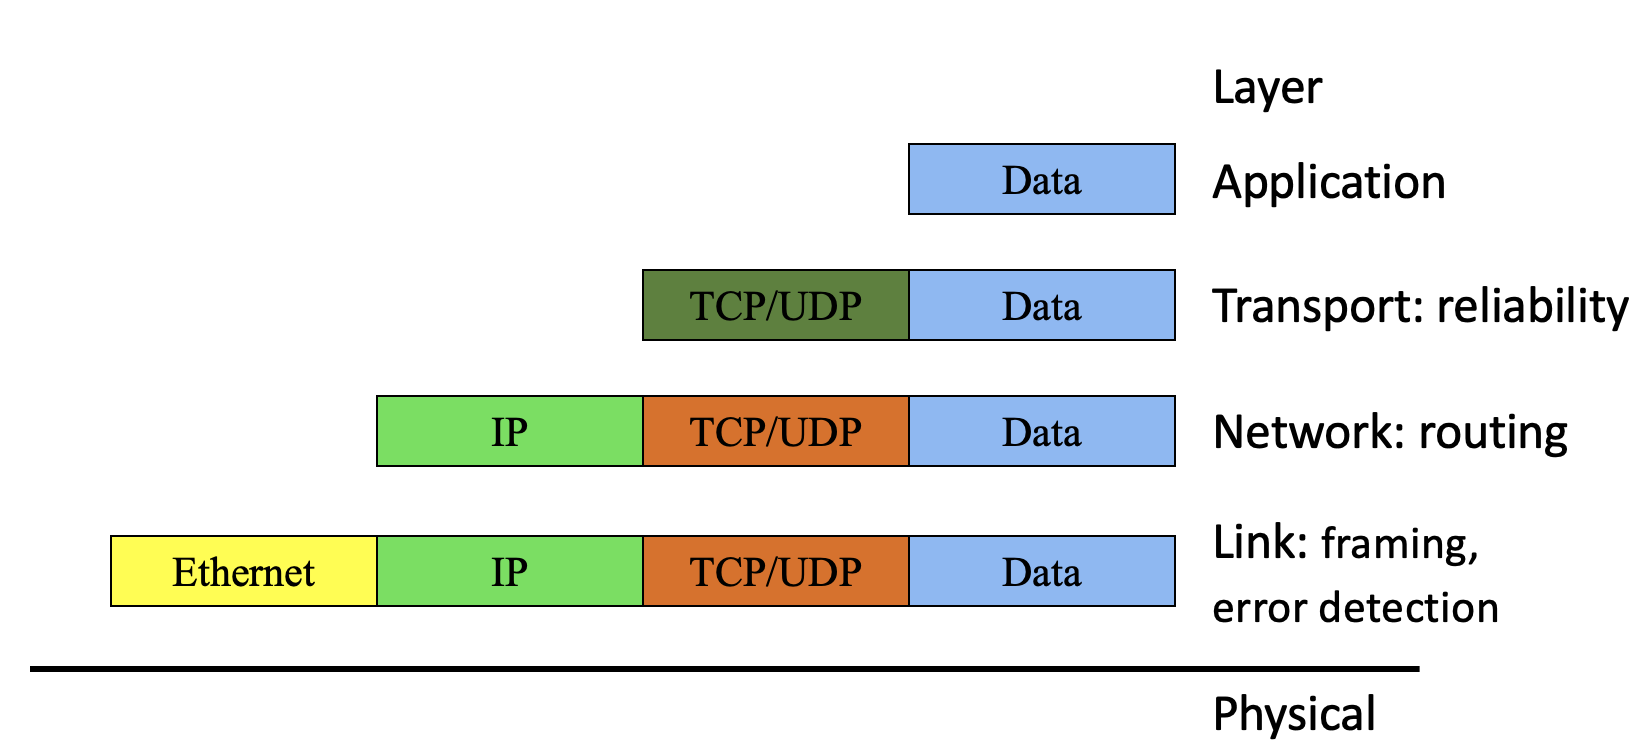
At each layer of the Network Protocol stack, we will have packets that have two distinct parts: the header, and the payload. As we have seen in the pre-class videos, as we go down the 5-layer stack, the packet at the application layer, forms the payload for the transport layer and the packet at the transport layer forms the payload for the network layer and so on.
But what exactly goes into a header of a packet? You can think of a header, as meta-data about the payload. The header information is added by the protocol in use at a particular layer in the network protocol stack.
For example, if we want reliable end-to-end packet delivery at the transport layer, then we would need transport-layer header information that includes packet sequence numbers, retransmission times, number of packets in flight, etc.
We will see as we go along that, at each layer of the network protocol stack, there are different protocols with their own specific header data, that allow us to express different types of service and functionality.
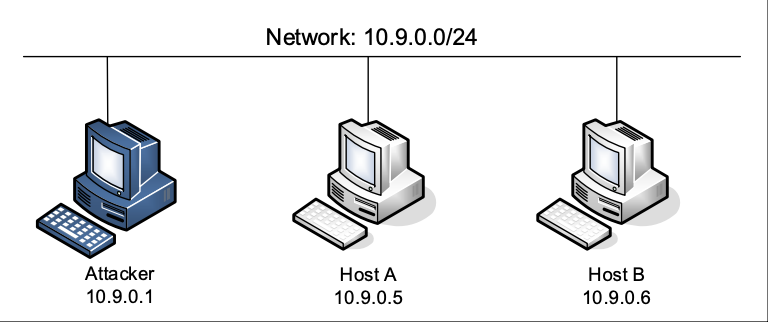
In this lab, we will use three machines that are connected to the same Local Area Network. A Local Area Network or LAN is used typically on university and corporate campuses to connect end hosts. These machines are connected usually using Ethernet. Wired Ethernet typically refers to twisted-pair copper wire physical links, as well as the link-layer protocol that defines how the link should be shared between different machines.
In a Wireless LAN setting, wireless end hosts talk to a wireless access point using the IEEE 802.11 protocol colloquially known as WiFi.
Lab Setup
The lab setup for our network is shown above. We will launch all our attacks from the attacker container.
-
To make our task of editing code and inspecting packets easier, we will use the VM to write code and then move the code into the
./volumesfolder on the host machine (the VM). -
This folder is shared between the VM and the attacker container. When we fire up the attacker container, and
dockshinto the attacker container, we can move the code from./volumesinto the appropriate directories (like we did in previous labs). -
The attacker container has been setup to sniff packets on all the host’s network interfaces (i.e., it lives in the same network namespace as the host VM).
DO THIS STEP BEFORE YOU START!
Clean Up the Previous Lab Setup. In the previous lab, we modified the /etc/resolvconf/resolv.conf.d/head file. We want to now set it back to what it was originally. To do so, follow the steps below in your VM:
-
Open
/etc/resolvconf/resolv.conf.d/headin your favorite editor and remove the linenameserver 10.9.0.53. Save the file and close. -
Run
sudo resolvconf -u. -
To make sure we are all set, run the following. If your SERVER entry looks the same you should be all set for this lab.
$ dig www.google.com

;; ANSWER SECTION:
www.google.com.     133 IN  A   172.217.12.164

;; Query time: 19 msec
;; SERVER: 127.0.0.53#53(127.0.0.53)-
If despite the above steps, the client server program does not run, open
/etc/resolv.confin your favorite editor, and addnameserver 8.8.8.8to the very top of this file. You should now be all set.
Get Your Starting Point code
For the first part of this lab, you can work on the lab machine. For Task 2 and 3, you will need to clone your repo on the VM. Follow along with the prompts below to SSH, create a lab directory and clone your lab repos.
# cd into your cs88 directory on the lab machines
$ username: cd <path to cs88 directory>

# clone your lab5 repo into your labs sub-directory
$ cs88: git clone [your-ssh-URL]

# change directory to list its contents
$ cs88: cd lab4b-username1-username2

# ls should list the following contents
$ cs88: ls
README.adoc	    hello_world_client.py*  lab5-checkpoint.adoc  pcap/		     sniff_spoof_icmp.py   spoof_icmp.py
docker-compose.yml  hello_world_server.py*  lab5-worksheet.adoc   sniff_packets.py*  sniff_tcp_packets.py  volumes/
Task 1: Network Forensics
In this task, we will get familiar with Wireshark, a packet analysis tool to inspect, and filter packets. TIP: For this task, you do not need to be in the VM. You can run wireshark from the terminal on the lab machines.
-
Given the five-layer internet protocol stack we saw above, where do we think this stack lives? It lives in the O.S of every endhost connected to the network!
-
While the application layer is running as a user process, the task of constructing the headers from the transport layer and below are the Operating System’s responsibility. (In fact, an active area of research, is trying to figure out how an extremely low-powered IoT device can or even if it should, run the five-layer protocol stack).
-
-
Run the following commands to download the PCAP files (Packet CAPture files) associated with the following exercises:
-
Warm Up
-
Adventure A
-
Adventure B
-
Adventure C
lab5-username1-username2: cd pcap
pcap$ cp /home/chaganti/public/cs88/lab5/*pcap .
-
| For this task, we will download the PCAP files in your lab5 folder. *However, these files will not be pushed to github. Please do not try to overridde existing settings to push these files. * |
-
Looking at a PCAP File in Wireshark: Open Wireshark from the terminal or through the VM (the app with the fin icon on the left of your homescreen), and click on the orange folder icon, to open the PCAP file. Here are more detailed instructions for reference.
-
The term PCAP stands for a packet capture, i.e., the process of saving or "capturing" network packets, that your machine can listen to on a shared Local Area Network. Once you store your captured stream of packets in the PCAP format, you can port them to any machine to view. One way to view them is using a GUI interface such as Wireshark.
-
Understanding the various sections in Wireshark
Once you fire up Wireshark and load the PCAP file, you should be all set to look at the various views that Wireshark offers when inspecting packets. Remember that packets are simply units of data, represented in bits.
-
Wireshark is performing the task of parsing those bytes, and displaying the header and payload information of the packet at each layer of the protocol stack.
-
The Main Window: The Main Window in wireshark, is home to The Packet List Pane which shows the list of captured packets, in our case, packets from the PCAP file.
-
We can also see packets traversing our Local Area Network, and we’ll see how to do so shortly.
-
-
Packet Details Pane: Next, below that we have the Packet Details Pane, which shows the details of the currently selected packet. You can click on different packets in this PCAP file to inspect each packet.
-
Here, you will see the encapsulation (shown in Figure 1), that we’ve been talking so much about. On most packets you observe, you will see that the first layer is the Ethernet (a link layer protocol), followed by IP (the network layer protocol), followed by UDP/TCP (transport layer protocols), and above that, the application layer protocol (DNS, HTTP, etc).
-
In the packet layers you might also notice a https://wiki.wireshark.org/SLL#:~:text=This%20is%20the%20pseudo%2Dprotocol,or%20can’t%20be%20used.[Linux cooked capture] "layer". You can think of this as metadata tacked on when we are capturing packets on wireshark.
-
-
The Packet Bytes Pane: In the final pane at the bottom, is the Packet Bytes Pane, that shows the
hexdumpof the packet. I.e., the bytes of the entrie packet represented in hexadecimal.-
If you click on various sections of the packet in the
Packet Details Pane, you can see the corresponding bytes in the Packet Bytes Pane.
-
Go through the first section of the lab5-checkpoint.adoc for an introduction to the Internet and getting started with Wireshark.
|
-
Below are hints to get started with each of the PCAP files for the Warm-Up and Adventures A-C.
Warm-Up Exercise
The Warm-Up Exercise is asking you to answer the following questions:
-
Which IP address received the most packets?
-
Which IP address sent the fewest packets?
-
Which IP address sent the most bytes?
| To answer statistics based questions it’s helpful to look at the Statistics Menu in Wireshark, and in particular the Endpoints Window. |
Adventure A
-
In this PCAP file, you will see packets marked with different coloring rules. Take a look at Wireshark’s rules to indicate various properties of a packet. Which colors do you see most often?
-
For this adventure we want to investigate the PCAP file to find an attacker trying to send data out. Since the data is usually the payload section of the packet, this is the region of the packet we care about.
-
An additional hint we have here is that the attacker is using a protocol that is not TCP and it is not UDP. You can setup Display Filter Rules, to specify that we don’t want to view specific packets. Here are some examples.
-
Take a look at the following references for ICMP here and here, a network diagnostic protocol and OSPF, a network routing protocol.
|
Record your responses in lab5-checkpoint.adoc.
|
Adventure B
In this adventure we are trying to find hackers who have accessed the security cameras in the building through a security vulnerability in the web server.
You can use the methods we looked at in the warm-up and Adventure A, to figure out which security cameras (identified by their IP addresses), are being hacked.
If you want to filter on a particular HTTP method you can use http.request.method == "<your method>". In particular, you might want to find a command injection that uses cgi-bin. Try using http contains "cgi-bin" as a filter rule along with your http.request.method rule.
|
Record the IP address of the equipment that has been exploited as well as the attacker’s IP address in your response in lab5-checkpoint.adoc.
|
Adventure C
In this final adventure we are trying to find suspicious activity on UDP Port 53, and in particular, find a 12 character hex string. Port 53 is a reserved port for a specific application layer service.
-
Try investigating which application this maps to, before applying your display filters.
-
Next, you mgiht want to sort the responses by length, and identify any patterns you observe.
-
Next, you can filter on the pattern, and sort the messgea by time and find an 8 character password embedded in the payload.
-
Once you find the data exfiltration payload (everything before
code.zip), you can use CyberChef to decode it.
|
You might want to apply a filter in CyberChef that converts the response to something that looks like a hexdump.
|
Record your responses in lab5-checkpoint.adoc.
|
Task 2: Build a simple client server program
Build your docker container
-
In your VM
cdinto the lab folderlab5, and start up the docker container as follows:seed@VM:~/.../lab5$ dcup Creating network "net-10.9.0.0" with the default driver Creating seed-attacker ... done Creating hostA-10.9.0.5 ... done Creating hostB-10.9.0.6 ... done Attaching to seed-attacker, hostB-10.9.0.6, hostA-10.9.0.5 hostB-10.9.0.6 | * Starting internet superserver inetd [ OK ] hostA-10.9.0.5 | * Starting internet superserver inetd [ OK ] -
Let’s now look at the list of networked devices that are running:
lab5$ docker network ls
NETWORK ID          NAME                DRIVER              SCOPE
6a695e3c95c3        bridge              bridge              local
b3581338a28d        host                host                local
0dd5ef8e67b1        net-10.9.0.0        bridge              local
77acecccbe26        none                null                local
We will be using the net-10.9.0.0, network to both sniff and spoof packets.
Socket Programming
As we saw in class, a protocol defines both the message + header format and transfer procedure. We saw that like a human protocol (initial Hello), the network protocol must first establish a connection, before we start sending and receiving data.
-
To establish this connection, the application layer message, relies on a transport layer protocol - either TCP (reliable delivery) or UDP (unreliable delivery). In this section of the lab, we will write a simple UDP client-server program.
-
To start a UDP connection, we associate the client with a socket. You can think of a socket as a construct offered by the O.S. that functions like a mailbox used to send and receive mail.
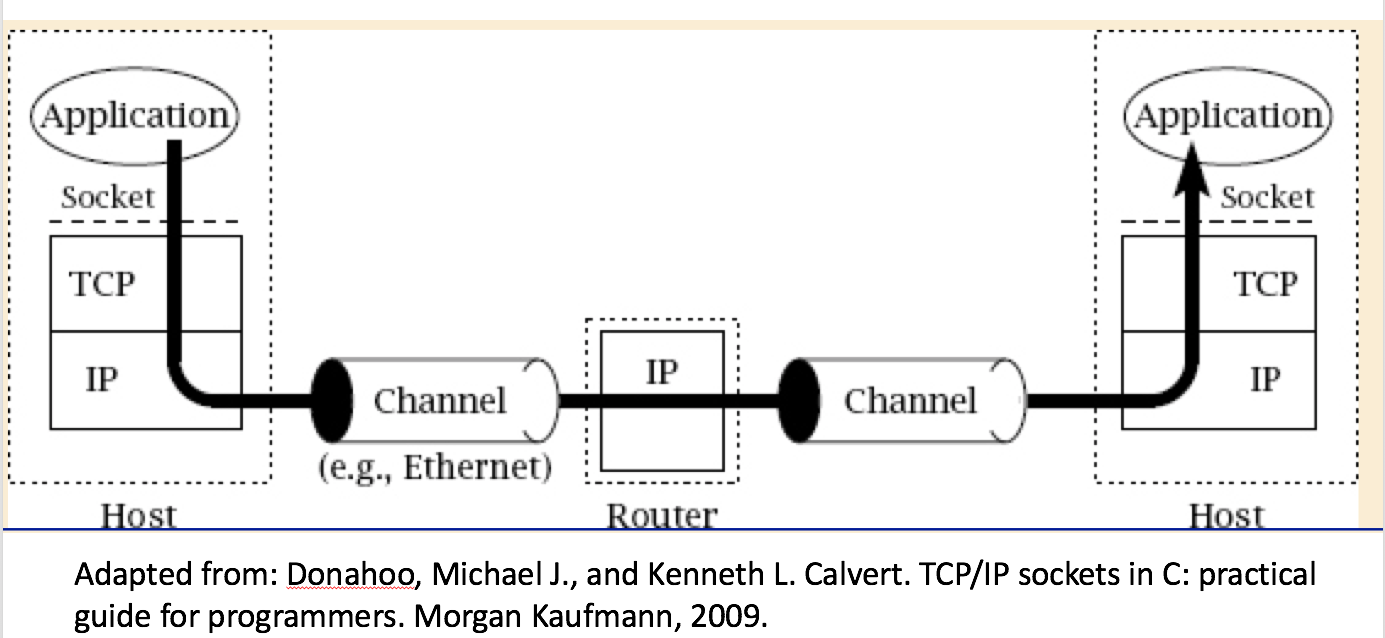
-
To traverse the Internet stack we have in the figure above, as the user interacting with the application layer service, we need to specify the following elements of our packet to the O.S. socket.
Pull up hello_world_client.py and follow along with the header information to be filled at each layer, as shown below.
|
-
@ Application Layer: Payload: the actual data or message that we want to send across to the receiving entity.
-
@ Transport Layer:
-
Choice of transport layer: In our case, UDP or a socket of type
DGRAM. -
Port Number: Used by the application to figure out which application service we want the packet to go to. Since we are creating our own echo service, we can specify any port number above 4096. Lower port numbers (<4096) are reserved port numbers used to implement widely used application-layer protocols.
-
-
@ Network Layer:
-
Choice of network layer protocol: There’s only one that everyone uses and specified in our socket using
socket.AF_INET. -
IP destination address:
127.0.0.1
-
Write a simple client program
In this task we will build a simple echo client-server program. To test our client, we will fire-up a server that simply echos whatever the client has sent it. The client hello_world_client.py initiates communication, and a server that is always-on, passively waits and responds.
Complete hello_world_client.py and then follow along below to create your first client server program.
|
Running a server using netcat: netcat is a powerful network command-line utility for reading data on the wire (listening in or reading data going to specific ports, or IP addresses) and can also be used to write data out to an end host. We will use netcat to act as a test server to test if our hello_world_client.py is functioning correctly.
-
To pull up a network server let’s use
netcat: Open a new terminal window in yourlab5folder and run the netcat command,nc.# open netcat in listening mode (-l) using UDP (-u) and show us verbose output (-v), and (-n) to use the IP address that maps to localhost. lab5$ sudo nc -luvn <port_number_used_in_client> Bound on 0.0.0.0 <port_number_used_in_client> -
Now we’re ready to fire up our client in a different terminal.
lab5$ sudo ./hello_world_client.pyYou should now see the following received on the server end. Note: your port number on the third line (the 5 digit value after the IP address) will look different.
[Line Numbers:] 1: lab5$ sudo nc -luvn <port_number_used_in_hello_client.py> 2: Bound on 0.0.0.0 <port_number> 3: Connection received on 127.0.0.1 35987 4: Hello, World! -
If you see the same output as above, congratulations!! You’ve written your first network client :). Note here that the client and server scripts run on the same machine (your VM), but you could also run them on different machines.
Running the client-server program on different machines
-
This time, let’s view the packets traversing our virtual network! We want to run the client on the attacker machine. To do so, copy
hello_world_client.pyintovolumes, and then rundockpsto see the docker containers that currently exist.lab5$ dockps 1119db9933d2 hostB-10.9.0.6 ec9f6c07f076 hostA-10.9.0.5 20b023d534f7 seed-attacker -
dockshinto theseed-attackerand copy the files over fromvolumesto a new directory/home/seed/lab5/using the following commands:# SSH into seed-attacker root@VM:# mkdir /home/seed/lab5 root@VM:# cp /volumes/*.py /home/seed/lab5/ root@VM:# cd /home/seed/lab5/ -
Similarly,
dockshintohostB, and let’s run the server codenc -luvn 9090on hostB. .-
Note that since these two programs are now running on different machines, you might want to think about which IP address to use in your client program to make sure that the packet reaches the server on Host B.
-
|
View the packet on Wireshark
Open wireshark in your virtual machine so we can sniff packets on our virtual network. To do so, our first step is going to be to identify the ID associated with our network. Run the following command in a new terminal window
$ docker network ls
NETWORK ID          NAME                DRIVER              SCOPE
6a695e3c95c3        bridge              bridge              local
b3581338a28d        host                host                local
0dd5ef8e67b1        net-10.9.0.0        bridge              local
77acecccbe26        none                null                local
Now in wireshark, identify the interface associated with net-10.9.0.0 --- In this example the ID is 0dd5ef8e67b1. You should see the same interface ID (with br- preceding the ID) displayed in Wireshark. Click on this interface to get started.
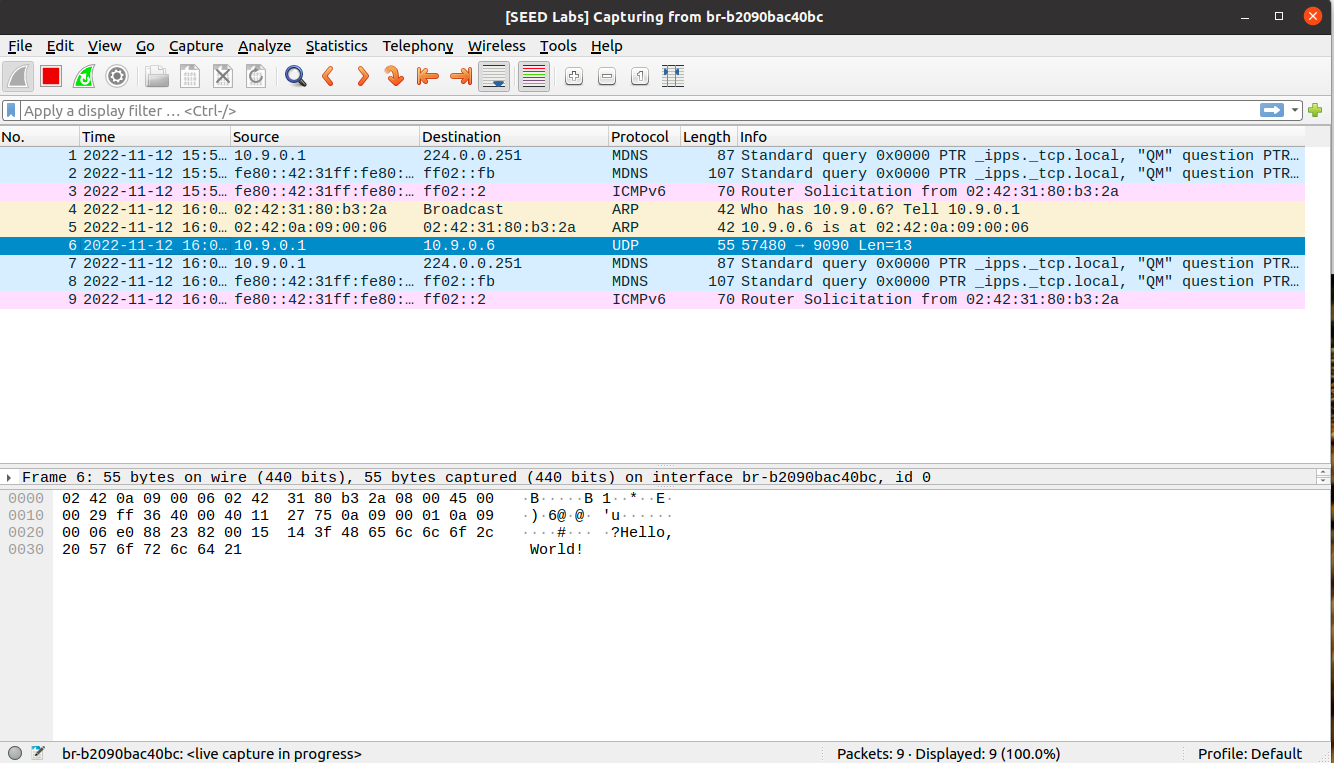
Now, send the packet from the client to the server. What are the three packets that you see traversing the network? Record your responses in lab5-worksheet.adoc.
|
If everything went correctly, you should see packets 4, 5, 6 as shown below:
Write a simple server program
Now let’s write our server program! We can similarly write a server program. The starting code is given in hello_world_server.py. You are given two TODOs in this file
-
Attach the server to listen for incoming connections on a specific port number. HINT: which port number does the client connect to?
-
Complete the call to
sock.recvfrom(1024), to receive data in our socket "mailbox" from the client. Look at the python documentation forsock.recvfrom(), to see a list of the return values. -
Next, let’s copy our
hello_world_server.pyto volumes. And copy it over to Host B. -
You should now be able to reproduce the same wireshark image we had above with our client and server talking to each other.
In lab5-worksheet.adoc, explain your choice of port number for your server program.
|
Task 3: Using Scapy to Sniff and Spoof Packets
In this task, we will use Scapy an interactive program to construct packets from the Link Layer all the way up to the Application Layer. Scapy integrates with Python, and we can import Scapy as a module and use the functions that Scapy provides. Here’s a basic overview of Scapy.
-
In your VM you can run the following commands, to create a simple IP packet.
$sudo python3
Python 3.8.5 (default, Jul 28 2020, 12:59:40)
[GCC 9.3.0] on linux
Type "help", "copyright", "credits" or "license" for more information.
>>> from scapy.all import *

## The next command creates an IP-layer packet a.
>>> a = IP()  \\create an IP packet with default values.
>>> a.show()
###[ IP ]###
 version   = 4
 ihl       = None
 tos       = 0x0
 len       = None
 id        = 1
 flags     =
 frag      = 0
 ttl       = 64
 proto     = hopopt
 chksum    = None
 src       = 127.0.0.1
 dst       = 127.0.0.1
 \options   \
 >>>> ls(IP)
version    : BitField  (4 bits)                  = (4)
ihl        : BitField  (4 bits)                  = (None)
tos        : XByteField                          = (0)
len        : ShortField                          = (None)
id         : ShortField                          = (1)
flags      : FlagsField  (3 bits)                = (<Flag 0 ()>)
frag       : BitField  (13 bits)                 = (0)
ttl        : ByteField                           = (64)
proto      : ByteEnumField                       = (0)
chksum     : XShortField                         = (None)
src        : SourceIPField                       = (None)
dst        : DestIPField                         = (None)
options    : PacketListField                     = ([])
|
READ BEFORE YOU PROCEED For the sniff and spoof
|
Construct a spoofed packet
We can now use Scapy to construct spoofed packets. I.e., malicious packets from an attacker (either MiTM, on-path or off-path attacker).
-
As an example, let’s build the same UDP packet we built in our
hello_world_client.pyusing Scapy. This time we will construct the packet "from scratch".-
I.e., we will specify the source and destination IP addresses, and source and destination UDP addresses.
>>> a = IP(src='1.2.3.4', dst = '10.20.30.40') >>> b = UDP(sport = 1234, dport = 1020) >>> c = 'Hello World' -
Finally we will encapsulate our packet - i.e., put our application layer payload inside UDP, and UDP inside IP using the following command:
>>> pkt = a/b/c -
Now that we have built our packet we can look at the packet using
pkt.show().
-
>>> pkt.show()
###[ IP ]###
  version   = 4
  ihl       = None
  tos       = 0x0
  len       = None
  id        = 1
  flags     =
  frag      = 0
  ttl       = 64
  proto     = udp
  chksum    = None
  src       = 1.2.3.4
  dst       = 10.20.30.40
  \options   \
###[ UDP ]###
     sport     = 1234
     dport     = 1020
     len       = None
     chksum    = None
###[ Raw ]###
        load      = 'Hello World
Sniff Packets using Scapy
The objective of this task is to learn how to use Scapy to do packet sniffing in Python. Packet sniffing is a technique to observe network traffic, undetected. Sample code for this task is provided in the lab5 folder in sniff_packets.py.
|
Spoofing ICMP packets
As a packet spoofing tool, Scapy allows us to set the fields of IP packets to arbitrary values. The objective of this taks is to spoof IP packets with an arbitrary source IP address.
-
We will spoof ICMP echo request packets and send them to another VM on the same network. We will use Wireshark to observe whether our request will be accepted by the receiver. Read up on ICMP packets in the Handy References section.
-
If it is accepted, an echo reply packet will be sent to the spoofed IP address. Here’s an example of how you might set this up in Scapy:
$ sudo python3 >>> from scapy.all import * >>> a = IP() >>> a.dst = '1.2.3.4' >>> b = ICMP() # create an ICMP echo request >>> pkt = a/b >>> send(pkt) . Sent 1 packet -
If we now run
ls(a)we should see the following:>>> ls(a) version : BitField (4 bits) = 4 (4) ihl : BitField (4 bits) = None (None) tos : XByteField = 0 (0) len : ShortField = None (None) id : ShortField = 1 (1) flags : FlagsField (3 bits) = <Flag 0 ()> (<Flag 0 ()>) frag : BitField (13 bits) = 0 (0) ttl : ByteField = 64 (64) proto : ByteEnumField = 0 (0) chksum : XShortField = None (None) src : SourceIPField = ’127.0.0.1’ (None) dst : DestIPField = ’127.0.0.1’ (None) options : PacketListField = [] ([])
Use the above code snippet as a starting point to write your own spoof_icmp.py code.
|
Sniffing and then Spoofing
In this task, you will combine the sniffing and spoofing techniques to implement it in a python file called sniff_spoof_icmp.py.
-
You need two machines on the same LAN: the attacker and one of the host docker containers. From the host docker container, you ping IP
X. This will generate an ICMP echo request packet. If X is a valid end-host, the ping program will receive an echo reply, and print out the response. -
Your
sniff_spoof_icmp.pycode runs on the attacker container, which monitors the LAN through packet sniffing. Whenever it sees an ICMP echo request, regardless of what the target IP address is, your program should immediately send out an echo reply with a spoofed packet. -
Therefore, regardless of whether machine X is valid or not, the ping program will always receive a reply, indicating that X is valid.
|
-
To test your program, you should ping the following two IP addresses from the user container.
ping 1.2.3.4     # a non-existing host on the Internet
ping 8.8.8.8     # an existing host on the Internet
In lab5-worksheet.adoc write your responses you see on the echo client when you call ping 1.2.3.4. When you call ping 8.8.8.8 explain why you observe duplicate responses. Explain whether you can tell the two responses apart, and which you think is generally faster to arrive at the client.
|