Lab Due Date: Tuesday, October 25, 11:59 PM
Lab 3 Goals
-
Random Number Generators:
-
Get familiar with the limitations of pseudo random number generators (PRNG).
-
Avoid pitfalls in PRNGs - they’re not as random as you think!
-
-
Secret Key Encryption
-
Understand substitution ciphers and apply frequency analysis
-
Understand common mistakes in using symmetric-key encryption algorithms
-
-
Public Key Infrastructure
-
Understanding how PKI works
-
Deploying Web Certificates
-
Securing Certificates from MiTM attacks
-
Overview: Cryptography
This lab is built on the SEED Labs for Security Education project by Prof. Wenliang Du, at Syracuse University.
Informally, cryptography is the science of transforming data from plaintexts (that naturally arise in the context of our application or system) to messages that are ciphertext (that appear to "make no sense"). Cryptography derives etymologically from secret writing. The use of ciphers to preserve the confidentiality of secret messages, dates back to antiquity — some well known cryptography ciphers are the Ceasar’s Cipher ( a mono-alphabetic substitution cipher) and Enigma - used in World War II (a poly-alphabetic substitution cipher). Both of these can be trivially defeated today - we’ll discuss this more in class.
A principal component of generating a cipher, is using a random secret key that converts plaintext to ciphertext. Therefore, preventing an attacker from predicting or generating the key is one of the fundamental building blocks of a a secure cryptographic system.
Modern cryptography relies on generating keys that are as close to truly random as possible. The keys have to be unguessable and intractable - i.e., there cannot be a predictable pattern to key generation nor can they be brute-forced in polynomial time.
In this lab we will look at generating random numbers, running attacks on substitution ciphers, and programming a cryptographic algorithm.
Secure Random Number Generation
Generating random numbers is a quite common task in security software. In many cases, encryption keys are not provided by users, but are instead generated inside the software. Their randomness is extremely important; otherwise, attackers can predict the encryption key, and thus defeat the purpose of encryption.
In software engineering, it is quite common to generate random numbers for various tasks (e.g., running a Monte Carlo Simulation, running a gaming platform, etc.), and very often the same methods or function calls are to generate the random numbers for security purposes.
Unfortunately, a sequence of random numbers that may be good for Monte Carlo simulation, might not be sufficiently random when used to generate secure random keys for encryption. It is a well documented fact that de-facto methods in most programming languages are susceptible to security attacks.
Task 1: Random Number Generation Done Wrong
Part A: A Simple Random Number Generator
To generate good pseudo random numbers, we need to start with something that is random; otherwise, the outcome will be quite predictable.
-
Your starting point code has a file named
random_time.c. Runmakeand take a look at the output by running./random_time. What happens when you run this function multiple times? Think of how this program generates unique keys. -
This function makes use of an inbuilt C library function
time(). Type inman timeat the terminal to see its inputs, outputs and its functionality. Note that callingtime(NULL)returns the time as the number of seconds since the Epoch1970-01-01 00:00:00 +0000 (UTC).
Answer the first two questions in lab3-checkpoint.adoc
|
Part B: Guessing the Key
In part B, we are going to launch an attack based on the simple random number generator that we saw in part A. Here’s the scenario for our attack:
On April 17, 2018, Alice finished her tax return, and she saved the return (a PDF file) on her disk. To protect the file, she encrypted the PDF file using a key generated from random_time.c. She wrote down the key in a notebook, which is securely stored in a safe. A few month later, Bob breaks into Alice’s computer and gets a copy of the encrypted tax return. Since Alice is CEO of a big organization, this file is of significant value to Bob.
Bob cannot get the encryption key, but by snooping around Alice’s computer, he sees the key-generation program random_time.c, and suspects that Alice’s encryption key might have been generated by this program.
He also notices that the timestamp of the encrypted file is 2018-04-17 23:08:49. He makes an educated guess that the key may have been generated within a two-hour window before the file was created.
Your task is to help Bob use a brute force method to crack the key that Alice used to encrypt her tax documents. Below are additional details to help get you started.
-
Your task is to help Bob find out Alice’s encryption key, so you can decrypt the entire document. Write your attack in
random_time_attack.c. -
As Bob, you see that
random_time_attack.cuses thetime()function to generate random keys. Inrandom_time.cwe saw that thetime()command takes the current time and returns the time as the number of seconds since the Epoch1970-01-01 00:00:00 +0000 (UTC). Your task is to list all possible keys generated starting 2 hours before the timestamp of the encrypted file2018-04-17 23:08:49. -
To figure out the starting and ending times you would need to use as inputs to your attack, you can use the
datecommand in Unix. Thedatecommand allows you to find the number of seconds between a given date (e.g.2018-04-15 15:00:00) and the Unix Epoch. Here’s an example on usingdate.
$ date -d "2018-04-15 15:00:00" +%s
1523818800
Launch your brute force attack! Once you have your keys generated in random_time_attack.c let’s pipe the output to a file to store all our keys as follows:
$ make
$ ./random_time_attack  > keys.txt
We can now run our attack in the guess_key.py file provided in your starter code.
=== Part C: Measuring Entropy or Degree of Randomness
In the virtual world, it is difficult to create randomness, i.e., software alone is hard to create random numbers. Most systems resort to the physical world to gain the randomness. Linux systems use the following physical resources to generate randomness:
1. void add_keyboard_randomness(unsigned char scancode);
2. void add_mouse_randomness(__u32 mouse_data);
3. void add_interrupt_randomness(int irq);
4. void add_blkdev_randomness(int major);
The first resource is the timing between key presses. The second uses mouse movement and interrupt timing, the third gathers random numbers using just the interrupt timer, and the last, measures the finishing time of block device requests. Of course, not all interrupts are good sources of randomness (think of why a timer interrupt is not a good choice).
The randomness of a system is measured using entropy which in the case of computer systems simply means the number of bits used to represent random numbers in the system. You can find out how much entropy the kernel has at the current moment using the following command. This can be thought of as the entropy pool or the store of randomness that accumulates from resources listed above.
Monitor the change in entropy by running the command below:
$ watch -n .1 cat /proc/sys/kernel/random/entropy_availWhile it is running do the following: * move your mouse * click and point at various things with your mouse, * type something * read Pride and Prejudice online * Save the plaintext Pride and Prejudice and read it from file.
Oberve the activities that significantly increase entropy significantly. And record your observations in lab3-checkpoint.adoc
|
Task 2: Secure Random Number Generation
Part A: Understand Pseudo Random Numbers from /dev/random
Linux stores the random data collected from the physical resources into a random pool, and then uses two devices to turn the randomness into pseudo random numbers. These two devices are /dev/random and /dev/urandom. They have different behaviors.
-
The
/dev/randomdevice is a blocking device. Namely, every time a random number is given out by this device, the entropy of the randomness pool will decrease. When the entropy reaches zero,/dev/randomwill block, until it gains enough randomness. -
Let us design an experiment to observe the behavior of the
/dev/randomdevice. We will use thecatcommand to keep reading pseudo random numbers from/dev/random. We pipe the output tohexdumpfor pretty printing.$ cat /dev/random | hexdump
Run the above command and at the same time use the watch command as before to monitor the entropy. What happens if you do not move your mouse or type anything? Then, randomly move your mouse and see whether you can observe any difference. Record your responses in your lab3-checkpoint.adoc.
|
If a server uses /dev/random to generate the random session key with a client. Describe how you can launch a Denial-Of-Service (DOS) attack on such a server in your lab3-checkpoint.adoc.
|
Part B: Measuring the entropy of /dev/urandom
Linux provides another way to access the random pool via the /dev/urandom device, except that this device will not block.
-
Both /dev/random and /dev/urandom use the random data from the pool to generate pseudo random numbers. When the entropy is not sufficient, /dev/random will pause, while /dev/urandom will keep generating new numbers.
-
Think of the data in the pool as the “seed”, and as we have seen in our first task, we can use a seed to generate as many pseudo random numbers as we want.
-
Let us see the behavior of
/dev/urandom. We again usecatto get pseudo random numbers from this device.$ cat /dev/urandom | hexdump -
This time, let us measure how random our random number is. Let’s first generate 1 MB of pseudo random numbers from
/dev/urandomand save them to a file. Next, we will use a tool calledent, that measures whether the pseudo-random number generators we have generated are satisfactory for encryption.$ head -c 1M /dev/urandom > output.bin $ ent output.bin
Theoretically speaking, /dev/random is more secure, but in practice, there is not much difference, because the “seed” used by /dev/urandom is random and non-predictable (/dev/urandom does re-seed whenever new random data become available).
A big problem is the blocking behavior of /dev/random. I.e., the process suspends execution until we return from the system call. This can lead to denial of service attacks. Therefore, it is usually recommended that applications use /dev/urandom to get random numbers.
Part C: Generate a 256-bit encryption key
Let’s now generate a 256 bit encryption key taking input from the /dev/urandom file. Complete the code in random_keygen.c. Note that the code currently generates a key of length 128 bits, your task is to increase this key length to 256 bits and print the key out to the terminal.
Complete the final questions for lab3-checkpoint.adoc.
|
Task 3: Substitution and Block Ciphers
Part A: Launching a Ciphertext-Only Attack against substitution ciphers
It is well-known that mono-alphabetic substitution ciphers are not secure, and can be subjected to frequency attacks. In this task, you are given a variant of the Ceasar Cipher that we saw in class. This is commonly called the ROT13 cipher (shown below).

Here, we have the substitution cipher defined as follows:
-
each letter in the
plaintextis replaced by another letter given by a key, in the english alphabet. -
As an example, if we have a substitution cipher where the
plaintextletters{a, b, c, d}that map to the key{x, t, m, f}. Then we have the following transformations:plaintext : bad ciphertext: txf plaintext : dab ciphertext: fxt -
Notice that each letter in the
plaintextmaps to exactly one letter in theciphertext.
As an attacker, you also have the following a-priori information:
-
the
plaintextis an english text consisting only of lowercase alphabets without punctuations or numbers, and, -
you can also assume that spaces between words will be preserved, to simplify the task (note: in a real-world application this would not be the case).
| Your tasks are listed below: |
-
Using the file
freq_attack.pyin your starter code, to write a frequency analysis attack, to figure out key, i.e., theplaintexttociphertextmapping. -
Once you have the frequency analysis of the ciphertext, try to map the ngrams you see to the following letter frequencies from the english language and start trying to figure out the substitution key used to create the cipher.
-
You can figure out what the substitution cipher is iteratively. First check if your decryption works you can use the
trcommand at the commandline as follows:$ tr 'cipher_alphabet' 'YOUR_SUBSTITUTION' < ciphertext > solution.txtAs an example I might try the following substitution for the message above:
$ tr 'txf' 'BAD' < ciphertext > solution.txtsample output:
$ cat ciphertext
    #original ciphertext:
    txf sdflkjataf asdfx asdfkttdsf txf

$ cat solution.txt
   # ciphertext with 'txf' characters substituted by 'BAD':
    BAD sdDlkjaBaD asdDA asdDkBBdsD BAD.
The reason we have the substitution characters in all uppercase is so that, in the resulting ciphertext there is no ambiguity about which letters correspond to the ciphertext, and which correspond to the substituion we fed in. -
Save your output to
solution.txt, and your key tokey.txt. You can create akey.txtoutput as follows$ touch key.txt #creates any empty file named key.txt $ vim/atom key.txt #edit the key.txt in vim or atom.
Part B: Launching Known Plaintext Attack (KPA) against block ciphers
The block cipher is a fundamental building block in implementing symmetric encryption schemes today. They satisfy our definitions of computational secrecy, and overcome the limitations of the One-Time Pad encryption scheme - we can use short keys, and use a fixed key for the duration of the encryption scheme.
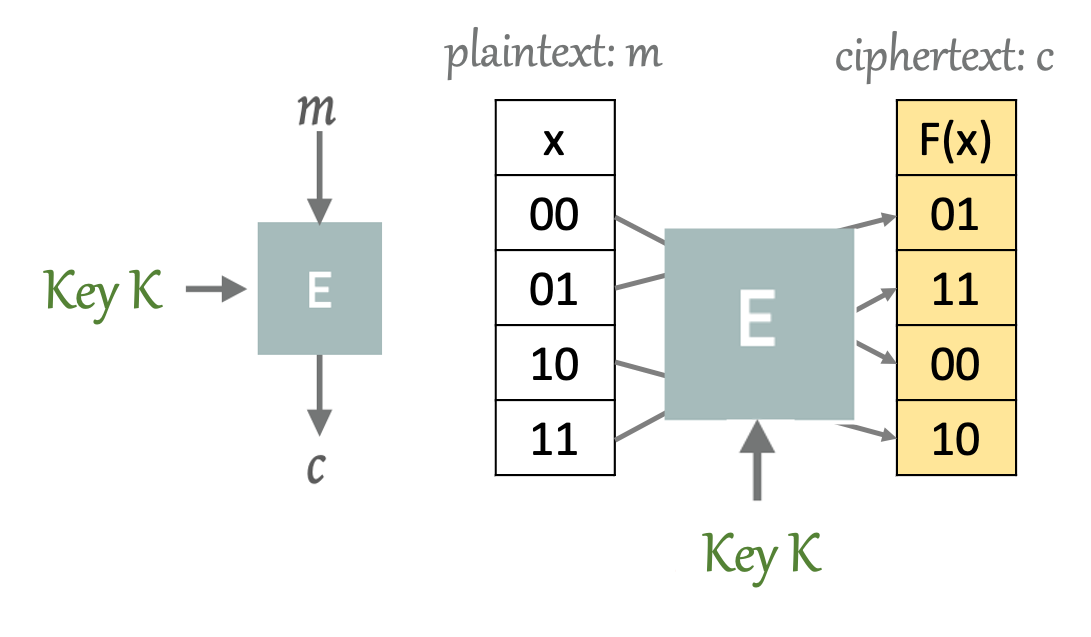
We can think of a block cipher as a black box E that takes as input a randomly generated k bit key , and an n-bit plaintext message m, to produce an n-bit ciphertext, c. An example of a block cipher on two-bit messages is shown below. Here, we have the input, which is the space of all possible two-bit inputs, x, that map to an output space F(x). We can think of F(x) as a random permutation of the input x. And the key k, as providing the mapping between the input space and output space for this particular encryption function E.
When we talk about block ciphers we will treat these encryption functions as black boxes, that perform a series of bitwise operations on the key,and the input, to produce the output. These encryption functions are extremely complex (here’s an example of what goes into the AES Block Cipher), but every single block cipher, AES, or otherwise, satisfies our notion of computational secrecy (i.e., observing the ciphertext gives an efficient attacker no additional information about the plaintext).
View the following videos for further details: One-Time Pads, Introduction to Block Ciphers and Block Cipher Modes.
-
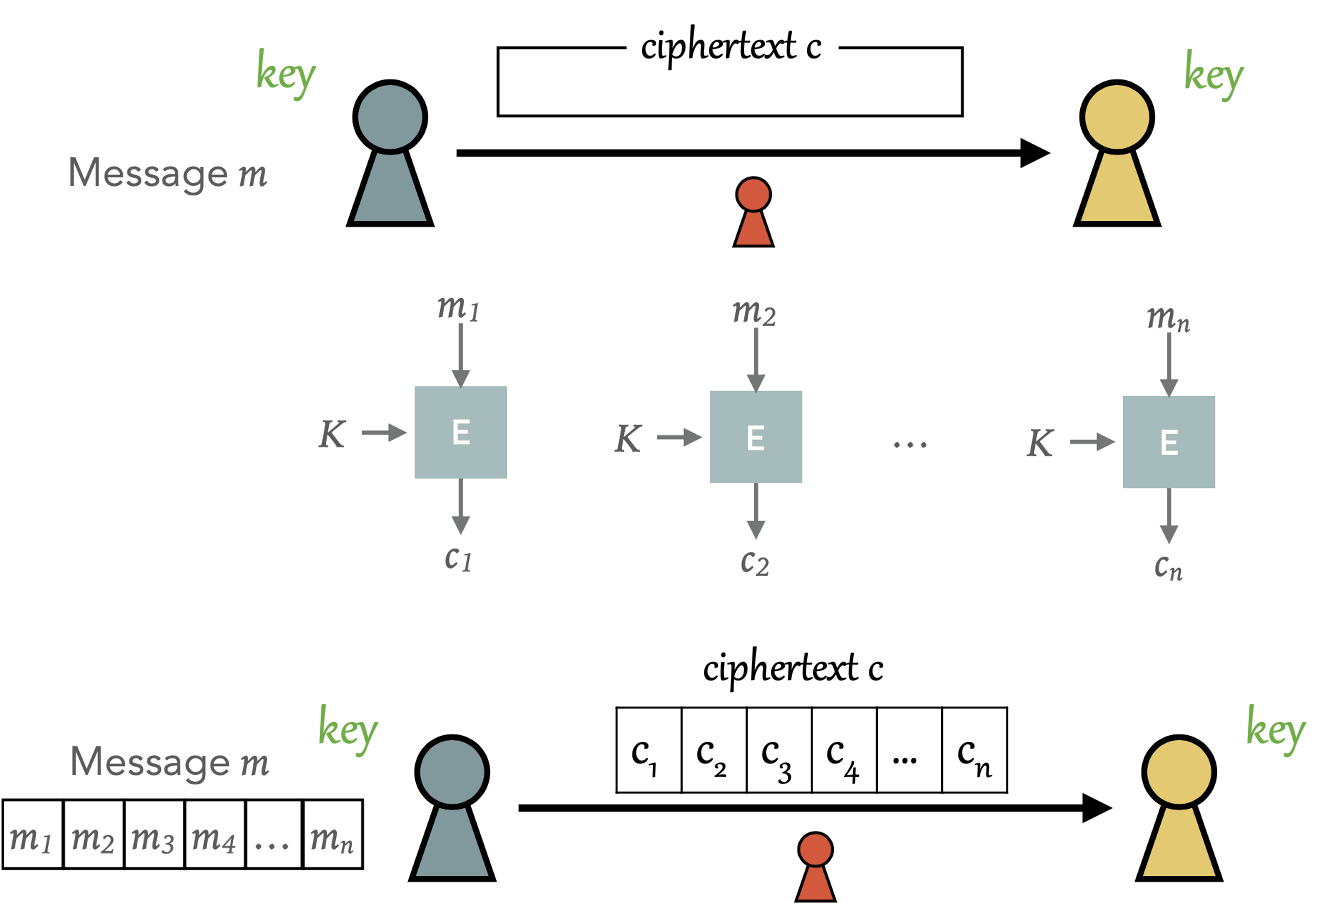
Block sizes come in a small set of fixed sizes. For AES, each block cipher can be either 128, 192 or 256 bits. This means, that it can process a
plaintextmessage of size 128/192/256 bits. -
But clearly, our message can be much larger than these fixed block sizes. To accommodate for these varying message lengths, we will first chunk our messages into the size of our block ciphers and chain the block ciphers together to generate our
ciphertext. Below is a visualization of chunking up our message into fixed size blocks.
-
Now that we can chunk up our message, it turns out that simply passing each message through a block cipher is actually extremely insecure for the reasons we talked about in class - if the same message recurs, then for a fixed encryption scheme and a fixed key we get the same cipher.
-
In order to randomize the output from the same message, we will now introduce a new random value known as the Initialization Vector or IV.
-
The manner in which we chain together different block ciphers (see the Output Feeback Mode Block Cipher shown below) results in different operational "modes" of a crypto scheme. We will go over two such modes in this lab - and launch two different types of attacks on these schemes by exploiting vulnerabilities in the Initialization Vector.
Launching a known-plaintext attack (KPA)
We will now try to launch a known-plaintext attack in the scenario described below:
Bob is designing a new secure payment service for the restaurant that he works at. Bob decides to use AES encryption and assumes that since the plaintext, (the user details, orders and timestamp) do not repeat, using the same IV for AES encryption should be safe. He uses the Output Feedback Mode to implement his cipher.
Bob has hired you as a security expert. Advise Bob on how secure his encryption scheme is. Your task is to help Bob assess whether an attacker can launch a known plaintext attack on his encryption scheme.
-
As the attacker launching a known-plaintext attack, you have observed C1, C2, and additionally are aware that P1 maps to C1. Given the same encryption function, the same key and the same Initialization Vector your task is to reidentify P2.
-
All the information you need to launch the attack can be found in the pictorial representation of the OFB mode, along with your understanding of bitwise XOR.
Complete KPA.py with your known plaintext attack, and fill in lab3-worksheet.adoc with your answers.
|
Plaintext (P1): This is a known message!
Ciphertext (C1): a469b1c502c1cab966965e50425438e1bb1b5f9037a4c159

Plaintext (P2): (unknown to you) # what you need to find
Ciphertext (C2): bf73bcd3509299d566c35b5d450337e1bb175f903fafc159
The figure below shows the OFB mode, and we see that this mode consists of two distinct operations:
-
OFB uses the IV, block cipher and encryption key to generate an output stream, shown in shaded blocks in the figure.
-
This output stream is XORed with the
plaintextto produce theciphertext.

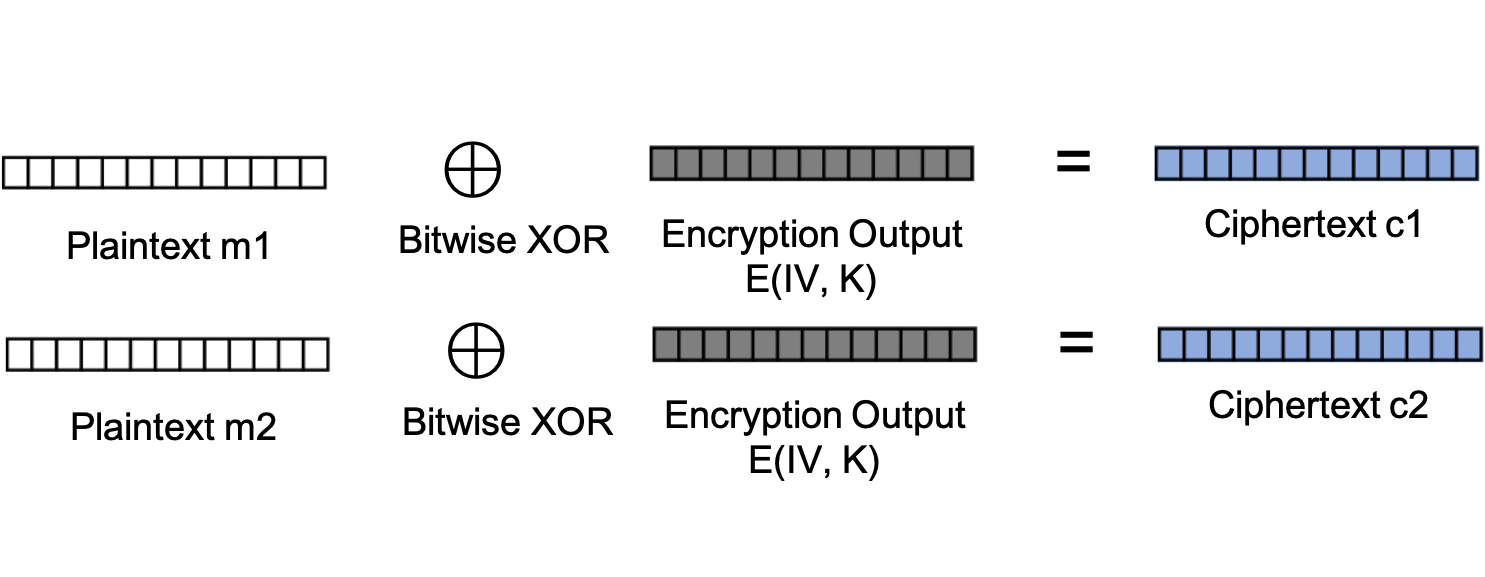
Given the information from the second figure, complete KPA.py to demonstrate whether Bob’s scheme will hold up against known plaintext attacks.
|
Part C: Launching Chosen-Plaintext Attack (CPA) against block ciphers
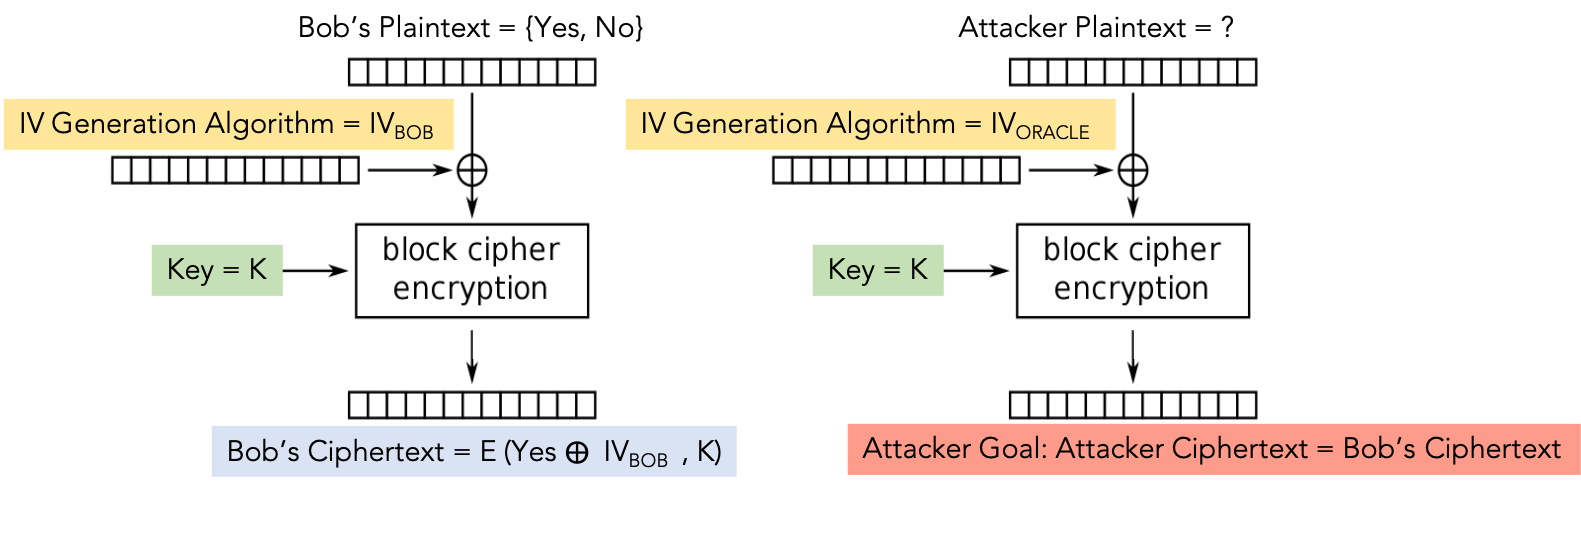
Bob has know grown wiser from your counsel, and he has gained the trust and recognition of his supervisors. There are upcoming internal elections for the CEO to continue his term in Bob’s organization. All the employees are required to vote in this election with either a "Yes", to indicate confidence in the current CEO, or a "No" to indicate the current CEO needs to be replaced.
Bob has been given the responsibility for overseeing the internal elections and he hires you to help him oversee a fair and confidential election process. He shares his current encryption mechanism with you. You see that Bob has implemented an AES encryption scheme, and this time, rather than selecting a constant value for IV, Bob uses the C rand() function to generate a new deterministic IV to encrypt each vote.
Your task is to help Bob assess whether an attacker can launch a chosen plaintext attack (CPA) on his encryption scheme.
In this task, since we have an extremely small plaintext message, we are only concerned with the CBC encryption mode for the first block, as shown in the figure below.
-
We know that Bob’s plaintext is either a Yes, or a No. We also know that the key K and the encryption function are constant. We know that the IV is deterministic.
-
Deterministic IV: In this implementation, for every plaintext that is encrypted we are also given the current IV in use and the next IV that will be used.
-
Your task is to construct a
plaintextmessage and ask Bob to encrypt it and give you theciphertext. Theplaintextyou give as input should be such that you can conclusively figure out what Bob’s plaintext was.
In order to help with simulating Bob’s block cipher, we have an oracle setup that will provide the interface shown below. To get started with the oracle, follow the steps below to setup and run the docker container with the oracle.
Setting up the Oracle: You can get access to the oracle by first setting up the docker container in lab3\task3-parta-c.
-
Setup your docker container using the following commands:
lab3$ cd lab3\task3-parta-c
task3-parta-c$ dcbuild
building oracle-server
....
Successfully built 5cec357343b8
Successfully tagged seed-image-encryption:latest
$ dcup
Creating oracle-10.9.0.80 ... done
Attaching to oracle-10.9.0.80
oracle-10.9.0.80 | Server listening on 3000 for known_iv
<--- Following output will be generated after you launch netcat
oracle-10.9.0.80 | Connect to 3000, launching known_iv-
Once your docker container is up and running, type the following command in a new terminal to get started. To exit from your interaction with the oracle, press Ctrl+C.
$ nc 10.9.0.80 3000
Bob’s secret message is either "Yes" or "No", without quotations.
Bob’s ciphertext: 54601f27c6605da997865f62765117ce
The IV used : d27d724f59a84d9b61c0f2883efa7bbc

Next IV : d34c739f59a84d9b61c0f2883efa7bbc
Your plaintext : 54601f27c6605dsdfas201u4113

Next IV: d34c739f59a84d9b61c0f288asf2131w
Your plaintext: ^C # <--- Control+C: to break out
seed@VM$
Oracle Functionality
-
After showing you the next IV, the oracle will ask you to input a
plaintextmessage (as a hex string) as shown above. -
Once the user inputs a new
plaintext, the oracle will encrypt the message with the next IV, and output the newciphertext. -
Your task is to craft a plaintext message using
CPA.pyand give that input to the oracle, in the plaintext field. The oracle should then produce the same first block of ciphertext as Bob.-
Here’s an example of a functioning solution:
nc 10.9.0.80 3000 Bob's secret message is either "Yes" or "No", without quotations. Bob's ciphertex: ea93df42a748d69ca5f74dbed8d85087 The IV used : bd68adc6d015a9bbc7443f53b9806b00 Next IV : 304fe915d115a9bbc7443f53b9806b00 Your plaintext : <plaintext solution generated in CPA.py> Your ciphertext: ea93df42a748d69ca5f74dbed8d850878ce1f287d442cf54dd495a5fdc8f583d Next IV : 422dea94d115a9bbc7443f53b9806b00 Your plaintext : -
Observe above that we have correctly crafted a plaintext message such that the resulting ciphertext has an exact match between the first block of the ciphertext that Bob has and what we have generated:
Bob's ciphertex: ea93df42a748d69ca5f74dbed8d85087
Your ciphertext: ea93df42a748d69ca5f74dbed8d850878ce1f287d4....
-
Write your attack out in CPA.py and provide your solution in lab3-worksheet.adoc
|
Part D: Block Cipher Padding
When constructing block ciphers it is often the case that the plaintext messages may not be a multiple of the block size. While some encryption modes can process plaintext streams, and don’t require the plaintext to be multiples of the block size, this is not universally the case.
In the CBC mode of encryption, the message has to be a multiple of the block size. To accomplish this, most block ciphers use what’s called the PKCS#5 padding scheme which works as follows:
-
Assume that we are looking at the last block of a block cipher of length 16 bytes.
-
If the message fills up 15 bytes of the last block, we have 1 byte free, and we write in
01in the location of the last byte. -
If we have a message which fills up 14 bytes of the last block we have 2 bytes free, and we write
02 02in the location of the last two bytes. -
We proceed in this manner until our message is 1 byte long in the last block as shown below:
XX XX XX XX XX XX XX XX XX XX XX XX XX XX XX 01 XX XX XX XX XX XX XX XX XX XX XX XX XX XX 02 02 XX XX XX XX XX XX XX XX XX XX XX XX XX 03 03 03 XX XX XX XX XX XX XX XX XX XX XX XX 04 04 04 04 XX XX XX XX XX XX XX XX XX XX XX 05 05 05 05 05 ... XX 0F 0F 0F 0F 0F 0F 0F 0F 0F 0F 0F 0F 0F 0F 0F -
But what happens if our message is actually a multiple of 16 bytes? It turns out that our
PKCS#5padding scheme will still add padding - in fact one whole block of padding as follows:[Block N-1]: [16 byte message] [Block N]: 10 10 10 10 10 10 10 10 10 10 10 10 10 10 10 10
Let’s see this in action. For each of our encryptions we will leverage openssl functionality that lets us encrypt plaintext messages using symmetric key encryption schemes. Here, we are specifying the aes encoding scheme with 128-bit block ciphers using the CBC mode.
-
First, let’s encode a plaintext message, 9 bytes in length, using our CBC mode which adds padding:
$ echo -n "123456789" > plain.txt $ openssl enc -aes-128-cbc -e -in plain.txt -out cipher-cbc.txt \ -K 00112233445566778899AABBCCDDEEFF \ -iv 000102030405060708090a0b0c00e0f -
Next, let’s use a different encoding to encode the same plaintext using the CFB mode that does not add padding:
$ openssl enc -aes-128-cfb -e -in plain.txt -out cipher-cfb.txt \ -K 00112233445566778899AABBCCDDEEFF \ -iv 000102030405060708090a0b0c00e0f-
Once you run the above commands you should see output that looks like the following: "hex string is too short, padding with zero bytes to length". This is an expected output.
-
-
Now let’s examine the length of both the ciphers and the plaintext:
$ ls -l plain.txt cipher-cbc.txt cipher-cfb.txt -rw-rw-r-- 1 seed seed 16 Oct 19 12:16 cipher-cbc.txt -rw-rw-r-- 1 seed seed 9 Oct 19 12:17 cipher-cfb.txt -rw-rw-r-- 1 seed seed 9 Oct 19 12:16 plain.txt-
You should see that clearly CBC is adding padding while CFB is not. Look at the diagrams of both these modes and provide your answers to questions in
lab3-worksheet.adoc
-
-
Let’s try decrypting both these ciphers to see what our corresponding outputs look like. Fill in
decipher.shin your github repo and run it as follows to decipher the two ciphertexts above.$ chmod +x decipher.sh $ ./decipher.sh -
Once you decipher the two encrypted texts you should see that they are the same size! The decryption for each mode takes care of the padding for us.
$ ls -la plaintext-cbc.txt plaintext-cfb.txt plain.txt -rw-rw-r-- 1 seed seed 9 Oct 19 12:29 plaintext-cbc.txt -rw-rw-r-- 1 seed seed 9 Oct 19 12:29 plaintext-cfb.txt -rw-rw-r-- 1 seed seed 9 Oct 19 12:16 plain.txt -
Now let’s modify
decipher.shto use the-nopadoption. You can append this option to the end of the command after providing the IV. Useman openssl-Now if we dols -layou should see something like the following:$ ls -la *.txt -rw-rw-r-- 1 seed seed 16 Oct 19 12:16 cipher-cbc.txt -rw-rw-r-- 1 seed seed 9 Oct 19 12:17 cipher-cfb.txt -rw-rw-r-- 1 seed seed 16 Oct 19 12:33 plaintext-cbc-nopad.txt -rw-rw-r-- 1 seed seed 9 Oct 19 12:33 plaintext-cbc.txt -rw-rw-r-- 1 seed seed 9 Oct 19 12:33 plaintext-cfb-nopad.txt -rw-rw-r-- 1 seed seed 9 Oct 19 12:33 plaintext-cfb.txt -rw-rw-r-- 1 seed seed 9 Oct 19 12:16 plain.txt -
Let’s example the output of the plaintexts created by
cbcandcbc-nopadusing a command-line utilityxxdthat allows us to examine hexadecimal values.$ xxd -g 1 plain.txt $ xxd -g 1 plaintext-cbc.txt $ xxd -g 1 plaintext-cbc-nopad.txt-
Write down your observations in
lab3-checkpoint.adoc
-
-
Finally, let’s try changing the value of plaintext to be a multiple of 16 bytes, and look at the length of the output with the
nopadoption with the following encryption modes:ECB, CBC, CFB, OFB. Explain inlab3-worksheet.adoc, why some of these schemes use padding while others do not.
Part E: Bonus Level: Launching a Chosen-Ciphertext Attack (CCA) against block ciphers
Some systems, when decrypting a given ciphertext, verify whether the padding is valid or not, and throw an error if the padding is invalid. This seemly-harmless behavior enables a type of attack known as a padding oracle attack.
-
The attack was originally published in 2002 by Serge Vaudenay, and many well-known systems were found vulnerable to this attack, including Ruby on Rails, ASP.NET, and in the OpenSSL crypto library.
For this task, we have a padding oracle hosted on port 5000 and another on port 6000. Each oracle has a secret message inside, and it prints out the ciphertext of this secret message. The encryption algorithm and mode used are AES CBC. The encryption key K, IV and plaintext are secret, and known only to Alice and Bob.
-
For this task there is no docker container to build. You can simply run
dcupto get the container up and running as shown below:$ cd task3-partd-e task3-partd-e$ dcup Starting oracle-10.9.0.80 ... done Attaching to oracle-10.9.0.80 oracle-10.9.0.80 | Server listening on 5000 for padding_oracle_L1 oracle-10.9.0.80 | Server listening on 6000 for padding_oracle_L2 -
This time we will interact with the oracle using the interface provided in
manual_attack.py. For our purposes we are only concerned with thedecrypt()method. In your starter code formanual_attack.pyyou are already provided with all the code required to interact with the oracle:-
Line 34: CallPaddingOracleto receive an object with ciphertext -
Line 37: Get the ciphertext from the oracle object and save it as a bytearray. -
Line 89: Pass a ciphertext to the oracle and check if the status of the ciphertext is valid or not.
-
-
For example calling the following
nccommand in a new terminal window will generate the following hexadecimal data provided by the oracle.$ nc 10.9.0.80 5000 01020304050607080102030405060708a9b2554b094411...-
Here, the first 16 bytes is the IV, and the rest is the ciphertext.
-
From the length, you can see that the ciphertext has 32 bytes, i.e., 2 blocks, but the actual length of the plaintext is unknown due to the padding (i.e., it might be less than a multiple of 32).
-
Launching a known cipher text attack.
-
The oracle accepts ciphertext input that you give, and lets you know if the command is valid or not.
-
The format of the input is the same as the message above: 16-bytes of the IV, concatenated by the ciphertext.
-
The oracle will then decrypt the ciphertext using its own secret key K and the IV provided by you.
-
It will not tell you the plaintext, but it does tell you whether the padding is valid or not.
-
Your task is to use the information provided by the oracle to figure out the actual content of the secret message. For the sake of simplicity, you only need to find out one block of the secret message.
Understanding the Attack
We will first walk through how we will launch this attack one byte at a time, manually in manual_attack.py. Based on this, you should then automate your attack.
We know that our plaintext has two blocks P1 and P2 and we only need to get P2 (getting P1 is almost exactly the same). The skeleton code is provided in manual_po_attack.py. Let’s go through this code
-
First, let’s get the ciphertext from the oracle. The ciphertext in this task consists of two blocks, and we use two 16-byte bytearrays C1 and C2 to hold the content of these two blocks.
oracle = PaddingOracle(’10.9.0.80’, 5000) # Get the IV + Ciphertext from the oracle iv_and_ctext = bytearray(oracle.ctext) IV = iv_and_ctext[00:16] C1 = iv_and_ctext[16:32] # 1st block of ciphertext C2 = iv_and_ctext[32:48] # 2nd block of ciphertext print("C1: " + C1.hex()) print("C2: " + C2.hex()) -
As depicted in the figure, D1 and D2 are the output of the AES block cipher. If we can get their values, we can easily get the plaintext by xoring them with the ciphertext (or IV for the first block). Since our focus is the second block P2, if we can figure out the values of D2, we can calculate P2 using P2 = C1 ⊕ D2.
-
The general idea of the attack is to send to the oracle a ciphertext with modified C1 (let’s call it CC1). Although the oracle will not tell us the result of D2 ⊕ CC1, it does tell us whether the result has a valid padding or not. That opens the door for us to figure out the value of D2. There are 16 bytes in D2, we can figure out its value one byte at a time. In the skeleton code, we have initialized two arrays D2 and CC1. Their initial values do not really matter. Your task is to use an iterative process to figure out the value for the D2 array. For each iteration, you need to construct the CC1 array properly.
Grading Rubric
This lab is worth 8% that is going to be graded as follows:
-
1 point for Task 1
-
1 point for Task 2
-
3 points for Task 3: Parts A - C
-
1 point for Task 3: Part D
-
1 point for completing
lab3-checkpoint.adoc -
1 point for completing
lab3-worksheet.adoc -
BONUS POINT: Task 3: Part E
Submitting
Please remove any debugging output prior to submitting.
To submit your code, simply commit your changes locally using git add and git commit. Then run git push while in your lab directory.