Due: Thursday, October 22, 11:59 PM ET
Handy references
-
The dig utility.
Lab 3 Goals
-
Implement an iterative DNS client.
-
Understand how to parse a binary protocol.
-
Use Wireshark to walk through packet headers.
-
Use UDP sockets to send and receive data.
Overview
For this lab, you will be implementing the DNS protocol to build your very own iterative name resolver! Your DNS client is going to iteratively query servers from the root, TLD, and authoritative DNS servers to resolve: (a) a name → IP address (b) a name → mail server name → IP address.
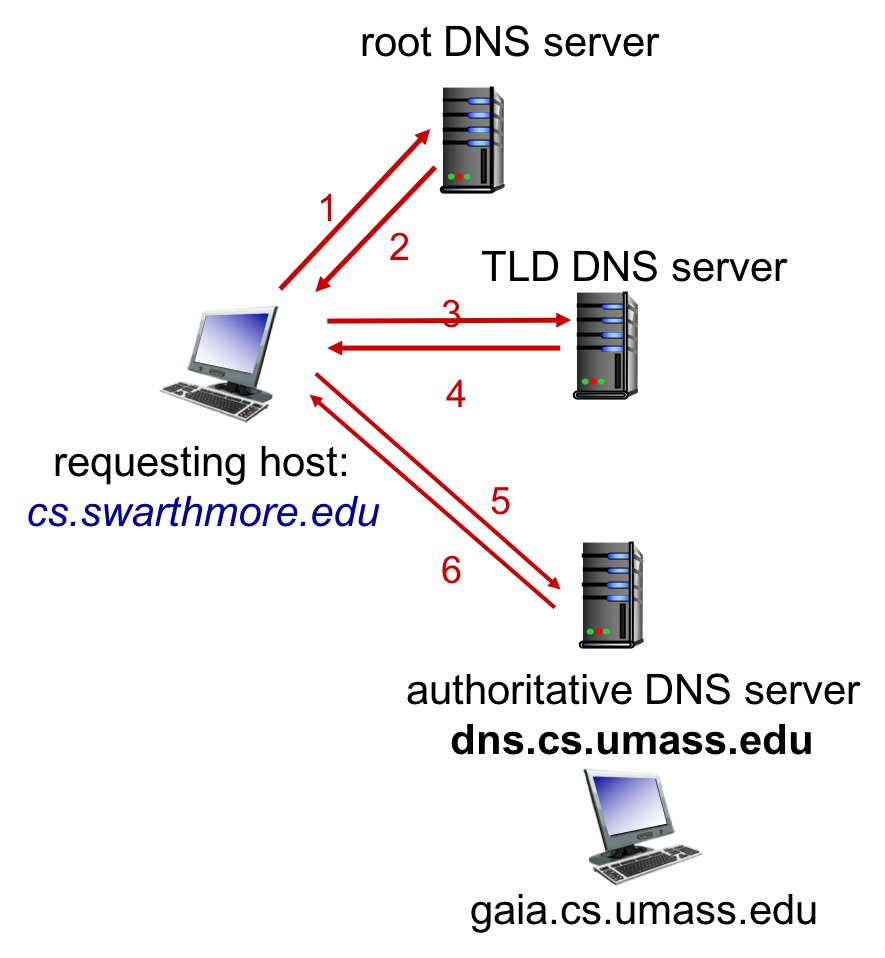
cs.swarthmore.edu performing an iterative DNS request for the IP address of gaia.cs.umass.edu. The host first goes to the root servers and they map the .edu portion of the host name to the IP address of the Top Level Domain (TLD) servers. The host then sends the same query to the TLD servers, which resolve .umass.edu to the IP address of the authoritative address of the UMass DNS servers. And finally, the host queries UMass DNS server dns.cs.umass.edu which returns the IP address for gaia.cs.umass.edu.Lab Requirements
-
We will write a DNS client called
lab3that takes a hostname as its an input parameter and one optional flag (-m) to return either the IP address of the hostname or the mail server and IP address associated with the hostname. -
You should assume that there will be a file named
root-servers.txtin your program’s current working directory and that it contains a list of IP addresses for root DNS servers. Your program must use this file to find a root server. -
It should iteratively work its way down the DNS hierarchy, querying the root, then the TLD, then authoritative server(s) until resolves the requested host name.
| Due to the campus security policies put in place by ITS you will only be able to run your lab from one of the CS department machines. This won’t work using VPN or from residence halls. |
Working example
-
If the flag is absent, you’re being asked to resolve a hostname’s IP address. If the flag is present, you’re being asked to find the mail exchange for a domain. For example:
$ ./lab3 demo.cs.swarthmore.edu
-Querying 198.41.0.4 (root server) to look up demo.cs.swarthmore.edu (MX:False)
-Querying 192.54.112.30 (h.edu-servers.net) to look up demo.cs.swarthmore.edu (MX:False)
-Querying 130.58.64.20 (ibext.its.swarthmore.edu) to look up demo.cs.swarthmore.edu (MX:False)
The name demo.cs.swarthmore.edu resolves to: 130.58.68.26
-
You should also be able to look up the mail server that a machine should use, e.g.,
$ ./lab3 -m cs.swarthmore.edu
-Querying 198.41.0.4 (root server) to look up cs.swarthmore.edu (MX:True)
-Querying 192.5.6.30 (a.edu-servers.net) to look up cs.swarthmore.edu (MX:True)
-Querying 130.58.64.20 (ibext.its.swarthmore.edu) to look up cs.swarthmore.edu (MX:True)
---MX Answer: cs.swarthmore.edu
-Querying 198.41.0.4 (root server) to look up cs.swarthmore.edu (MX:False)
-Querying 192.5.6.30 (a.edu-servers.net) to look up cs.swarthmore.edu (MX:False)
-Querying 130.58.64.20 (ibext.its.swarthmore.edu) to look up cs.swarthmore.edu (MX:False)
Answer: cs.swarthmore.edu resolves to 130.58.68.9
Here, you’ll get an
MXanswer telling you that cs.swarthmore.edu is the name of the mail server. You’ll then need to do an additional query to resolve its name to an A record of130.58.68.9.
Getting your Lab 3 Starting Point Code
Log into CS43 Github for our class and get the ssh-URL to your lab git repository. Follow along with the prompts below to SSH, create a lab directory and clone your lab repos.
# ssh into our lab machines
ssh yourusername@lab.cs.swarthmore.edu

# cd into your cs43/labs sub-directory and clone your lab2 repo
cd ~/cs43/labs
git clone [your-ssh-URL]

# change directory to list its contents
cd lab3-user1-user2

# ls should list the following contents
ls
 Makefile README.md worksheet.md lab3.py
 root-servers.txt struct_example.py timeout.c timeout.py
High-level overview of your program
-
You can use Python or C to implement this lab.
-
I encourage you to try Python so that you can see the similarities and differences between high- and low-level languages with respect to network programming.
Regardless of which language you choose, you must NOT use any libraries that simplify DNS or hide the details of socket programming! Don’t make any calls to gethostbyname()/getaddrinfo()or the equivalent functions in Python. If you have any doubt about which functions you may use, please ask!
-
-
Query Types: Your program should query for host name to IP address mappings (Type
A, decimal value 1) unless given the-mflag, in which case it should query for mail exchanges (TypeMX, decimal value15).-
You may assume that the additional records section will contain the
Arecords for any server names listed in theNSrecords of the authority record section.
-
-
Query status messages: Your program should print short status messages regarding its intermediate steps as it traverses the DNS hierarchy. For each request you make, you should output the server you’re querying and a brief summary of the response you got back. If you didn’t get a response (because you timed out), say so. You should print:
-
who you’re querying (IP address or, name + IP if available).
-
result of the query (success, failure, timeout, etc.).
-
If successful and the final query, print the final result.
-
If asked to resolve an invalid name, your program should print an error message.
-
You should never ask a DNS server to perform a recursive query for you.
-
-
Query Timeout: If you attempt to query a server and get no response after waiting a short time (approximately 5 seconds), your program should move on to the next server and attempt to query that instead.
Workflow of your program
Roughly, your server should follow this sequence:
-
Check the arguments to determine if it’s being invoked for an
AorMXlookup.-
Populate a collection of root DNS server IP addresses from
root-servers.txt.
-
-
Build a query.
-
Build your DNS request, according to RFC 1035, Section 4.
-
Pack your binary header and message query using
struct.pack().
-
-
UDP Socket Calls
-
After your request is built you will need to use
socket.sendto()andsocket.recvfrom()to send and receive from the server. DNS uses UDP port number 53. -
Send that query to a root server and wait for a response. If you wait too long, move to the next root. See an example on setting timeouts in
timeout.pyin your starter code. -
Your request will start at the root server, but note that the DNS server you send the query to will change depending on which level of the DNS hierarchy you are at!
-
-
Receive responses per request from the DNS server hierarchy
-
When you receive your response from the call to
socket.recvfrom(), you will have to unpack the response usingstruct.unpack(). -
When you are unpacking results from
struct_unpackuse one of the following formats:result, = struct.unpack() //NOTE THE COMMA AT THE END of result result1, result2, result3 = struct.unpack()
Since the header is always the first 12 bytes [0:12] of your response, you might want to unpack the header first by calling struct_unpack()`.
-
-
Parse response message: Now that you have your response headers, you can parse the rest of the Resource Record in the response, to figure out whether you have received an NS record, an A record, an AAAA record, or an MX record.
-
Continue this process as you work your way down the hierarchy, only instead of using the root servers for subsequent queries, use the
NSrecord results from previous query’s response. -
Returning the resolved IP address for an A record: Once you’ve made it down to the final authoritative server, inform the user of the result and exit.
Once you receive an A record: you can use socket.inet_ntoa()at the offset of your response where the IP address is located to return the IP address of the hostname. -
You may find that structuring your program with recursion is helpful. For example, in processing one lookup, you might need to start another. If your code can call itself again, it’ll be easier!
Weekly Deliverables
Week 1
-
Hostname-to-IP resolution [1-6 of Workflow]: Successfully navigate the DNS hierarchy, parse NS records and reach the authoritative DNS name server.
Week 2
-
Hostname-to-IP resolution [7, 8 of Workflow]: Return an IP address from the authoritative DNS name server.
-
Hostname-to-Mail server resolution: Entire workflow for MX records
Lab Tools
dig queries
dig is a command-line utility that allows you to construct DNS queries. Your lab3 is mimicing dig 's behavior. To get an idea of how your DNS client is supposed to function,, SSH into the CS lab machines, and try out a dig query on the terminal. You can also use man dig to find out what input parameters it takes.
dig @8.8.8.8 demo.cs.swarthmore.edu
-
This query is requesting Google’s local DNS resolver to resolve demo.cs.swarthmore.edu. If we don’t specify a resolver, then
digwill default to the ISP’s (Swarthmore’s CS) local resolver. -
8.8.8.8: Google’s DNS server -
demo.cs.swarthmore.edu: hostname for which we want to find the IP address.
Iterative dig queries
By default, dig will send recursive queries to resolve a domain name to an IP address. This is not what we want in to do with our DNS client! Let’s use dig to replicate the responses that you should be seeing with your DNS client. Open up Wireshark to see the output of each dig query.
dig . ns
dig +norec demo.cs.swarthmore.edu @a.root-servers.net
dig +norec demo.cs.swarthmore.edu @a.edu-servers.net
dig +norec demo.cs.swarthmore.edu @ibext.its.swarthmore.edu
Complete the section on dig queries in your worksheet.
|
Wireshark
Open up Wireshark either through X11 forwarding from the CS machines or locally on your machine. Follow along with the Wireshark Intro with these slides to make sure Wireshark is working on your end.
To use X11 forwarding on the CS Machines: Setup X11 forwarding locally on your machines. If you haven’t set this up before, a quick note that this process can be slow and a little glitchy.
| According to Swarthmore CS policies you are not allowed to use Wireshark to save any observed traffic. You are only allowed to view DNS and HTTP traffic. If you have questions about Wireshark usage, please contact your professor. Failure to comply with these instructions will result in receiving a zero on the lab along with potentially other consequences. |
#on your home terminal: (Y: trusted X11 forwarding)
$ssh -Y user@lab.cs.swarthmore.edu

# once you login successfully, you should be able to type in the following, and see a GUI terminal
$wireshark
Using tshark
You can also use tshark the command-line equivalent of Wireshark. SSH into the CS machines, and one one terminal type in one of the following tshark commands. Each tshark command has different verbosity as described below. On another terminal (SSH-ed into the same machine), run a dig query. Once you see that tshark has captured 2 packets you can kill tshark using Ctrl+C.
tshark -i eth0 -f "port 53" -O dns
This command would capture traffic on interface eth0 on port 53, the canonical port for DNS, and print out all the details of the DNS packets. This is similar to the output from the middle section in Wireshark.
$ tshark -i eth0 -f "port 53" -O dns -Y dns.flags.response -T fields -e dns.ns -e dns.flags.authoritative
This command uses the -Y option to set a display filter, requesting that only DNS response messages be shown. The -T option then tells tshark that we only want to display certain fields on each of the captured packets. Each -e option is followed by one of the fields that we want to see. In this case, we ask to see the name servers listed by the packet, as well as a binary bit indicating whether or not that name server is authoritative.
tshark -i eth0 -f "port 53" -O dns -x -T jsonraw -J "dns" > dns.json
To capture the hexadecimal values of each DNS field. After a few seconds type in Ctrl+C to kill tshark. Open dns.json to view the output.
You can filter DNS fields with the following filters:
-
dns.flags.response- A bit indicating whether the packet is a response or request -
dns.flags.authoritative- A bit indicating whether a record is from an authoritative server -
dsn.ns- The field containing a name server -
dns.a- The field containing an address associated with a host name, if any -
dns.mx.mail_exchange- The field containing a mail exchange address associated with a host name, if any.
Lab Components
The DNS Protocol
The DNS protocol is a binary protocol. Details of the protocol format are given in the RFC and in these slides for quick reference. You will still need to refer to the RFC to encode the right values for each field.
-
For the Header: Format
-
For the Question Format: Formatting Question, QTYPE, QCLASS
-
For the Answer Format: Resource Record, TYPE, CLASS
-
For names: domain names are maximum of 255 bytes, sub-domains are 63 bytes or less.
-
Message Compression: Example
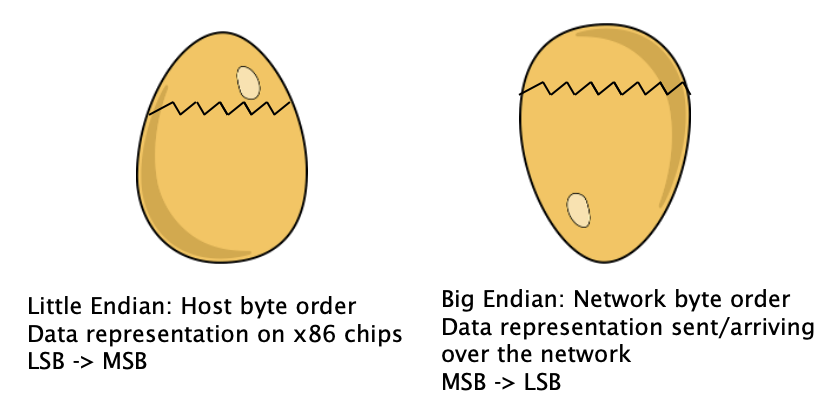
Byte Ordering: Network Byte Order
Since we are now working with a binary protocol rather than ASCII-text based protocols, we need to figure out how to send multi-byte integer values over the network such that all network entities know how to interpret these bytes.
E.g. Let’s consider a 2-byte (16 bit) integer represented in binary:
Binary:      00000000                 11111010
        Most Significant Byte    Least Significant Byte
          "the big end"             "the little end"
Which byte should we send over the network first? MSB → LSB or the other way around? And how does the receiving end host know how to represent this value - Is it 250 or 64000?
-
The networking community adopted the Big Endian format, which means we send the Most Significant Byte first.
-
As it so happens, most end hosts store all multi-byte values internally in memory and the CPU using Little Endian i.e., Least Significant Byte First.
-
This means, that you as a programmer need to convert between the two byte orderings before sending your data over the network!
-
In Python, you’ll want to use the struct module and in particular
!to indicate converting from one format to the other. -
In C, the functions
htonl()andntohl()(32-bit l-ong integers) andhtons()andntohs()(16-bit s-hort integers) will help you convert back and forth between h-ost (your local machine’s integer format) and n-etwork byte orderings.
-
Using Python struct.pack and struct.unpack
Follow along with the example code provided in struct_example.py to pack a binary header in Python.
|
struct.pack()
This function is useful to put the data we want into a bucket of a specific size in network byte order.
For e.g., to get started with the DNS header, we know from the DNS Header format, that the first field in the header is the ID field. We can set the ID field to any number we want (as long as it fits in 16 bits!). We can also pack the flag fields (which are all zero) and concatenate the two. So we would pack our struct as follows:
# packed_id = binary value 500, stored in 2 bytes.
packed_id = struct.pack("!H", 500) # 500: random ID value that we chose
packed_flag = struct.pack("!H", 0) # !H: 16-bit unsigned integer in network byte order
packed_fields = packed_id + packed_flag

#alternatively:
packed_once = struct.pack("!HH", 500, 0)
Packing variable length hostnames:
The NAME field of the DNS Question Format has the following format:
<length><sub_domain><length><sub_domain>...<length_of_root>. Here, the length_of_root = 0.
e.g. for domain name = demo.cs.swarthmore.edu
Delimiter format you would use = 4 demo 2 cs 10 Swarthmore 3 edu 0

Packing "demo" in Python:
subdomain = struct.pack(“!B”, 4) + 'demo' # ASCII characters are 1-byte: no packing required
struct.unpack()
This function is useful to retrieve data we want. Let’s say we wanted to unpack the entire DNS Header, where each field is 2 bytes long, and there are 6 fields (total 12 bytes).
a, b, c, d, e, f = struct.unpack('!HHHHHH', response[0:12])
struct.unpack() will fail if the array size you are unpacking does not equal the size specified by the format specifiers.
UDP Socket programming
-
DNS uses UDP (port number 53) rather than TCP. So there are no guarantees about connections, and we are not going to establish a connection in advance at all this time.
-
Rather than explicitly connecting a socket to one particular destination, this is a socket you can send to any destination!
-
UDP Socket Calls in Python: We will use
socket.sendto()andsocket.recvfrom()socket calls. You will need to specify the destination every time you want to send.-
You can use a
4096size buffer to receive data. All DNS responses are required to fit in 4K bytes.
-
-
UDP Socket Calls in C: Make sure to use
SOCK_DGRAMrather thanSOCK_STREAM, and you don’t need toconnect()it to anything. Instead, you will need to specify the destination in C using sendto(). -
Unlike TCP, UDP will not do partial sends and receives. If you call send on a message and the socket buffer is full, UDP will drop the message! Similarly for
recv. Do not need to callsendandrecvin a loop anymore.
Grading Rubric
This assignment is worth 8 points.
-
2 points for completing the worksheet.
-
1 point for sending a request to and correctly parsing a response from an authoritative server (e.g., sending a query directly to our local department’s server for a
*.cs.swarthmore.eduhost name). -
2 points for traversing the DNS hierarchy down from the root to an authoritative server and letting me know which servers you’re querying and what they’re telling you along the way.
-
1 point for timing out and moving on to the next server in your list when you do not receive a response.
-
1 point for correctly detecting invalid host names and printing a reasonable error message.
-
1 point for resolving
MXrecords.
When submitting, please provide a small executable script named lab3 along
with your program. This script should take the same arguments as your program
(described above) and it should call your program with those arguments. This
helps me to account for various ways of invoking programs in different
languages when grading your assignments.
FAQs
-
Wireshark for debugging: Since DNS is not a text-based protocol, Wireshark is a very useful tool for interpreting the data that you’re sending and receiving.
-
Structuring your code: You will find yourself using similar logic to parse many parts of a resource record. Structure your program in a modular way. You’ll have a much better time if you create one function, that you can call whenever necessary, to handle a task that comes up repeatedly. Duplicating code leads to more difficult debugging!
-
Querying Servers: You only have to query one root server, and one TLD server. If your server times out, you can query the next server in your list of servers.
-
Resource Record Types: In your queries, you can expect to encounter resource records of type
A,MX, andNS. You’re likely to also come acrossCNAME(in the case of a name alias),SOA(if you’re asked to resolve a name that doesn’t exist), andAAAA(IPv6 answer). You don’t need to handle the first two in a special way, just print what you got and exit. When you get anAAAAresponse, look to see if you got other answer records of typeA. -
Timeout on non-responsive Server: When waiting for a response (while blocked on
recvfrom()), you’ll need to tell the OS that you don’t want to block indefinitely, otherwise you might deadlock. Python makes this easy with the settimeout() socket method. In C, you can set theSO_RECVTIMEOoption with setsockopt(). -
Bit Masking: If you need to check for the presence of a single bit or set a single bit in a larger integer field (with message compression), recall the bitwise operations you learned at the beginning of CS 31. If you bitwise and (
&) a variable with a value that has the bit you want to test, you’ll get either 0 (it wasn’t set) or the value (it was set). With bitwise or (|), if you dovariable = variable | value, you will set any of the bits that are 1’s invalue.
Test your code in small increments. It’s much easier to localize a bug when you’ve only changed a few lines.
Submitting
Please remove any debugging output prior to submitting.
To submit your code, simply commit your changes locally using git add and
git commit. Then run git push while in your lab
directory.