Due: Tuesday, November 12, 11:59 PM
1. Handy references:
-
The protocol you implement will be simpler than TCP, but you may find TCP’s header information to be useful for inspiration.
-
select() manual. (You will need to set timers for your timeout, select makes this easy.)
Week 2 Copy the weekly-lab.adoc that we will go through in lab today.
cp ~chaganti/public/cs43/weekly-lab.adoc <your_github_repo>
2. Lab 5 Goals
-
Understand principles of reliability at the transport layer
-
Design and implement a stop-and-wait (SW) transport layer protocol.
-
Develop C library code for your SW protocol over a UDP socket.
-
Learn to use mininet, a network emulator to design and test your protocol.
3. Overview & Requirements
For this lab, you will be designing and implementing reliable data transfer over an unreliable (simulated) link. Your submission will be in the form of a library that mimics the type of functionality that you would expect to get from an OS’s transport-layer implementation.
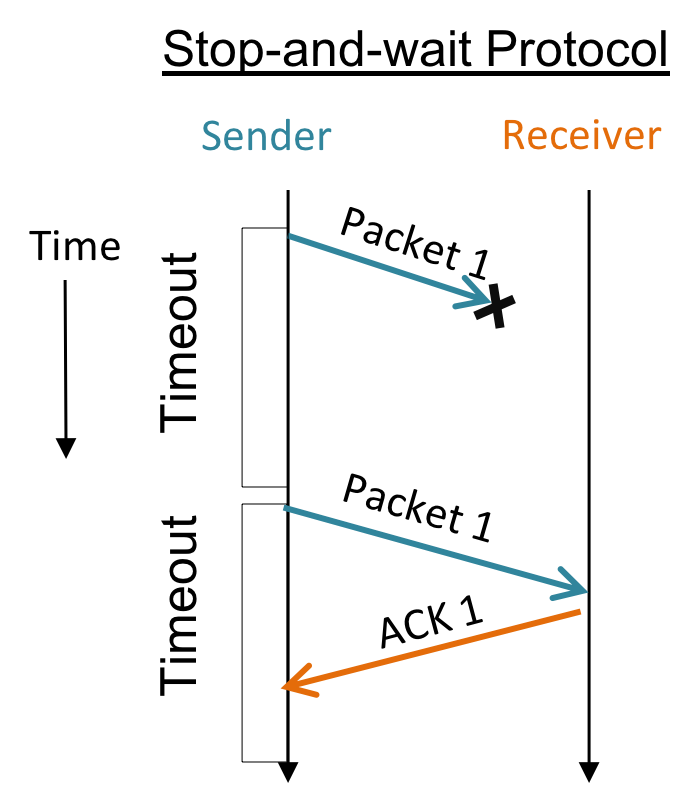
Your transport protocol should be a stop-and-wait protocol for now. We will introduce high-performance pipelining features in lab 6. To implement stop-and-wait you should use ACKs and timeouts to reliably (without packet loss), transfer all the packets from source to destination over a simple dumbbell network.
Requirements: Stop-and-wait protocol specifications:
-
your protocol should reliably transfer data in the presence of lossy links.
-
link packet buffers will be very small (e.g., size = 2 packets)
-
perform RTT estimation to determine setting timeout values.
-
cleanly shut down connections on both ends, even if packets get lost.
-
you do not have to deal with checksums or error detection and corruption.
-
Your library (
lab5.handlab5.c) should allow any application that’s built on top of it to achieve reliable communication. When transferring files with your library, you should get byte-for-byte identical copies usingdiff,md5sum. -
You can do a test-run of the application layer. Of course, at this point there is still no reliability built in!
./lab5_receiver 9000 > [output_file]
Once that’s running, you can fire up a sender that will send a file to it. The sender reads its input from standard in. For example, on h1:
./lab5_sender 10.0.0.2 9000 < [input_file]
-
Use
diff input_file output_fileto see the number of packets lost on the receiver end. Once your reliability is built in, these files should be identical.
-
4. Mininet Environment
Once you’ve connected to the VM, you can run mininet:
4.1. Mininet Topology
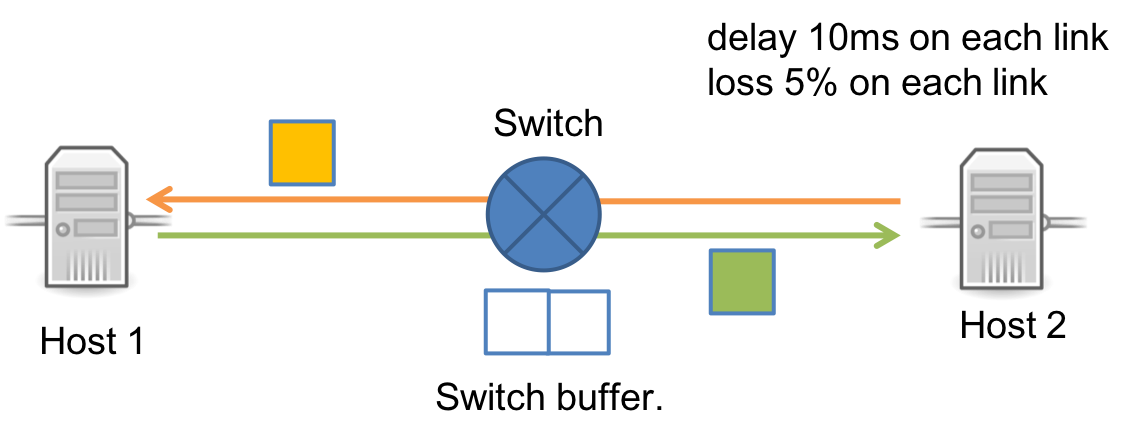
We will run a minimal network topology with two hosts connected to a switch as shown in Figure 1. We will use the following sudo mn command, to set a latency of 10ms, and 5% packet loss on each link. Since this is a Stop-and-wait protocol we will set a buffer size of 2 at the switch. For this lab, each time you want to run your lab5 code you need to execute the following commands:
-
From your terminal that’s
sshed to the VM, runmininet. -
Run the following command, note that there is no space between parameters:
sudo mn --link tc,delay='10ms',loss=5,max_queue_size=2 -x

command options explanation:
--link tc: traffic control for the links
       -x: setup X11 forwarding for the four terminal windows to pop up.
           Feel free to disable this if you like.
This will pop up four terminal windows: one for each of the two virtual hosts (h1 and h2), one for the switch (s1), and one for a controller (c0). Close the controller and switch terminals, you won’t be using those for this lab. All the operations you perform on the gray boxes for the two virtual hosts
h1andh2in our network. These hosts function as though you weressh'ed to two lab machines! They work independently like different machines but share the same files. -
You can choose to either run commands in the little gray boxes (virtual hosts), or run commands on your
mininetterminal (much easier to view generally!).-
If you run commands your
mininetterminal you should prefix the commands below with the name of the endhost you want to run the command on. For e.g. rather thanping 10.0.0.2, you would haveh1 ping 10.0.0.2. -
All the commands listed below are as though you are running on the little gray boxes.
-
4.2. Running commands on mininet hosts
-
Run
ifconfigon each of the two end hosts: You will see thath1has an IP address of10.0.0.1and h2 has10.0.0.2. -
You can also transmit data between the two end hosts. Test this by running the ping command at
h1:ping 10.0.0.2
You should see a (round trip time) delay of ~
40 mswith approximately a19%loss rate (each link has an independent5%chance of dropping a packet). -
You will find the example code in the
lab5directory, which is shared between the VM and each of the virtual hosts. (Trylson the two hosts to see the shared folder).
4.3. Saving and Shutting down the VM
-
Edit/execute code and work on the lab. You’ll want to periodically make a backup of your changes (push to GitHub), since the VM image is stored on the machine’s local disk. If the disk fails, you don’t want to lose your changes…
-
When you’re done, you can tell the VM to shutdown by executing:
sudo shutdown -h now
5. Stop-And-Wait Protocol
-
Protocol API: You are responsible for writing/editing only the following functions:
-
in
lab5.c:my_socket,my_send,my_rtt,my_recvandmy_close. -
in
lab5.h: add state tostruct lab5_hdr -
to send and receive data across the wire, we will be using UDP’s unreliable
sendandrecvfrominmy_sendandmy_recv. Your code in the functions above are responsible for implementing reliability on top of UDP.
-
-
Application layer:
lab5_sender.candlab5_receiver.cimplement the application layer that calls your library functions.lab5_sender.candlab5_receiver.ceach get their own copy of your library functions.-
You may only edit
lab5_sender.candlab5_receiver.cfor your own testings purposes. When grading, I will use the default version, so do not rely on changes to the application layer for correct operation.
-
5.1. Setting up headers and state
Setting up the packet headers:
-
Your packet header in
lab5.hshould look like the following:struct lab5_hdr { uint32_t sequence_number; uint32_t ack_number; }; -
You can add maybe one more variable to keep track of a close packet.
-
Your code does not need to implement the TCP header! The state we have (seg #, ack #, <blank>) should be all we need.
Setting up state in lab5.c:
-
Currently, the only state in
lab5.cisint sequence_numberon line 18. -
Your code should probably have a few more global state variables to maintain RTT values, and a state variable for closing.
5.2. my_send function:
-
This function is responsible for reliable delivery of data packets from the sender to the receiver. Only
lab5_sender.cwill callmy_send. -
To implement reliable delivery, you want to keep sending your data in a loop until, you have received an ACK from the receiver.
-
To figure out if a packet has been successfully sent we will use
selectto implement our timeout functionality. Typeman selectat the terminal and take a look at the last parameter toselect. -
Using select to implement sending: To implement sending a packet and setting a timeout value with select, your code should implement the following functionality:
1: setup your packet and initial state, timeout, etc.
2: if not received an ack:
3: FD_SET your socket for reading
4: send packet
5: set value of timeout struct using: msec_to_timeval(timeout_val, &timeout_struct)
6: call select(sock +1, params, &timeout_struct)
7: check if select has timed out, and double the timeout value if so.
8: if not, receive an ACK using recvfrom()
9: only return from the function *after* receiving ACK from receiver.
-
Note that the
timeout_structhas to be reinitialized every time you callselect!selectinternally decrements the value of thetimeout_structuntil you receive an ACK.
-
5.3. RTT estimation in my_rtt
-
Your implementation will need to perform RTT estimation to determine how you should set timeout values.
-
Use
current_msec()to get an estimate of the current time stamp and usemsec_to_timeval()to fill outstruct timeval. -
To estimate RTT, we will use an exponentially weighted moving average (EWMA) estimate that we discussed in class.
EstimatedRTT  = (1 – a) * EstimatedRTT + a * SampleRTT, with a = 1/8
DevRTT = (1 – B) * DevRTT + B * | SampleRTT – EstimatedRTT |, with b = 1/4
TimeoutInterval = EstimatedRTT + 4*DevRTT + 15
Normally you wouldn’t export such information up to the application/user, but I’ll use this to check your RTT calculation.
-
Your starter code has an initial RTT of 1000. You can change that to around 100 and let your code converge to the network RTT.
-
Like TCP, you should compute your timeout as a function of the current RTT estimate, sampling only those segments for which no retransmission is necessary. If a timeout occurs, you should double the timeout for each subsequent retransmission of the same segment.
|
Adding 15 to the TimeoutInterval
The EstimatedRTT and DevRTT estimation assumes that there is some noise in your estimation (DevRTT > 0), as it tries to converge to the network RTT. In practice, network RTT also has some variance, but since this is mininet, we have artificially set a fixed value for the network RTT for every packet. This means, as we increase the file sizes that we send, the estimate of DevRTT will start to converge to zero! With DevRTT zero, the TimeoutInterval will be exactly equal to the RTT and most of your calls to send will timeout! If we add some constant parameter to your timeout formula we can ensure that you are not going to timeout exactly at EstimatedRTT. |
5.4. my_recv function:
-
The receiver is responsible for sending ACKs to the sender. Since we are only sending one packet at a time, it’s worth thinking about what you want to set as your ACK value.
-
Only
lab5_receiver.cwill callmy_recv. -
The receiver should use UDP
recvfromto receive data, andsendan ACK for every packet received. -
my_recvshould only return to the application if a new packet has been received. Your might want some sort of a loop to implement this functionality. -
Since the receiver is only responsible for sending ACKs, we do not need to keep timeouts, or use
selecton the receiver side.
| For both send or receive we are not going to be using a loop. This time, the underlying socket is using UDP rather than TCP, so there is no byte stream abstraction. When you call receive, you will get one UDP datagram whose size is exactly the size of of MAX_PACKET. It is our responsibility to build reliability over the underlying UDP send and receive. |
5.5. Implementing my_close
Your implementation should cleanly shut down connections on both ends, even if packets get lost. You do NOT need to implement the TCP behavior that allows each side to shutdown independently. TCP is substantially more complex than the protocol you’re building because your protocol is unidirectional.
-
Like TCP though, in
my_close(), you may want to wait for some time, to make sure the last ACK didn’t get lost (leaving one end hanging). -
HINT: since you are closing reliably, you can call
my_sendinmy_close. -
You should NOT rely on ICMP error messages to help your closing procedure. To be safe, it’s best to disable ICMP from both hosts before starting the sender and receiver with:
iptables -I OUTPUT -p icmp -j DROP
5.6. struct casting tricks
Network folks often write code with the following weird syntax:
char packet[MAX_PACKET];
memset(packet, 0, sizeof(packet));
struct lab5_hdr *hdr = (struct lab5_hdr *) packet;
-
The syntax above lets us create a pointer to the packet of type
struct lab5_hdr. This means, that anytime we want to pack values into the header we can use a more intuitive representation of the data we are packing.uint32_t ack_number = 1; /* without struct casting */ memcpy(packet+4, htonl(ack_number)) //packing ack_number = ntohl(*((uint32_t *) &packet[4])) //unpacking /* with struct casting */ hdr->ack_number = htonl(ack_number); //packing ack_number = ntohl(hdr->ack_number); //unpacking
6. Grading Rubric
This assignment is worth five points.
-
1 - You fill in the weekly-lab sheet and provide a description of how you tested and debugged your protocol.
-
1 - Your protocol is a stop and wait protocol that delivers data reliably, even when link buffers are small (i.e., two packets) when no packets are lost.
-
1 - Your protocol reliably delivers data despite packet losses.
-
1 - Your protocol correctly estimates the round trip time of the path.
-
1 - Your protocol cleanly terminates connections such that both ends agree that the connection is closed.
7. Testing
-
If you want to add a print statement to your library, use
fprintfto print to thestderrstream rather than the usualstdout. There are examples of this in the library already. The benefit of using this method is that it won’t interfere with the results that are outputted by the receiver, since that captures only stdout. -
You should experiment with a range of loss rates in
mininet. You can go from 1% to 10% (effective overall loss rate of 35%) at most. If you set higher loss rates, you will need larger files to allow your RTT estimate to converge to the network RTT. -
Autogenerating Test Files: You can test for longer files using the code below:
#!/usr/bin/env python
for size in [1000, 10000, 100000, 1000000]:
    f = open('%dlines' % size, 'w')
    for i in xrange(size):
        f.write('This is line number %d\n' % i)
    f.close()
8. Tips
-
START EARLY! The earlier you start, the sooner you can ask questions if you get stuck. Test your code in small increments. It’s much easier to localize a bug when you’ve only changed a few lines.
-
You may find the textbook to be more useful for this lab than it has been previously. It has good descriptions of the various reliability mechanisms that you might want to adopt.
-
Because you have root account access on your VM, you will have the necessary permissions to run Wireshark. You may find that to be useful while debugging. It won’t be quite as nice as when we used it to look at DNS, since it knows how to decode DNS and it knows nothing about your protocol, but you can still use it to look at the raw values, if necessary.
9. Virtual Machine (VM) Setup
For this lab, we’ll be using an emulation package called mininet to create virtual links that allow us to vary their performance characteristics (latency, loss rate, etc.). Because it requires special permissions to execute, we’ll be running it inside of a virtual machine. The VM image will NOT fit in your home directory, so you’ll need to work in /local, which is the local hard disk of the machine you’re using.
-
To get started, you’ll need to import a copy of the starter VM image:
-
Run
virtualboxin a terminal or open it from within your favorite graphical menu. -
Go to File→Preferences, set your
Default Machine Folderto/local, and then close the preferences window. -
Go to File→Import Applicance. Choose:
/local/CS43-Mininet-VM-2019.ovaand push next once. -
You should now be seeing Appliance settings. Edit the name to include your username. For example,
CS43-Mininet-VM-<your_username>. -
Click import and wait a minute for it to complete.
-
-
Storing things on
/localhas two major implications that you need to account for:-
The data on
/localis stored on a single disk (unlike your home directory, which is split across multiple disks for redundancy). When you’re done working, you should save your important lab files elsewhere (e.g., push them togithub) to avoid data loss in the event of a disk failure. When you’re done working on your VM, you should shut it down nicely:sudo shutdown -h now -
The
/localpartition on each machine is only available on that machine. This means that if you want to move and work a different machine, you’ll need to set up a new VM at the new location. You could also copy your VM image from/localon one machine to/localon another withscp.
-
-
After you have completed these steps, you should see the your VM in the list of VMs available to start. Go ahead and turn it on.
9.1. Starting/Copying your new Virtual Machine
While you could work from within the new VM window that just came up, doing so is a huge pain if you enjoy nice things like graphical interfaces. Instead, it’s much easier to connect to the VM via ssh with X11 forwarding turned on. The VM is already configured such that you can connect to it by ssh ing to your local machine on port 22222. (Port 22222 on your machine gets forwarded to port 22 on the VM):
ssh -Y localhost -p 22222 -l mininet
(The password is: mininet)
Before going any further, you should use the passwd command to set
a new password to protect your VM. After that, you’ll need to configure an SSH key so that you can access GitHub. You have two options:
-
Create a new key for the VM and add it to your GitHub account. (Instructions)
-
Copy your existing ssh key from your CS account to the VM (e.g., with
scp).
10. Submitting
Please remove any debugging output prior to submitting.
Please do not submit output file(s) that you used in testing.
To submit your code, simply commit your changes locally using git add and git commit. Then run git push while in your lab directory.