Due: Tuesday, September 24, 11:59 PM
Handy References:
-
RFC 1945: HTTP 1.0 Specification. Sections 4, 5, and 6 are probably the most helpful.
-
Manual pages for pthread_create, and pthread_detach.
Lab 2 Goals
-
Implement the server side of a HTTP / TCP connection.
-
Understand how the socket system calls on the server side interact with the client side socket system calls.
-
Use threading to serve multiple concurrent clients.
-
More practice with sockets, send(), and receive().
Overview
Having built a Web client, for this lab we’ll look at the other end of the HTTP protocol — the Web server. As real web clients (e.g., browsers like Firefox) send requests to your server, you’ll be finding the requested files and serving them back to the clients.
Lab Requirements
Your server program will receive two arguments: 1) the port number it should listen on for incoming connections, and 2) the directory out of which it will serve files (typically called the document root). For example:
./lab2 8080 test_documentsThis command will tell your web server to listen for connections on port 8080 and, serve files out of the test_documents directory. You should be able to connect to your server from a web-browser or from telnet using http://localhost:8080/path.
Why are we using port 8080? I thought HTTP ran on port 80.
On most UNIX systems, only users with administrative or root privileges, were allowed to run a web server on port 80. If users do not have root privileges, they can use any port greater than 4096 to run their own web server. Often, port 8080 and 8000 are used since they sound "close" to port 80.
But how would the client know that the web-server was using a different port? Isn’t it expecting that the web-server would be on port 80?
Great question! For the client to connect to a web-server on anything other than the default port 80, we would have to explicitly specify the port number in the URL as follows: http://host:port/path
Workflow of your program
Roughly, your server should follow this sequence:
-
Read the arguments, bind to the specified port, and find your document root (you might find the chdir() system call helpful).
-
Accept a connection, and:
-
hand it off to a function.
-
pass the function to a new thread for concurrent processing.
-
-
Receive and parse a request from the client.
-
Look for the path that was requested, starting from your document root (the second argument to your program). One of four things should happen: You might want to make each of these cases a separate function!
-
If the path exists and it’s a file, formulate a response (with the
Content-Typeheader set) and send it back to the client. -
If the path exists and it’s a directory that contains an
index.htmlfile, respond with that file. -
If the path exists and it’s a directory that does NOT contain an
index.htmlfile, respond with a directory listing. -
If the path does not exist, respond with a
404code with a basic HTML error page.
-
-
Close the connection, and continue serving other clients.
Weekly Deliverables
Week 1
Serial web-server: Workflow items above 1 - 5, except 2.b and 4.c.
Week 2
Concurrent web-server: Implement 2.b and 4.c. Please copy over weekly-lab-part2.adoc into your lab2 github repos.
cd <your_lab2_folder>
cp ~chaganti/public/cs43/weekly-lab-part2.adoc .
Make sure to git add, git commit and git push for weekly-lab-part2.adoc.
For week 2 we will implement parts 2.b and 4.c listed in the workflow.
SimpleHTTPServer
To get an idea of how your webserver will function, try out a simple Python HTTP Server.
$ cd lab2/test_documents #cd into the directory from where you want to serve content
$ python -m SimpleHTTPServer 8000 #specify the port number you want to run your server on.
Serving HTTP on 0.0.0.0 port 8000....
Open a separate terminal window and run a client using telnet!
$ telnet localhost 8000
Trying 127.0.0.1...
Connected to localhost.
Escape character is '^]'.

GET /index.html HTTP/1.0
Host: localhost

(enter twice)
Socket Programming
Open your weekly-lab.adoc and answer sections up to socket programming.
|
You will notice that the server side of socket programming has a few more system calls. Use man 2 bind, listen, and accept to read through each of these functions. Look through your starter code on github, and follow along with the description of each of the system calls.
-
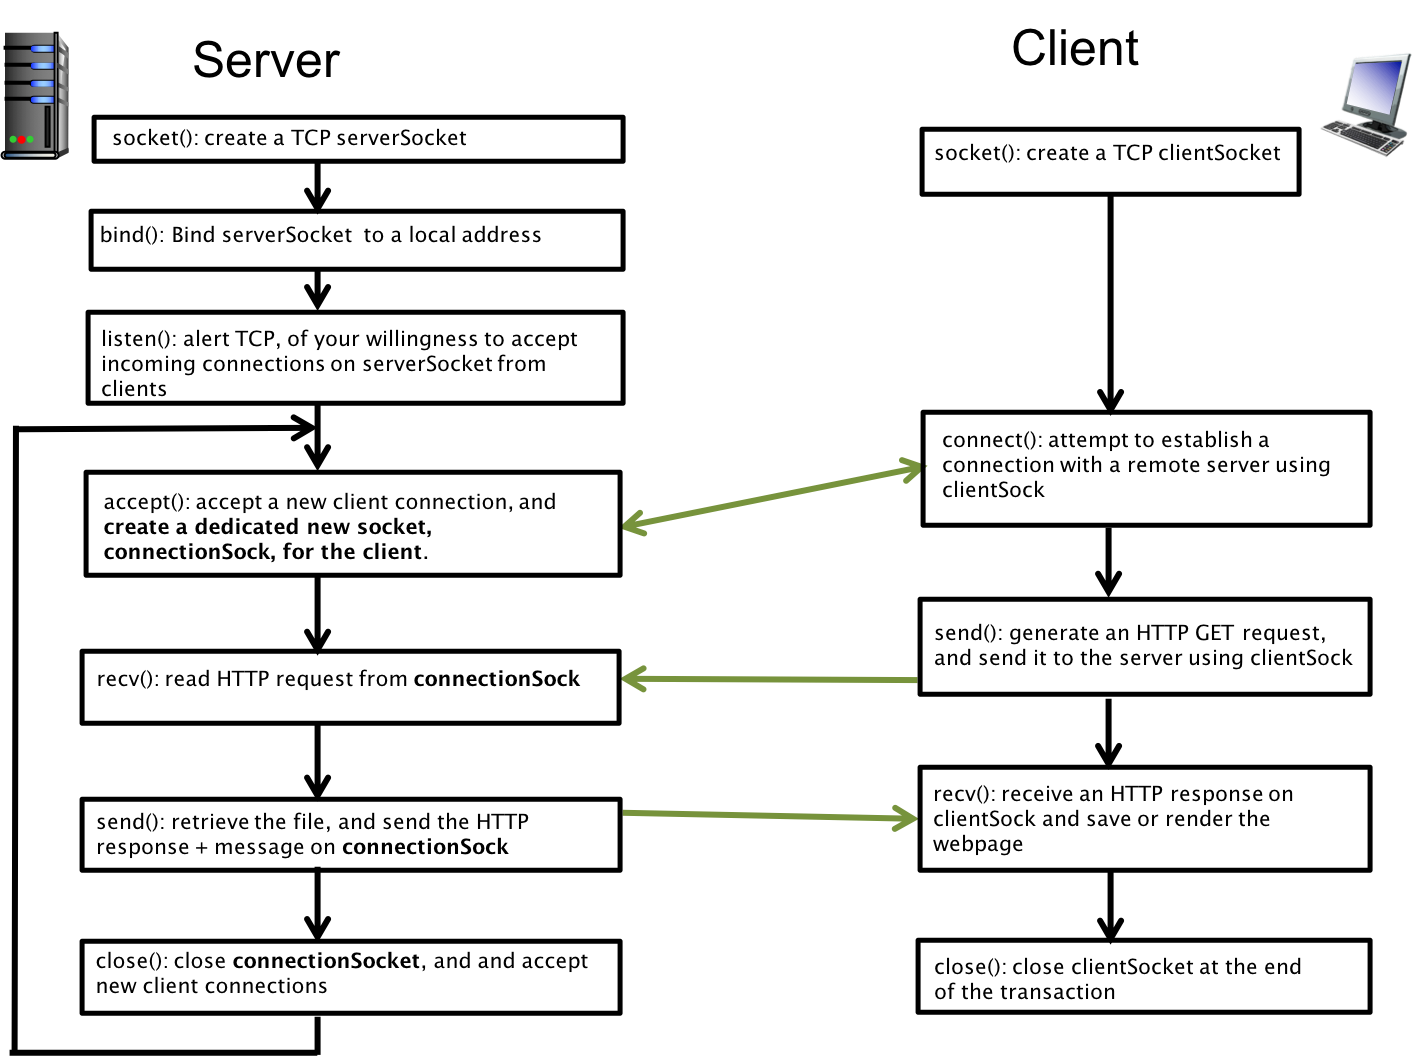
socket(): Like the client side we first create asocketand we will name itserver_socksince it is going to serve a special purpose. We are going to use it to just receive new connections but we are never going to useserver_sockto callsendandrecv. -
setsockopt: The default behavior of TCP (implemented by the OS) is that if you bind to a port and terminate your program, the OS makes you wait for a minute before anyone else can bind to that port again, so that there is no confusion as to who you are connecting to. This option turns it off and is really handy when you are trying to debug your webserver. -
bind(): Similar to the client side, we now have to associate the socket with something. On the client side, we wanted our socket to associate with the server port and IP address, so we filled in the server information. On the server side, we instead want to callbind()to announce the port and IP address we are serving content from.-
As the server, we stake our claim on a port and IP address, as our identifier, so that any incoming client can connect to us. A machine can have more than one network interface or IP address, usually if they connect to two different networks. We pass the
INADDR_ANYmacro, saying we are willing to serve content on all the IP interfaces we have on the server side.
-
-
listen(): So far we’ve just established the port and IP address we want to be identified with. To start accepting client connections we have to calllisten(). This is the equivalent of turning the socket "on". -
while(1): next, we enter an infinite loop, and this where the main body of the work is going to happen. We declare a second socket, that we will eventually use to represent a new client. -
accept(): finally, we callacceptto connect to a new client. Inacceptyou will notice that there are two sockets. One is a parameter, and the return value of accept is a new socket. Once we have a valid return value insockfrom theacceptcall, we are ready to send and receive usingsock. We will never callsendandrecvon theserver_sock, this is just accepting new clients and handing them off to the new socketsock.
Week 2: Threading
Some clients may be slow to complete a connection or send a request. To prevent all other clients waiting on one slow client, your server should be able to serve multiple clients concurrently, not just back-to-back. For this part of the lab, we will use multithreading with pthreads to handle concurrent connections.
-
We will use pthread_create, and pthread_detach, after we call
acceptfor each new client. -
Unlike many of your prior experiences with threading (e.g., parallel GOL in CS 31), the threads in this assignment don’t need to coordinate their actions. This makes the threading relatively easy, and it’s something that can be added on once the main serving functionality is implemented. When starting out, organize your code such that it calls a function on any newly-accepted client sockets, and let that function do all the work for that connection. This will make adding
pthreadsupport quite simple! -
In your starter code you should see a
thread_detach_example.c. This is very similar to what you will be implementing. This function takes the number of threads as an input argument, and creates and detaches each thread. Each thread independently runsthread_function. We pass one argument to the thread in the example, an integer pointer. In your server, this will be the socket ID.-
Inside of the
thread_function, you just have to cast the input back from a genericvoid *unknown type pointer to be an integer pointer. And then you can dereference that pointer to get the value, and then you can free it. This is the main complexity in this part of the lab-- wrangling pointers!
-
-
Finally, we have a
pthread_detachfunction. This basically says I am creating a thread, it is going to go do something in the background, and I don’t need the thread to return a result, but just exit once its done executing. Therefore the return value of ourthread_functionisNULLto satisfy avoid *return value. By detaching a thread, we are telling the OS to just clean it up once its done executing ourthread_function.
Accessing documents and directories on the Server
As mentioned in the lab Requirements, your server program will take in the port number and the directory to serve files from. The test_documents directory in your git repository, is considered the document root path / when responding to requests. For e.g.,
-
if you are asked for
/index.html, you should respond with the file that resides intest_documents/index.html. -
If you are asked for
/dir1/dir2/file.ext, you should respond with the filetest_documents/dir1/dir2/file.ext. -
If the path requested by the client is a directory, you should handle the request as if it was for the file
index.htmlinside that directory if such a file exists.
Handling file types, and errors
In addition to serving requested files, your server should handle at least the following cases
-
A variety of file formats should all display properly, including both text and binary formats. You’ll need to return the proper HTTP Content-Type header in your response. Your code should be able to handle the following file extensions and return the appropriate Content-Type.
-
html:text/html -
txt:text/plain -
jpeg:image/jpeg -
jpg:image/jpg -
gif:image/gif -
png:image/png -
pdf:application/pdf -
ico:image/x-iconYou may assume that the file extension is correct (e.g., I’m not going to name a PDF file with a
.txtsuffix). You can assume. for example, that if the client asks for./hello.pdf, then either it does not exist or if it does, then./hello.pdfhas the correct filename extension. In this case you would search for the trailing "dot" and say if the extension ispdf, then thecontent-typeisapplication/pdf.
-
-
If asked for a file that does not exist, you should respond with a
404 error codewith a readable error page, just like a Web server would. It doesn’t need to be fancy, but it should contain some basic HTML so that the browser renders something and makes the error clear.
Determining if a path is a file or folder
-
chdir(): use this function to change yourcwdtotest_documents. You probably want to do this at the very beginning of your program so all paths can be relative to the document root. -
stat(): use this system call to determine if a path is a directory or a file. Allocate a variable of typestruct statand pass it tostat().-
Use the macro
S_ISDIR()and pass in thest_modefield of yourstruct statvariable.S_ISDIR()will return a boolean telling you whether your path was to a directory or a file. -
You don’t need to worry about all the other fields of
struct statincludingS_ISCHR,S_ISBLK, etc.)
-
Week 2: Providing a directory listing
-
Your Web server should respond with a list of files when the user requests a directory that does not contain an index.html file.
-
Similar to opening a file with
fopenand reading from a file withfread, you can read the contents of a directory using the opendir(), readdir() and closedir() calls. -
That is, if you have a valid directory path, you can pass it to
opendirand store the result in a(DIR*)pointer. Just like a file pointer, everytime you open a directory, you should close the directory withclosedir. -
Next, you can keep calling
readdir(), which returns info for one file, on that(DIR*)pointer until it returnsNULL. Look upman 3 readdirto figure out the return value ofreaddirand how can access the name of the file, and type of the file from the return value. DO NOT attempt to free that pointer — the man page makes it very clear that you should not attempt to free that pointer in the man page forreaddir!. -
Note that there should be no additional files created on the server’s disk to respond to the request.
-
You can follow the following
htmlformat to create your directory listing:<html> Directory listing for: #current path# <br/> <ul> <li><a href="your_dir_listing_with_slash/">"dir_name"</a></li> .... </ul> </html>
-
Hints / Tips / Assumptions
Always, always, always check the return value of any system calls you make! This is especially important for send, recv, fread, and fwrite calls that tell you how many bytes were read or written.
* You may assume that file suffixes correctly correspond to their type (e.g., if a file ends in ".pdf" that it is a PDF file).
|
Client Request Assumptions
-
You may assume that requests sent to your server are at most 4 KB in length.
-
You may assume that if the user requests a path that is a directory, the path will end in a trailing
/. When generating the list of files in a directory, make sure your server also sends back URLs that end in/for directories. This is for the benefit of your browser, which keeps track of its current location based on the absence or presence of slashes. -
You can assume that you will always be passed a valid root directory that can be resolved by chdir().
-
You will only receive GET requests from the client. You can use a buffer size of 4096 for the incoming GET requests (and for that matter for the send buffer too).
-
If you receive an HTTP/1.1 request, please respond back with an HTTP/1.0 response.
String Parsing and File I/O
-
If you need to copy a specific number of bytes from one buffer to another, and you’re not 100% sure that the data will be entirely text, use memcpy() rather than strncpy(). The latter still terminates early if it finds a null terminator (
\0). -
If you are trying to do some sort of specific string or memory manipulation, feel free to ask if there’s a better/recommended way to do it rather than brute force. Often there may be a standard library function that will make things easier.
-
the file size you send to your client might be bigger than your buffer. You will probably want to read in the file from disk in a loop. And every time your buffer is full, you can call send (in an inner loop) - recall that one call to send with say 200 bytes, will not necessarily send all 200 bytes!). You can choose a buffer size of 4k - 4096, and read from disk using
fread().
Testing
-
Take compiler warnings seriously. Unless it’s an unused variable, you should address the warning as soon as you see it. Dealing with a pile of warnings just makes things more difficult later.
-
Test your code in small increments. It’s much easier to localize a bug when you have only changed a few lines.
Week 1, testing
-
The response from your server should mimic result of running:
python -m SimpleHTTPServer
-
When testing, similar to Lab1 testing, you should be able to retrieve byte-for-byte copies of files from your server. Use
wgetorcurlto fetch files andmd5sumordiffto compare the fetched file with the original. -
I will do this when grading. For full credit, the files need to be exact replicas of the original.
-
To test for valgrind errors you can use the following command
valgrind --leak-check=full -v ./lab2. You might find thatvalgrindreports somestill-reachable blocks. This comes from the "sock" variable that identifies the socket, which is not freed when you kill your webserver with ctrl-C since its running in an infinite loop waiting on "accept()". You should ideally have a LEAK Summary that has 0 bytes in definitely lost, indirectly lost, and possibly lost and a small number of reachable bytes when you kill your server.
Week 2, testing
In addition to the testing for week 1, your lab in week 2 should be able to handle clients in parallel. Testing simultaenous requests is next to impossible using two browsers, especiall since your webserver is hosted locally.
Instead, we are going to create a degenerate client with telnet. Run your webserver, and in a seperate window, run telnet and issue only the first line of the GET request. While your server is still waiting for the telnet client to complete its GET request, open a browser window to connect to localhost. You should still be able to receive and send requests from your browser.
Grading Rubric
Total: 5 points
-
1/2 point for completing weekly-lab questions and lab review.
-
1/2 point for correctly returning a
404 error codeandHTMLmessage when a request asks for a file that does not exist. -
1/2 point for serving
index.html, if it exists, when asked for a file that is a directory. -
1/2 point for returning a file listing when asked for a directory that does not contain an
index.htmlfile. The listing should use simpleHTMLto provide clickable links. -
1 point for handling multiple clients concurrently. Your server should be able to have one or more open telnet connections, doing nothing, while still being able to handle browser/
wget/curlrequests. -
1 point for serving both text and binary files (that can be rendered correctly — set
Content-Type) to a standard Web browser (e.g.,Firefox). -
1 point for serving exact copies of text and binary files to command line clients like
wgetorcurl. The MD5 sums should match!
Submitting
Please remove any debugging output prior to submitting.
To submit your code, simply commit your changes locally using git add and git commit. Then run git push while in your lab
directory. Only one partner needs to run the final push, but make sure both partners have pulled and merged each others changes. See the section on Using a shared repo on the git help page.