1. Due Date
Complete lab: Due by 11:59 p.m., Saturday, Oct. 10, 2020.
Checkpoint: We do not have a hard due date for the checkpoint
due to Quiz 1. However, we expect you to get functionality
to pass all or most of the tests in the checkpt program
before lab on Wednesday, Sept. 30.
If you are not passing the checkpoint by that date,
you should consider yourself behind schedule and plan to spend a significant
amount of time on the lab after the Quiz to get caught up.
Your lab partner for Lab 2 is listed here: Lab 2 lab partners
Our guidelines for working with partners: working with partners, etiquette and expectations
2. Overview
In this lab you will implement the Buffer Manager layer of the SwatDB database management system. You will implement all Buffer Manager interface functionality, and a version of the Clock page replacement algorithm that is described in the Lab Details section. The Buffer Manager will interact with the Disk Manager to read, write, allocate, and deallocate Pages of file data from disk in response to requests from the File and Index layers of the SwatDB system.
The primary goal of the SwatDB lab assignments is to gain an understanding of the details of how a relational DBMS works by implementing and testing parts of a relational DBMS.
The SwatDB code base is quite extensive and will require significant reading of its documentation (see Section 3).
2.1. Lab Goals
The main goals of the SwatDB Buffer Manager Lab are:
-
Understanding the functionality of the Buffer Management layer of a database.
-
Simulating the management of Main Memory and implementing and testing a page replacement policy.
-
Navigating provided documentation to utilize a provided interface for the SwatDB Disk Manager Layer.
-
Developing a testing strategy for a large, complex system; making use of a provided unit testing framework, testing sandbox, and debugging tools.
-
Practice working with part of a large code base, much of which you have access to only through its interface definition (i.e.,
.hfiles and generated documentation).
2.2. Starting Point Code
If you have not already done so, first create a course directory for this course, and add a lab subdirectory for your lab repos:
mkdir -p cs44
mkdir -p cs44/labs
cd cs44/labs
We will be using git repos hosted on the college’s
GitHub server for labs in this class.
If you have not used git or the college’s GitHub server before, here
are some detailed instructions on
using
git for CS44 labs.
Next find your git repo for this lab assignment off the GitHub server for our class: cs44-f20
Clone your git repo (Lab2-userID1-userID2) containing starting point files into your
labs directory:
cd ~/cs44/labs
git clone [the ssh url to your your repo]
cd Lab2-userID1-userID2
If all was successful, you should see the following files (highlighted files require modification):
Lab 2 Files
-
Makefile- pre-defined. You may edit this file to add extra source files or execution commands. -
README.md- some directions about how to compile and run test programs for the Buffer Manager. -
bufmgr.h- the SwatDB BufferManager class, and related classes header file. You should not add any new data members to these classes or public methods. You can add private helper methods for good modular code design. -
bufmgr.cpp- the SwatDB BufferManager and related classes implementation. Most of the code you implement will be in this file. All methods defined inbufmgr.hshould be implemented here. Make sure to include good function comments in the this file too (function comments in.hfiles alone is not sufficient). To start, copy and paste function comments from the .h file into here. Then, modify the comments to provide information to a reader of the C++ implementation). -
unittest.cpp- unit testing code for Buffer Manager. We are giving you a lot of unit tests in here, but you still may want to add some more for further stress testing your solution. Use the design of the tests in this file as an example for how to add others. -
sandbox.cpp- another way to test your code. This is a more application code style vs. using the unit-test infrastructure. Note the examples of how to print out BufferManager state. You can use this to add your own testing code. This is meant to complement the unit tests to help with implementation, debugging, or designing new tests.
2.3. Deliverables
The following will be evaluated for your lab grade:
-
The
BufferManager,Frame, andBufferMapclasses inbufmgr.cppfile. This is the primary file in which you will add code. These three classes implement the Buffer Manager layer of SwatDB. Their class definitions are in thebufmgr.hfile. -
The class definition in
bufmgr.h. Only add private helper methods to class definitions to support good modular design of your solution. Do not add public methods or data members to any classes defined in this file. -
The
sandbox.cppandunittests.cppare two programs for testing the Buffer Manager implementation. You will likely want to add code to both as you test your solution. -
Your Lab 2 Questionnaire to be completed individually (This will open on the due date and close after 3 days)
2.4. Checkpoint
Before the checkpoint due date, you should complete Buffer Manager
functionality to pass all the unit tests in the checkpt program. While we
recommend dealing with exceptions as you implement the methods,
we will not require that exceptions are implemented for the checkpoint.
The checkpoint functionality includes:
-
A complete implementation of the
BufferMap. -
A partial implementation of
_allocateFrame- enough to handle the case where the buffer pool is mostly empty. It should be able to increment the clock hand and return the nextFrameto the caller since it will be empty. -
allocatePagewithout triggering Page replacement (the case when there are freeFramesof Buffer Pool space to allocate), and without complete error handling or exceptions. -
getPagewithout triggering Page replacement (the case when there are freeFramesin the buffer pool), and without complete error handling or exceptions. -
releasePage -
setDirty -
flushPage
3. SwatDB
This is the first lab assignment of several that involve implementing parts of the SwatDB Database Management System. In this assignment you will implement the Buffer Manager layer of SwatDB, which interacts with DiskManager’s interface when Page data need to be de/allocated, or read/written between Memory and Disk.
For information about SwatDB, including a link to its on-line code documentation, see this page:
SwatDB documentation that will be particularly helpful for this lab includes:
-
Type and constant definitions in swatdb_types.h
-
The Exceptions classes defined at the BufferManager and DiskManger layers in exceptions.h that you may need to catch or throw. For some Disk Manager layer excpetion, the Buffer Manager may catch them or just pass them through to a higher level layer (not catch them). Check the BufferManager method function comments in
bufmgr.hto see if a particular method needs to throw a BufferManager layer exception(s) or not.
4. Lab Details
The BufferManger implementation is defined in the
bufmgr.h header file that is part of the starting point code with
this lab. Open this file in an editor to read its contents:
vim bufmgr.hYou may also look at the SwatDB on-line documentation of the
bufmgr.h for this file (Note: there are some
extra features in the online documentation that you are not responsible for
implementing, e.g., concurrency. Your local bufmgr.h is the version you are
responsible for implementing.).
4.1. What to implement
There are three classes defined in bufmgr.h: Frame, BufferMap,
and BufferManager.
You need to complete the BufferMap and BufferManager classes to
implement the Buffer Manger layer. The Frame class is fully implemented
for you.
The code for all three should be written in the bufmgr.ccp file.
The bufmgr.cpp starting point includes wrapper functions for all
the methods you need to implement, with TODO comments for the parts
you need to do. You may also add additional
private methods for good modular design (make sure to add
them in the bufmgr.h class definitions as well, but they must be private).
In addition, you will add some code to test your BufferManger implementation to one or more of the test program, that use different testing frameworks:
-
unit tests programs:
unittest.cppandcheckpttest.cpp -
programatic interface:
sandbox.cpp
Testing is described in more detail in the Testing your code section.
Below we describe the main functionality you need to implement.
However, make sure to read the more detailed comments about
each method in the .h and .cpp files for complete information
about what these methods should do. In particular look closely
at their parameter descriptions, return values, and any exceptions
they may throw.
4.1.1. Frame
The Frame class, defined in bufmgr.h, stores meta data
about the Page stored in a Frame of the Buffer Pool.
We give you full implementation of the Frame class methods, but
take a look at them to see what they do since you will need to use these
methods and the Frame data members in your BufferManager code.
4.1.2. BufferMap
The BufferMap class, defined in bufmgr.h, implements
a mapping of PageId to FrameId in the Buffer Pool. This allows you to
quickly identify whether a requested page is in the buffer pool already, and
where to find it. The implementation is a simplified dictionary (or hash table
implementation) from CS35 and uses the
C++ standard library unordered_map
to implement the map data structure. We provide a hash function
for it to use BufHash in bufmgr.h, and you can see how its
data member is defined:
private:
   std::unordered_map<PageId,FrameId,BufHash> buf_map;
Your implementation should use std::unordered_map methods to
find, insert, erase, etc. items to the BufferMap. Here is some
unordered_map
documentation. The implementation is not complicated, but you will need to
first understand how to use unordered_map before proceeding.
You will implement the following BufferMap class methods:
-
get: takes aPageIdand returns theFrameId(i.e., index into the buffer pool) in which thePageis stored. It throws aPageNotFoundBufMgrexception if the page is not in the buffer pool. -
contains: takes aPageIdand returns true if thePagewith thisPageIdis in the Buffer Pool, and false if not. -
insert: takes aPageIdandFrameIdand inserts a new<PageId,FrameId>mapping for it into theBufferMap. It throws aPageAlreadyLoadedBufMgrexception if thePageIDis already in the map (i.e., it is already in the buffer pool). -
remove: takes aPageIdand removes its mapping from theBufferMap. It throws aPageIdNotFoundBufMgrexception if the page is not in the map.
Read the method comments in bufmgr.h or bufmgr.cpp to see what specific
parameter values are, what the return values are, and if the method may
throw exceptions for certain cases. Your implementation must match these
more detailed criteria described in the method comments.
4.1.3. BufferManager
The BufferManger class defines the Buffer Manager interface to the higher layer of SwatDB.
Data Members:
-
frame_tablean array ofFrameobjects, one for each frame in the Buffer Pool. Each entry contains meta-data about thePagestored in the correspondingFrameof the Buffer Pool. -
buf_poolan array ofPageobjects. These are the Pages of Main Memory that make up the Buffer Pool. -
buf_mapaBufferMapobject that is used to map aPageIdto aFrameIdthat stores the Page. -
diskmgris a pointer to the SwatDBDiskManager. The Buffer Manager uses this to request Page I/O operations to the Disk Manager layer. -
clock_handis the valueFrameIdof the current frame pointed to by the Clock replacement algorithm.
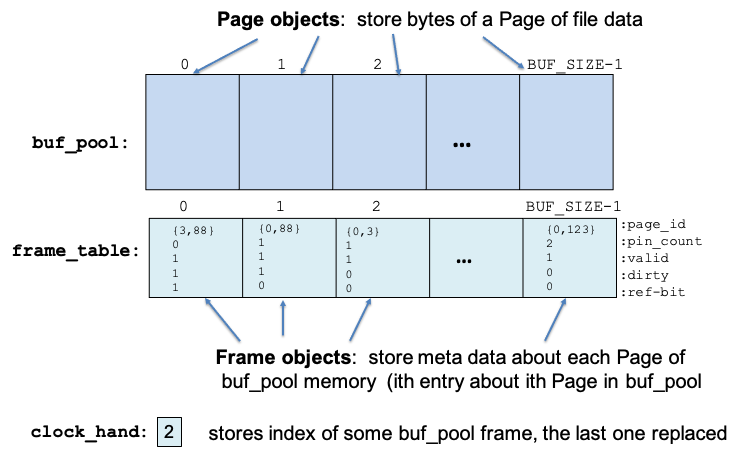
buf_pool, frame_table, and clock_hand data members of the BufferManager store file page data in frames of buffer pool memory, store meta-data for each frame of buffer pool memory, and store state for the clock replacement algorithm.Methods you need to implement Below is a brief description of the methods you need to implement. You will also need to read the function comments for key implementation details.
-
~BufferManagerdestructor needs to ensure that any dirty Pages in the Buffer Pool are written back to disk. The destructor would be called when the DBMS system is being shut down or reboot’ed, and needs to ensure that DB data are persistent. -
allocatePageadds a new page to a File and allocates an empty Page for it in the Buffer Pool. It takes aFileIdspecifying in which DB File to allocate a new page and returns the address of the Page of Buffer Pool allocated for the new page, and the PageId of the new Page.The method should first find a frame in the Buffer Pool to allocate to store this new empty page. This is handled by the
_allocateFramemethod (see below). If there is no space anInsufficientSpaceBufMgrexception should be thrown from_allocateFrame. If successful, this method can then call the Disk ManagerallocatePagemethod to allocate a newPagein the underlying file and get its uniquePageId. Note: theDiskManagercould potential throw an exception if theFileIdis invalid or there is no space on disk; you should let this pass through. The Buffer Manger state needs to be updated to reflect that this newPageIdis in the allocatedFrameof the Buffer Pool, and the address of thePageof Buffer Pool memory and the newly allocatedPageIdvalue are returned to the caller (see here for a refresher on using the C++pairobjects).There are several cases to handle in implementing this method, but you can (and should) implement it in parts, starting with just the easiest case assuming there is a free frame of Buffer Pool, and the replacement algorithm does not need to be called to find one. Test this case, and then add more page allocation functionality incrementally.
-
deallocatePageremoves aPagewith a givenPageIdfrom the underlying file on disk. If thePageis in the buffer pool, it also needs to be removed from the pool and associatedFramecleared. This method throws an exception if either the providedPageIdis not valid (see theDiskmanagerinterface for methods that can detect this) or the page is still pinned in the buffer pool. As for all exceptions, it is important to not leave the database in an inconsistent state if the method is aborted (due to a thrown an exception). For example, deallocating a page on disk but then aborting because the page is pinned will result in aPagein the buffer pool staying valid even though it no longer exists on disk. -
getPagetakes aPageId, pins the page, and returns a pointer to thePageof Buffer Pool storing thePagedata. Your implementation will need to handle two cases: the page is already in the pool, or the page is not in the pool. The latter scenario will require allocating a frame in the buffer pool and retrieving the page from disk.getPagethrows exceptions if thePageIdis invalid (does not exist on disk) or if there is not sufficient space in the Buffer Pool to store the requested page.This method has several cases to handle so you may want to implement one functionality at a time and test as you go. If this method throws an exception, be sure that any partial changes it has made to Buffer Manager state are cleaned-up before it is thrown. It may call
_allocateFrameif the requested page is not in the Buffer Pool. -
releasePageis the complement togetPage. It unpins a page in the buffer pool (but does not remove it). It may also need to update other metadata - therefbitshould be set if the pin count reaches 0, and thedirtyparameter indicates whether the page was modified by the upper layer. This method may throw exceptions. -
setDirtytakes a PageId and sets the dirty bit of theFrameassociated with this page. This method throws an exception if there is no page with a matchingPageIdin the Buffer Pool. -
flushPagetakes aPageIdand if it is dirty, writes its contents to disk using theDiskManagerinterface. ThePageshould no longer be dirty after the write. This method may result in exceptions, some of which are thrown by calls to theDiskManagerand need to pass through. -
_allocateFrameis a private helper function that may be called bygetPageandallocatePageto find a frame in the Buffer to store aPagenot currently in the buffer pool using the Clock Page Replacement algorithm. The clock algorithm may be implemented in this method or in another private helper method called by this one. This method returns theFrameIdvalue of the frame in the Buffer Pool that it allcates. The returnedFrameIdvalue is the index into the Buffer Pool of the specific frame it allocates.
The Buffer Manager also has two interface functions for higher-level layers to create and delete files on disk (these also show examples of how the BufferManger invokes methods of the DiskManager).
-
createFile: is called by a higher level to create a new file in the DB (this method is implemented for you). -
deleteFile: is called by a higher level to remove a file from the DB. This method is partially implemented for you, but you need to complete its implementation to remove all state associated with pages of the deleted file from the Buffer Pool. All of the file’s pages must be unpinned for this operation to succeed, and it throws aPagePinnedBufMgrexception if this is not the case.
You may add additional private helper methods or functions for good modular design but you may not modify the existing public interface (do not add new public methods or alter parameters/return values of existing methods).
There are a several BufferManager methods that are helpful
for debugging that have been implemented for you. You should read all of these
before beginning so that you can make good use of them when your program is
not working.
4.2. Clock Replacement Algorithm
Anytime the BufferManager receives a request that requires finding an
available Frame of Buffer Pool memory, it will invoke the
Clock Replacement Algorithm which is implemented as a part of
the _allocateFrame private method.
You should implement the Clock algorithm exactly as we described it in class, and as illustrated by the flow chart in Figure 2.
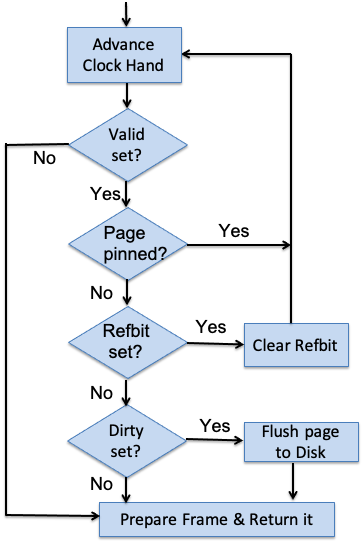
Briefly, the clock algorithm logically organizes the Buffer Pool pages
in a circular list. The clock hand "points" to the current frame (it
is the value of the FrameId of the current frame) under consideration
for replacement. The clock hand is incremented in a clockwise, circular,
fashion around the Frames in the circular list as the algorithm proceeds
in its search for either a page to replace or a free frame to use.
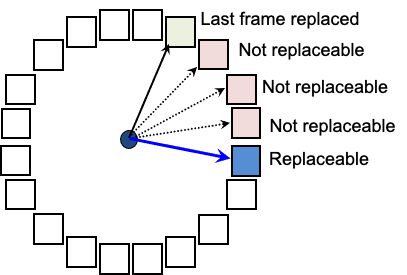
The clock hand is advanced from frame to frame until a frame is found, or until the algorithm determines that there is no frame available. If the page in the current frame is not valid (i.e., unoccupied), it is an obvious candidate for replacement. Otherwise, the algorithm checks to see if the page is still pinned, and if so is not a candidate for replacement. If a page is not in use (its pin count is 0), then the refbit is used to approximate LRU replacement: if the refbit is set or true, the page has been recently unpinned and gets a "free pass" (i.e, the refbit is cleared or set to false and the clock hand advances). Otherwise, a replacement page has been found.
If the page being evicted is dirty (i.e., it has been modified), the page needs to first be written to disk.
If a replacement is found, the Frame’s metadata needs to be reset before it is returned to the caller for use. If not, the algorithm returns an error to the caller. If a replacement is not found, an exception is thrown.
4.3. Exceptions
In some methods your calls to methods in the DiskManager may result in
exceptions being thrown by that layer (these have the suffice DskMgr).
In some cases, you need to catch and handle these exceptions; in other cases,
you may need to let the exception pass through to the caller (i.e., do nothing)
to handle. In certain situations you may need to throw a new SwatDB Exception
from the Buffer Manger (suffix BufMgr) layer in response to error handling.
For information about how to throw and catch different SwatDB exception
objects, look at the Exceptions Section
of the SwatDB information page. You will need to think carefully about the
cause of these exceptions in order to know how to handle them. It is helpful
to answer the question: who is responsible for the exception? For example,
if the PageId provided in the function call is not on disk, the exception
thrown by a call to the DiskManager is not the responsibility of the buffer
manager and should instead be passed on to the calling layer of the DBMS.
However, in some cases when a lower-level exception should be passed on up,
your code may need to catch the exception, clean-up some partial internal
state changes it made, and then re-throw it. See the documentation above
for an example of how to do this.
5. Lab Requirements
In addition to correctly implementing parts of the BufferManager and BufferMap classes listed above, and adding code to test your implementation, you should also:
-
Declare and use variables of the types defined in
swatdb_types.has opposed to their underlying type definition. Also use constants and enum types defined in this file - they help make the code more readable. For example, if a method returns aFrameId, declare a variable of typeFrameIdrather thanstd:uint32_torintto store its return value:FrameId frame_num; PageId pg_id; // some code that give pg_pid a value frame_num = buf_map->get(pg_id); -
Write good C++ code design, and good modular design in your solution. This includes using defined constants and types.
-
Ensure you code is robust to errors, in particular, be sure to test for error handling for exceptions that should be thrown and caught by the buffer manager.
-
Ensure your code is free of valgrind errors.
-
Make sure your code is well-commented, and there is no line wrapping. (See our C++ Style guide link from the Handy Links section.
-
Your submitted code should have all of our TODO comments removed…as you implement a TODO, remove it. These are also helpful to find parts of the given code that you need to implement.
6. Testing your code
There are three test files in the starting point code:
-
unittest.cpp -
checkpt.cpp -
sandbox.cpp
You may use any or all of these to start your Buffer Manager implementation,
but you will want to use all of them to verify you program is working correctly.
sandbox.cpp and checkpt.cpp are useful as in the early parts of your
implementation.
unit tests
The unittest.cpp and checkpt.cpp implement Buffer Manager layer test
code using the unit tests framework from CS35. You can add additional tests
to unittest.cpp by following the examples in this file (see the
studentTests SUITE below).
unittest.cpp contains a fairly complete set of test functions, and you may
want to use it later in your testing as most tests will fail until you have
implemented a fair amount of functionality.
checkpt.cpp has fewer tests, and tests partial functionality of some
methods (allocatePage, for example), and is likely a better first start
for running unit tests to test your code.
To run the unittest (and checkpt) unit test programs:
# run all of the unittest test suites
./unittests
Success: 16 tests passed.
Test time: 0.40 seconds.

# run all of the checkpt test suites
./checkpt

# or you can run individual test suites alone using -s testSuiteName
./unittests -s allocatePage   # run just allocatePage test suite
Success: 1 tests passed.
Test time: 0.02 seconds.

./checkpt -s allocatePageCkPt

# to list the test suites names run with -h
./unittests -h
 Usage: ./unittests -s <suite_name> -h help
 Available Suites: allocatePage, deallocatePage, releasePage,
  setDirtyAndFlushPage, getPage, clockReplacement, removeFile, studentTests

./checkpt -h
 Usage: ./checkpt -s <suite_name> -h help
 Available Suites: allocatePageCkPt, releasePageCkPt, setDirtyAndFlushPageCkPt,
 getPageCkPt
In unittest.cpp is an empty test suite into which you can add more test
code to test your solution:
/*
 * An empty SUITE for students to add additional tests. Students may add tests
 * to other existing SUITE as well.
 */
SUITE(studentTests){
  //TODO: add tests

}
sandbox test program
sandbox.cpp is a more programatic way of designing test code. It includes
an example of calling some of the BufferManager debugging functions that
are already implemented for you in the starting point of bufmgr.cpp.
It also includes two commented out test functions that are implementations
of two tests from unittests.cpp — one test for allocating pages and another
for testing the clock replacement algorithm. As you add functionality to
the Buffer Manager, you can uncomment the code in main that calls these
tests to try them out. You can also add any other test functions you would
like to this program to test your code. Follow the design of the tests
functions in this program to add more test code.
Read the code in this file to understand what it is doing, and add your own tests that follow this model to test a sequence of operations on your buffer manager.
cleaning up corrupted files SwatDB maintains several files to allow for persistent storage of data. While that is not a central feature of this lab, a consequence of a program crash is that temporary files do not get properly cleaned up since the DBMS did not shutdown cleanly. This can cause problems when you try to rerun the program, so you will need to clean this up. Use the two options below:
./cleanup.sh

make clean     # or make clean also runs cleanup.sh then just re-build
make
7. Tips and Hints
The following are some tips to help you implement the Buffer Manager:
-
We suggest starting out with the
sandbox.cpptest program testing some very simple starting functionality. After that, use whichever testing framework is easier. It may require less code writing to add tests tounittests.cppthan tosandbox.cpp, so we recommend eventually moving to use theunittests.cppframework. -
If your tests fail with a crash, run the
cleanup.shscript to clean-up any SwatDB files that may be left around (they did not get correctly deleted because your test program crashed):./cleanup.shIf this doesn’t run, make sure it is executable by running
ls -lto list file permissions:ls -l cleanup.sh -rwx------ 1 you users DATE cleanup.sh*If it doesn’t list
rwxas the permissions, you can change them with thechmodcommand:chmod 700 cleanup.sh ls -l cleanup.sh -rwx------ 1 you users DATE cleanup.sh* -
Make use of some of the
BufferManagerprint methods to see Buffer Manager state in either the test programsandbox.cpp(see theprintTutorialfunction for an example), or you can call functions from within gdb using thecallcommand:
  # assume there is a variable buf_mgr that points to the BufferManager obj:
  (gdb) call  buf_mgr->printBufferState();

  # or from a breakpoint inside a method, you can use this:
  (gdb) call  this->printBufferState();
-
Run
unittestsoften to see which you are passing and which fail. This will help you find missing functionality in your code, and some missing cases. NOTE: these tests are not necessarily complete, so you will want to add some more tests here to really stress test your solution (our grading tests will do this). -
Implement and test incrementally. Here is a suggestion for an order in which to implement Buffer Manger functionality:
-
Implement
BufferMapfunctionality first -
Implement
BufferManger::allocatePage, but just for the case that the buffer pool has space (without the full clock replacement policy yet). You can call and test fromsandbox.cppby uncommenting the call to theallocatePageTest()in themainfunction.Use the code in the the
allocatePageTestfunction to add and test more functionality toallocatePage. -
Implement
deallocatePage. -
Implement
setDirty. -
Implement just some
getPagefunctionality, without triggering the full clock replacement algorithm yet. You can use the unit tests or add some test functions tosandbox.cppto test it. Try callingallocatePagefollowed bygetPageon the samePageIdand check its pin count, for example. -
Implement
flushPage, with and without dirty set. -
Implement
releasePage, with and without dirty set. -
Implement the clock replacement algorithm, and add more functionality to
allocatePageandgetPageto make use of it. -
Implement
deleteFileand all remaining functionality and error handling. -
Go back and implement exceptions you skipped along the way. Be sure that you stress test these to ensure your code is using them properly.
-
-
Refer to Wednesday in-lab code examples for C++, gdb, and valgrind reminders.
-
Remember the
&operator returns the address of its argument (this is C-style operator, not&used to specify reference parameter types in C++). Its argument must be an lvalue (a storage location, such as the name of a variable or an array bucket). For example, to get the address of the 3rd bucket in and array of ints:int array[20];you would use the
&operator like this (in this example I’m assigning its value to an int * variable):int *ptr; ptr = &array[3]
8. Submitting your lab
Review the lab deliverables to ensure you have completed all of your work. Before the due date, push your solution to github from one of your local repos to the GitHub remote repo.
From your local repo (in your ~/cs44/labs/Lab2-userID1-userID2 subdirectory)
make clean
git add *.h *.cpp
git commit -m "my correct and well commented solution for grading"
git push
Verify that the results appear (e.g., by viewing the the repository on cs44-f20). You will receive deductions for submitting code that does not run or repos with merge conflicts. Also note that the time stamp of your final submission is used to verify late days, so please do not update your repo until after the late period has ended.
If that doesn’t work, take a look at the "Troubleshooting" section of the Using git for CS44 labs and the Using git pages. At this point, you should submit the required Lab 2 Questionnaire (each lab partner must do this).
9. Handy References
-
Information about SwatDB
-
Some C++ Programming Resources and Links including the C++ Style Guide
-
C++ programming tools compiling, linking, debugging C++
-
C references in Dive into Systems (some useful for C++ programming too) Chapter 2: C pointers, command line arguments; Chapter 3: debugging tools (valgrind, gdb for C)
-
my CS help pages (Unix tools, programming links)
-
Using Git more complete Git guide