CS35: Data Structures and Algorithms
Lab 9: Railway
Due on Tuesday, December 11th at 11:59 PM. This is a team lab. You and your assigned lab partner(s) will complete this lab together. Make sure that you are familiar with the Partner Etiquette guidelines. You may discuss the concepts of this lab with other classmates, but you may not share your code with anyone other than course staff and your lab partner(s). Do not look at solutions written by students other than your team. If your team needs help, please post on the Piazza forum or contact the instructor or ninjas. If you have any doubts about what is okay and what is not, it’s much safer to ask than to risk violating the Academic Integrity Policy.
We will be using Teammaker to form teams. You can log in to that site to indicate your preferred partner. Once you and your partner have specified each other, a GitHub repository will be created for your team. If you have any trouble using Teammaker, contact your instructor.
Overview
This lab concerns the application of graph data structures to create an interesting program. The objectives of this lab include
- implementing graph algorithms,
- applying those algorithms to a graph-based problem domain, and
- performing some amount of design in the development of a piece of software.
This lab should reinforce the graph algorithms you learned in lecture and improve your programming skills.
In order to complete the above objectives, we’re going to write a game! :-D
Railway
Railway is a two-player route-building game. The players are presented with a map of possible train routes and take turns laying tracks between them. Players are attempting to complete route goals while trying to connect as many cities to their rail lines as possible.
The GUI (graphical user interface) of Railway has been provided for you. When you launch the GUI, it will display something like the following:
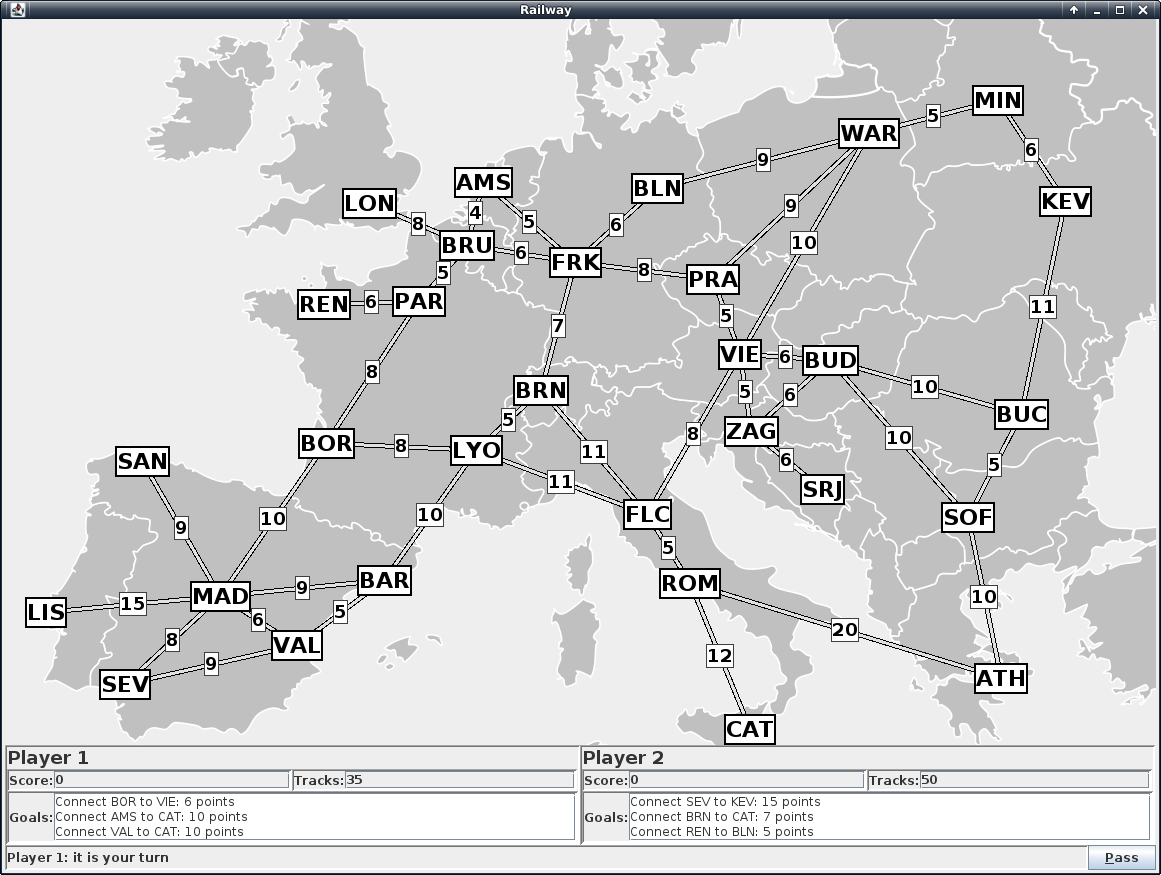
Your task will be to use this GUI to write the game. In the process, you will need to implement some of the graph algorithms that we discussed in class and apply them to the game.
Rules of Railway
To write a program to allow users to play Railway, you will need a formal description of gameplay. The rules of the game are provided here.
Setup
Railway is played on a map represented by a graph. The vertices of the graph are cities; the edges on the graph are potential railway routes. Routes have a cost in “tracks”, the resource used to build railway routes. Routes may also have an owner but, at the start of the game, neither player owns any route. Players take turns acquiring routes in order to complete goals while simultaneously connecting as many cities as possible.
Each player has a number of “tracks”, the resource used to build railway routes. Routes cost varying numbers of tracks to build. Player 1 starts with 35 tracks. Player 2 starts with 50 tracks (to compensate for the disadvantage of making the second move).
Each player also starts with three randomly-chosen goals. Each goal instructs the player to connect two cities on the map; these cities are always at least three routes apart.
Playing the game
Players alternate taking turns. A player must take one of two actions each turn: either pass or place a route. A player who passes gains one track for each city connected by that player’s network.
To place a route, the following requirements must be met:
- The route must be unowned.
- All routes owned by a player must be connected.
- The player has a number of tracks equal to or greater than the route’s cost.
To place a route, the player must pay a number of tracks equal to the route cost. The route must be unowned; a player cannot place a route owned by the other player. A player who places a route does not gain any tracks that turn.
The winner is the player with the highest score once all of the routes have been claimed.
Scoring
Each player’s score can be determined entirely by the state of the game board. A player receives one point for each connected city. Goals are scored by calculating the shortest path between the two cities (even if this is not the route the player took to connect them), dividing by four, and rounding down.
Example
Consider the following image of a game in progress:
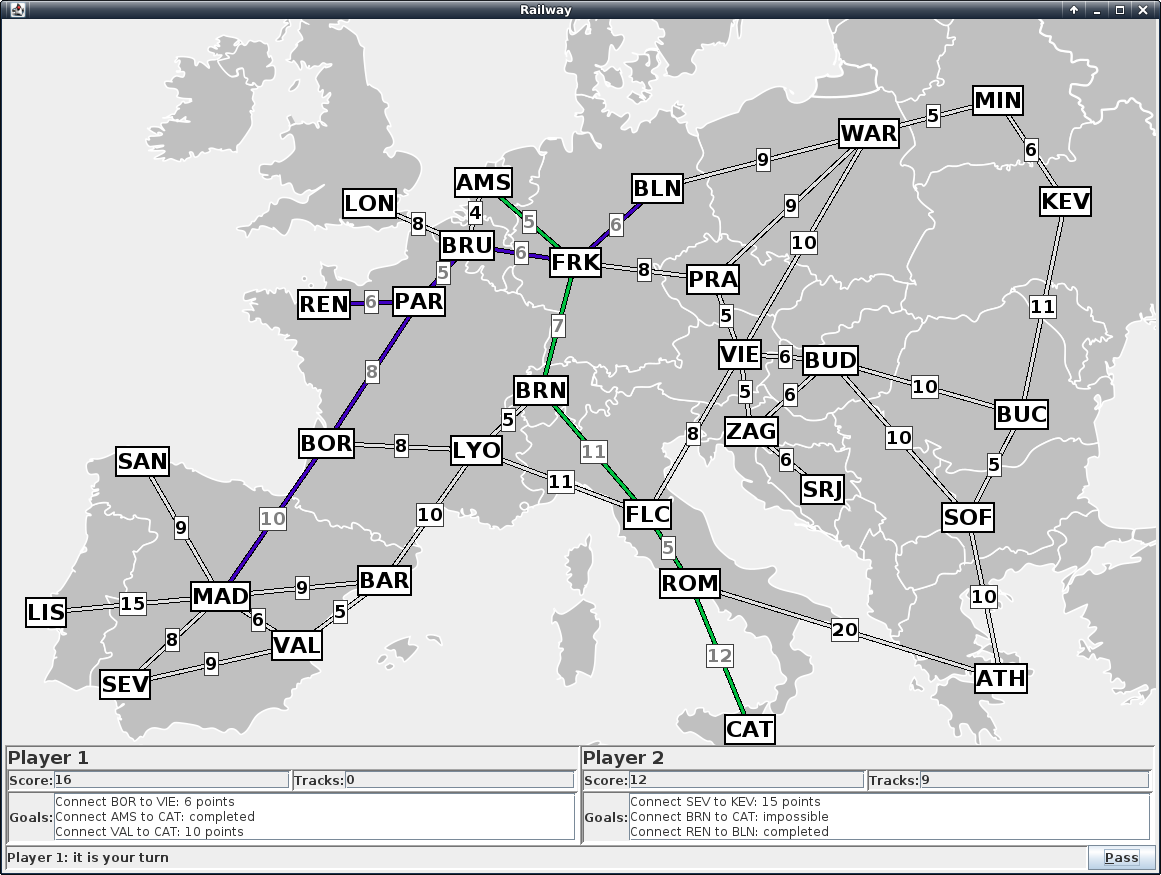
Observe the following:
- Player 1 (green) is out of tracks and will be forced to pass. This will give Player 1 a total of 6 more tracks (one for each of AMS, FRK, BRN, FLC, ROM, and CAT).
- Player 2 (purple) could acquire the route from MAD to SEV next turn (8 tracks) but cannot afford the route from MAD to LIS.
- Player 2 cannot acquire the route from WAR to MIN next turn, since that route is not next to a city that Player 2 has already connected.
- Player 1 has completed the goal “AMS to CAT” using the cheapest possible path (in terms of edge weight). This is worth \(\lfloor\frac{5+7+11+5+12}{4}\rfloor = 10\) points. Player 1 has also connected six cities, for a total score of 16 points.
- Player 2 cannot complete the goal “BRN to CAT” because Player 1 owns the only route that connects CAT to the rest of the map.
Starting Code
Your starting repository includes quite a few files this time around. The following sections discuss these files and what you should do with them.
Graph ADT
As usual, the adts/ directory contains the ADT declarations and implementations for you to use in this assignment. The graph.h and edge.h files are new; take a look at them.
There are two implementations of the graph ADT in your starter code: AdjacencyListGraph and AdjacencyListUndirectedGraph. The latter is a subclass of the former which changes the insertEdge and removeEdge methods to simulate an undirected graph: each time an edge is added with insertEdge, for instance, another edge is also added in the opposite direction. Both of these classes have been implemented for you, but you may wish to examine them.
Graph Algorithms
As part of this lab, you will write implementations of the following graph algorithms:
- Depth-first search
- Breadth-first search
- Dijkstra’s algorithm
These algorithms are required even if you can avoid using one of them in your Railway implementation. You will implement these algorithms in graphAlgorithms-inl.h. The provided unit tests in tests.cpp are designed to verify the correctness of these algorithms.
Railway Code
The RailwayGUI class (railwayGUI.h/railwayGUI.cpp) will, when instantiated, produce a window containing whatever information you provide. The resulting object allows you to update the graph on the map, change the message displayed at the bottom of the window, update each player’s score, and so on. You can also ask the RailwayGUI object for the next command that the user has sent: pass, place a route, or close the window. Look at main.cpp for some code to get you started and make sure to read the comments in that file as well as in railwayGUI.h.
The RailwayGame class (railwayGame.h/railwayGame.cpp) has been left empty. You should use this class to represent the idea of a game of Railway: it should contain information about whose turn it is, what the map looks like (as a Graph*), information about each player, and so on. You have also been provided with a Goal class (goal.h/goal.cpp); you are welcome to modify this class in any way you like. Part of the work of this assignment will be making decisions about what helper methods, fields, and classes you need to make the game work.
By the time you are finished, you should have a game that implements the rules of Railway as described above. To earn full credit, your program should function (no crashes or freezes) and play the game correctly (don’t let players take each other’s routes, score goals correctly, etc.). Your UI must also provide the following features:
- If a goal has not yet been completed but is still possible, you must show its point value.
- You must indicate when a goal has been completed or when a goal cannot be completed.
- If a player makes an incorrect move, you must use the message bar at the bottom of the GUI to explain the problem (e.g. “Player 1: that route has already been taken.”).
Running the Game
Part of the main function – which reads the graph data files and creates the GUI – has been written for you. You can run your code (or even the initial starting code) by running make and then
./railway test_data/Europe
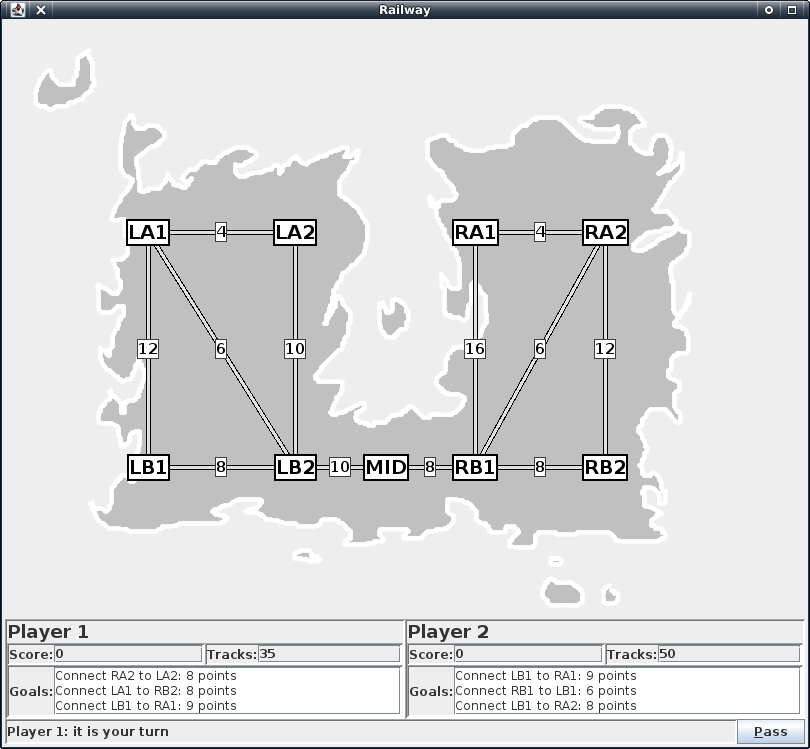
The game will use test_data/Europe to find the files it will use to run your game. To make testing easier, we’ve included a map of Testaria, the Island of Tests, which you can use by running the following command instead:
./railway test_data/Testaria
This will load a considerably simpler map to use for testing as shown below.
See the discussion about testing your code below.
Advice
This lab is more open-ended than the previous labs: you are responsible for part of the design of the application as well as the code. Here are some suggestions to get you started.
- Work out how you’re going to solve this problem before you write any code! It may help for you to write your plan down or discuss it before you start implementation. Make a list of the information you need to keep (player’s score, graph, etc.) and where you plan to keep it (e.g. the graph can be a field of
RailwayGame). Use top-down design, which you may have learned in CS21. Only after you have a plan should you start coding! - Do not change the
guivariable inmainto be dynamically allocated. You should not have to pass the GUI to any of the other routines that you write. If you find yourself doing this, stop and ask one of the course staff to talk with you about your design. - You may wish to create a
Playerclass. If you do so, you can either add its declaration and definition alongside theRailwayGameclass or you can create new filesplayer.handplayer.cpp. If you choose to create new files, make sure to addplayer.oto theOFILESvariable in theMakefileor you will get linker errors! - You can select a random number using the
randfunction from thestdlib.hlibrary. For instance,rand()%10will pick a random number between 0 and 9, inclusive. You will need this when picking goals at the start of the game. - When writing Dijkstra’s algorithm, you will need a min-heap. Although we haven’t used it before, such a heap is provided in the
adtsdirectory. - In the game GUI, the label of an edge determines who owns it. Edges with label
0are unclaimed; edges with label1or2are owned by the corresponding player. - Note that the
Graphclass’sgetEdgeandgetEdgesmethods return copies of the edges in the graph. Modifying the values they return will not change the graph; you will need to add and remove edges from a graph directly if you want to change it. - You may create as many
Graphobjects as you like. For some parts of the game, you may find it easiest to- copy the graph,
- make changes to the copy,
- run one of the graph algorithms on that copy,
- and then delete the copy, leaving the original graph unchanged.
- Although you should plan your lab before you start writing your code, you should code one feature at a time! First, get the game working without objectives or the pass option: just allow players to claim routes. Then, add features one by one until you have a working game. And each time you complete a new feature, commit and push your code!
Testing
As stated above, you can launch your game on a smaller, more predictable test map by running the following:
./railway test_data/Testaria
This map is designed to help you track down bugs. It has four vertices on each side of the map and one vertex in the middle which connects them. If your game is working properly, then the following should be true:
- Every legal goal connects an L vertex with an R vertex (because all of the other vertices are too close to be a legal goal). The MID vertex never appears in a goal.
- If either player acquires one of the edges touching the MID vertex, the other player’s goals immediately become impossible.
- The map always loads correctly. If loading the Testaria map sometimes causes the application to freeze, you probably need to think carefully about how you’re choosing goals at the start of the game.
Although the above does not guarantee that your code is correct, it gives you a means to determine if your code is generating and handling goals correctly.
Memory
Your code must run without any memory errors; make sure to use valgrind to find them. Memory leaks, on the other hand, are acceptable in small amounts and will not significantly impact your grade. In particular, your application should not leak more memory the longer the game is played; applications which leak constant memory will not be penalized, while applications that leak non-constant memory (e.g. more memory after each move) will be penalized slightly.
Coding Style Requirements
You are required to observe some good coding practices:

-
You should pick meaningful variable names.
// Good int* pixels = new int[size]; // Bad int* p = new int[size]; -
You should use correct and consistent indentation. Lines of code within a block (that is, surrounded by
{and}) should be indented four spaces further than the lines surrounding them.// Good if (condition) { cout << "Test" << endl; } // Bad if (condition) { cout << "Test" << endl; } -
You should use a block whenever possible, even if it’s not necessary. This helps you avoid subtle or messy bugs in the future.
// Good if (condition) { cout << "Something" << endl; } // Bad if (condition) cout << "Something" << endl; -
Any new methods or fields in your header files should have comments explaining their purpose and behavior. You are permitted to omit documentation for methods that are inherited from other classes; that is, if your class has a
foomethod because its superclass has afoomethod, you don’t need to document that method.// Good public: /** * Saves the image represented by this object to a file. * @param filename The name of the file to save. * @return The number of pixels in the saved image. * @throws runtime_error If the image could not be saved due to an I/O error. */ int save(std::string filename); // Bad public: int save(std::string filename);Your method/field documentation does not have to be in the format above, but you must describe the method’s behavior, its parameters, its return value, and any exceptions that it may throw. (If you’re indifferent, the above syntax is a good one to know; it’s a de facto standard used by Javadoc, Doxygen, and other tools that automatically process source code comments into other formats like searchable webpages.)
Summary of Requirements
When you are finished, you should have
- Implementations of the three graph algorithms
- A working Railway game!
- No memory errors
- Code which conforms to the style requirements above