CS35 Lab 07: Plagiarism Detector
This is a two week lab. Some parts you will be able to complete this week, while some parts will require knowledge of the Heap data structure and the PriorityQueue ADT, which we will be covering in class in the fist week. If you encounter these portions of the lab in the first week, you may safely ignore them and return to this material after you have covered the material in lecture.
There is both a written and a coding portion to this lab. In the written portion, you will be asked to review some operations for AVL Trees and Heaps. In the coding portion, you will implement an application that uses the Dictionary and PriorityQueue ADTs to build a plagiarism detector, and identify pairs of text documents with similar content.
UnitTests, and implementations of the key ADTs will be provided for you in this lab.
As with most assignments for the rest of the semester, you will be working with a partner. Both partners should be present and working on the code together. You will both be responsible for understanding all concepts, so dividing and conquering is not an option. The academic integrity policy applies to the entire pair; you cannot work or share code with anyone outside your partner.
You and your lab partner will share the same git repository,
which is named lab07-<user1>-<user2>.git.
Please access your lab by cloning the appropriate git
repository, e.g.:
$ git clone git@github.swarthmore.edu:CS35-F17/lab07-mgagne1-adanner1.gitYou can also get the ssh git url from CS35 github org.
For this lab, we also are hosting several test files. Instead of giving everyone identical copies of the somewhat large files, you will create a symbolic link to the folder containing the files.
$ cd ~/cs35/labs/lab07
$ ln -s /usr/local/doc/lab07-data/  ./test_data
Below is an overview of the files required for submitting this lab.
Those highlighted in blue will require implementation
on your part. Those highlighted in black are
complete and should not be modified except for comments.
- CS35 ADTs folder: a directory containing the C++
declarations of all the ADTs seen in CS35 so far,
including
priorityQueue.h. It also contains C++ implementations of the List, Queue, Stack, Dictionary and Priority Queue ADTs using the C++ Standard Template Library (STL). You can use any of them by writing a line like the following in your code#include <cs35/stlPriorityQueue.h>
This directory is in/usr/local/include/cs35and the compiler automatically looks there for header files. documentUtils.*A helper class that will read a text file and build aDocumentobject using yourDocumentimplementation. This handles the messy details of reading, parsing, and cleaning individual words and phrases from a text file.Makefile: The build instructions for your lab.similarityResult.*A small class that stores pairs of Documents and their similarity score.test_data: a directory containing many text files to use for the./plagiarismDetectorapplication. This is over 17 MB of data. Instead of every group having their own copy, this lab makes a shortcut symbolic link to a common directory on the CS network that all students can read from.tests*: several unit tests for this lab. The./testscan run all tests, or just a subset.textree.pyA python helper program for converting text representations of Trees to $\LaTeX$ representations.main.cpp: The main program. Given a list of filenames, this program will determine which pairs of documents have the most similarities.document.h/.cppThe declaration and implementation of the document class. This will use a Dictionary ADT to store the number of times short phrases appear in a given text file.plagiarismDetector.h/.cppThe declaration and implementation of the plagiarismDetector class. This will use a Priority Queue ADT to rank suspicious documents.README.md: The standard survey file for lab 07.manualTests.cpp: A "sandbox" test program that you can use while you develop your program.WrittenLab.texThe $\LaTeX$ source for the written portion of the lab.written-treesSample text tree representations.
LearningLatex.tex document for instructions on
how to use $\LaTeX$.
Drawing trees in LaTeX
For most of the written problems, you will need to pretty print trees. Doing this in $\LaTeX$ is difficult and cumbersome. To help you out, we've given you a python program to generate the $\LaTeX$. Additionally, we've included all the commands you need for compiling your trees in the Makefile.You'll be using a python program
called textree.py. This program will take a text
file containing a crude tree and produce pretty tree images.
In the written-trees directory, there are a series of
files named e.g. problem1.1.tree.
The textree.py program runs these tree files and
converts them in to .tex files. To complete the
written part of the assignment, you just need to edit the .tree files
to contain the right trees. The following rules apply to
these tree files:
- Blank lines and lines starting with # are comments and are ignored.
- Lines starting with a colon are treated as $\LaTeX$. Write your explanation of what is happening there.
- Lines containing only numbers, letters, and spaces are taken to be a binary tree. Each line is a level of the tree
- Lines containing only symbols are ignored. This allows you to
use
/and\symbols if you want to draw your tree in the text file.
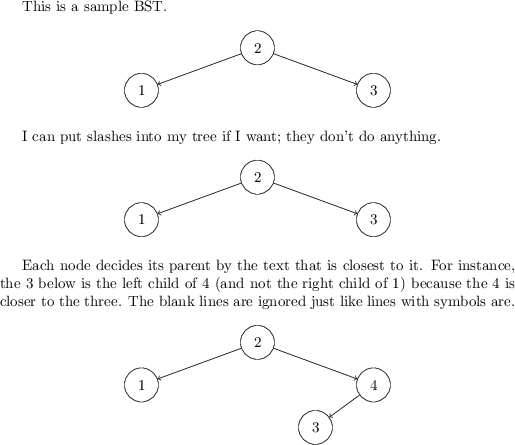
This is a sample BST.

 2
1 3

# This line is a comment.

: I can put slashes into my tree if I want;
: they don't do anything.

     2
    / \
   1   3

: Each node decides its parent by the text that is
: closest to it.  For instance,   the 3 below is
: the left child of 4 (and not the right child of 1)
: because the 4 is closer to the three.  The blank
: lines are ignored just like lines with
: symbols are.

      2

   1     4

       3
AVLTrees
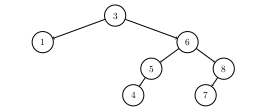
- Perform a left rotation on the root of the following tree. Draw the resulting tree after rotation.
- Show the right rotation of the subtree rooted at 6.
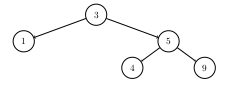
- Insert the value 7 into the following AVL Tree. Show the tree before and after each rebalancing.
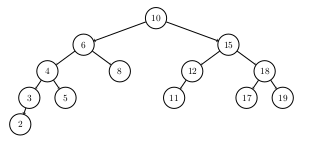
- Remove the value 2 from the following AVL Tree. Show the tree before and after each rebalancing. Note: A previous version of this page was missing the 10 from the AVL tree, meaning the original tree was imbalanced. Please use the updated version below and update the
written-tree/problem1.4.treeby adding 10 as the left child of 11 prior to removal.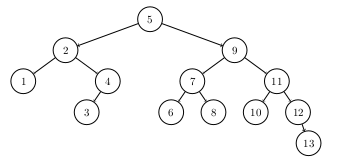
Heaps
- Show the addition of element 6 to the following binary heap. First, show the addition of 6 to the tree; then, show each bubble-up step.
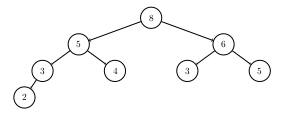
- Show the removal of the top element of this binary heap. First, show the swap of the root node, then, show each bubble-down step.
- Consider the sequence of elements $[8,1,6,3,9,4,5]$. Using the representation discussed in class, show the tree to which this sequence corresponds. Then, show the heapification of this tree; that is, show how this tree is transformed into a heap. Demonstrate each bubble-down step.
In this part of the lab, you will write a program for detecting plagiarism in written essays. To do this, we will make one fundamental assumption: plagiarized documents will have a significant number of phrases in common. Our plagiarism detector will then proceed according to the following high-level algorithm:
- Determine which phrases appear in each document and how often.
- Compare each pair of documents to determine how similar their phrase counts are.
- Report the most similar pairs of documents.
You will not have to write tests for your program; they have been provided. To approach this problem, we will break the work into a few parts. We'll start by writing code to represent a single document. Next, we'll write code to perform the comparison between documents. Finally, we'll put it all together into a main function.
The Document Class
We will begin by splitting the text files that we are checking into "phrases". Here, a phrase will be a sequence of three words that appear next to each other in the document. For instance, the five word text "hedgehog in a balloon factory" contains the following phrases three three-word phrases:
- "hedgehog in a"
- "in a balloon"
- "a balloon factory"
The files documentUtils.h and documentUtils.cpp already contain code that will read the files for you and split them into phrases. However, you must write the Document class that this code uses to remember the phrases for a particular document. Look at document.h for a description of how the Document class should work; write your implementations in document.cpp. Note that we do not have a document-inl.h file since the Document class is not a templated class.
Document constuctor does not need to open the provided filename. This is usually done in the loadDocument helper function which will call the Document constuctor, parse the input file, and return the newly created Document object.
When writing your code, note that each Document will need a Dictionary to keep track of how many times it has seen each phrase. You can find a balanced BST implementation of the Dictionary interface in stlDictionary.h.
Note that you must provide the private member variable declarations for the classes in this lab. Destructors are declared for each class, but how they should operate will depend upon the particular fields you pick. It's possible, for instance, that the right choice of member variable types means a correct destructor implementation involves no lines of code at all.
Testing the Document Class
Tests for this lab have been provided for you, but they have been split into several groups to allow you to run them separately. If you run tests as normal...
$ make tests
$ ./tests
...then you will receive a message requesting which tests to run. Your choices are all, document, detectorShort, detectorMedium, and detectorLong. You should avoid all until you have completed your lab. For now, just run
$ make tests
$ ./tests document
You should make sure your Document class tests succeed before you continue.
The PlagiarismDetector Class
Once you have implemented the Document class, you are able to load documents, count the frequency of phrases within a single document, and compare the similarity between two Documents. Next, we need to write code that uses this class to analyze numerous documents. We'll write this code in the PlagiarismDetector class to keep it organized; when we're finished, we'll be able to think of a PlagiarismDetector object as a device for detecting similar documents without focusing on the details of, e.g., AVL trees.
The first important method of the PlagiarismDetector class is the addDocument method. Given a filename, this method loads that file using the documentUtils.h functions and stores the resulting Document* pointer for later analysis. You will need to add an appropriate member variable to store this collection of Documents but, since both the loadDocument function and the Document class have already been written, there aren't that many lines of code involved.
The second important method of PlagiarismDetector is the findSuspiciousDocuments method. This method must compare each added document to each other, producing a list of SimilarityResult objects. It must then produce some number of the top matches based upon a parameter; for instance, the caller may want the top ten matches. The findSuspiciousDocuments method is required to use a Priority Queue to find these most suspicious documents. Sorting the entire list of results isn't an option.
For large sets of documents, findSuspiciousDocuments takes a very long time. Feel free to add a progress indicator to help you keep track of which files you are comparing or how much work you have left to do.
SimilarityResult objects and Copying
The findSuspiciousDocuments method of the PlagiarismDetector class allows you to find the most suspicious documents that the detector has loaded. This method returns a vector containing objects of type SimilarityResult, a class which has been written for you. SimilarityResult is similar to pair or string in that it knows how to copy itself; that is, the following code works:
SimilarityResult myResult("file1.txt", "file2.txt", 20);
SimilarityResult otherResult = myResult; // this doesn't usually work for classes we write
This means that you don’t need to create dynamically-allocated SimilarityResult objects; you can statically allocate them like you have done with pair objects in previous labs.
Testing the PlagiarismDetector Class
As mentioned above, the tests for this lab have been split into groups. For the PlagiarismDetector class, there are three groups: detectorShort, detectorMedium, and detectorLong. These groups reflect how long the tests will take to run. Because the plagiarism detection process is computationally intensive, you’ll want to start by debugging the short tests and move on to the longer tests when they’re the only ones left that fail. Make sure you read the following section on performance before moving on to the longer tests!
Performance
The plagiarism detection process is fairly slow. Fortunately, there’s one key optimization you can introduce which improves the wall time of your program considerably. This optimization could make the difference between your unit tests running for five minutes or five hours, so make sure to include it before running detectorMedium or detectorLong.
The optimization only involves changing a few lines of code. In your Document class where the similarity method is defined, your algorithm probably works something like this:
- Create a
vectorto contain the phrases. - Set that vector to contain all phrases from this document.
- For each phrase in that vector, accumulate either the phrase count from this document or the phrase count from the other document, whichever is smaller.
This algorithm works well on documents of similar size. If, however, one of the documents is much larger than the other, we run the risk of calling getPhraseCount many, many times only to get a lot of zeroes. To fix this problem, use the following algorithm instead:
- Create a
vectorto contain the phrases. - Set that vector to contain all phrases from either this document or the other document, based upon which document has fewer phrases.
- For each phrase in that vector, accumulate either the phrase count from this document or the phrase count from the other document, whichever is smaller.
With this algorithm in place, the tests should take roughly the following times on the CS network machines:
detectorShort: less than a seconddetectorMedium: less than a minutedetectorLong: about five or six minutes
Your main Function
Once you've written the PlagiarismDetector class, you should be prepared to write your main program. The main program accepts three or more arguments on the command line. The first argument of your program should be the maximum number of suspicious pairs to display. Every remaining argument is the name of a document to use when running your program. For instance, a user might write
$ ./plagiarismDetector 4 essay1.txt essay2.txt essay3.txt essay4.txt essay5.txt
to get the top four examples of plagiarism among the provided five files. In bash (the language used by the terminals on the CS network machines), you can accomplish the same thing by writing
$ ./plagiarismDetector 4 essay*.txt
The terminal will interpret the "*" in the filename to mean "any amount of text goes here"; it will then find all files matching that description and use each of their names as a different argument. For instance, you can try
$ ./plagiarismDetector 10 test_data/small/*
to test the small data set. For instance, the above command might return the following:
test_data/small/bgt61.txt test_data/small/sra31.txt 1639
test_data/small/bgt157.txt test_data/small/bgt160.txt 754
test_data/small/bmu392.txt test_data/small/mul30.txt 24
test_data/small/esv276.txt test_data/small/toi94.txt 23
test_data/small/bah105.txt test_data/small/esv276.txt 22
test_data/small/bah27.txt test_data/small/esv276.txt 21
test_data/small/bgt61.txt test_data/small/toi94.txt 20
test_data/small/sra31.txt test_data/small/toi94.txt 19
test_data/small/esv276.txt test_data/small/toi141.txt 18
test_data/small/ecu179.txt test_data/small/esv276.txt 18
The specific format of the output is up to you.
The main.cpp file provided in the initial git clone has a small example of how to read/print the command line arguments. Note that argv[0] is the name of the program, not the maximum number of results to display.
Invalid Input
Your program is expected to run without crashing or throwing an exception from main regardless of how it is run; in case of bad input, you should provide an appropriate error message. In particular, you must handle all of the following bad cases:
- Too few command-line arguments were provided.
- The first command-line argument is not a number.
- The first command-line argument is a number but is the only argument; no files are specified.
- The number of results requested is greater than the number of comparisons performed by the
PlagiarismDetector.
For this lab, your program is required to run without
memory errors or leaks. You should use valgrind
as you proceed in your testing to track memory errors. When you have
a complete first draft of your implementation:
- Commit and push what you have (in case something goes wrong).
- Run e.g.,
valgrind ./tests documentto make sure that the test program does not cause memory errors. - Once memory errors are cleared, run
valgrind --leak-check=full ./tests documentto identify and correct memory leaks.
Do Not run valgrind on ./tests detectorMedium or ./tests detectorLong. Valgrind has some computational overhead that slows down the execution of your program. These last two tests are already quite slow. Running them through valgrind would take an excessively long time.
When you have completed your lab, you should have
- A submitted PDF of your final WrittenLab
- A working plagiarism detector
- Passing unit tests
- No memory errors!
- No memory leaks!
- Code which conforms to the style guide above.
- A completed survey in README.md
Once you are satisfied with your code, hand it in using git. Remember the add, commit, push development cycle. You can push as many times as you like, but only the most recent submission will be graded. You may want to run git status to confirm all modifications have been pushed.