Week 6: graphics, objects, methods
Announcements
-
Lab 5 due Saturday, written part due in class on Friday
Two things for this week: have fun with graphics/drawing pictures, learn about objects and object-oriented programming (OOP).
Monday
objects and methods
Last time we started talking about objects and methods.
Technically, almost everything in python is an object. Most objects have both data and functions (now called methods), together in one thing (the object).
Here are some simple examples of calling methods on a python list object:
>>> L = []
>>> L.append("A")
>>> L.append("B")
>>> L.append("C")
>>> print(L)
['A', 'B', 'C']
>>> L.reverse()
>>> print(L)
['C', 'B', 'A']
>>> L.sort()
>>> print(L)
['A', 'B', 'C']
>>> L.count("A")
1
>>> L.count("Z")
0
The list methods used above are append() (add an item to the list), reverse()
(reverse the order of the list), sort() (sort items from low to high), and
count() (count how many are in list). There are other python list methods available.
Here are some string methods, acting on a string object:
>>> S = "swarthmore"
>>> S.upper()
'SWARTHMORE'
>>> S.count("r")
2
>>> S.index("w")
1
>>> S.isalpha()
True
>>> print(S)
swarthmore
The string methods used above are: upper() (return uppercase version of string),
count() (count how many are in string), index() (show where char is in string),
and isalpha() (return True if string in only alphabetic chars). There are many
other python str methods available.
Note: strings are immutable, so even calling S.upper() doesn’t change what
is stored in S (it just returns a new, uppercase, string). If you want to change
what is stored in the variable S, you could use S = S.upper().
Using objects in your programs is just a different way to organize your data, but also provides advantages as programs and programming teams get larger and more complex (divide and conquer, code reuse, easier to read/write/debug, etc).
syntax
The syntax for calling methods on objects is object.method(), where the
method may or may not require arguments.
Zelle graphics library
This week we will learn the Zelle graphics library, which is an excellent example of using objects (i.e., it’s easy to see the objects, because they are graphical objects, like circles and squares, drawn on the screen).
To use the Zelle graphics library, we need to import the classes and functions with this at the top of our programs:
from graphics import *
(and don’t name your program graphics.py, because that’s what the Zelle graphics
file you are importing is named).
examples
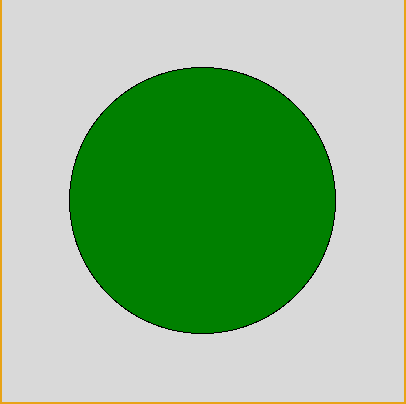
This program creates a graphics window and draws a circle in the middle of the window:
from graphics import *

def main():

   width = 400
   height = 400
   gw = GraphWin("first graphics!", width, height)

   cp = Point(width/2, height/2)   # center point
   c = Circle(cp, width/3)
   c.draw(gw)
   c.setFill("green")

   # wait for click to end
   gw.getMouse()

main()
Things to note:
-
three objects are constructed: a
GraphWin, aPoint, and aCircle -
for the circle object, the
draw()and thesetFill()methods are used -
the point object is used to place the circle, but it isn’t drawn
-
the
getMouse()method is used to wait for a mouse click, which ends the program
And here’s the image:
challenge
Look through the documentation on the
Zelle graphics library
and learn about all of the possible objects (Circle,
Rectangle, Text, etc), as well as the methods that go with each
object (draw(), move(), setFill(), etc).
See if you can draw one of these simple graphics pictures
Wednesday
The goal for today is a tic-tac-toe board, where the user can click the mouse in any square and place a mark (X or O). We’ll start by drawing the vertical and horizontal lines for the board.
setCoords()
In the tictactoe.py file I gave you, I make a graphics window that is
600x600, then call the drawLines() function (which doesn’t work yet).
from graphics import *

def main():
    width = 600
    height = width
    gw = GraphWin("tic-tac-toe game", width, height)
    drawLines(gw)

    # add code here to get a mouse click
    # then update the graphics window with an X


    # wait for user input before we close
    gw.getMouse()
    gw.close()

def drawLines(gw):
    """draw the horizontal and vertical lines for the board"""
    p1 = Point(1,0)
    p2 = Point(1,3)
    L1 = Line(p1,p2)   # first vertical line at x=1
    L1.setWidth(3)
    L1.draw(gw)

main()
Instead of working with a graphics window that is 600x600, and trying to
figure out where the vertical lines go (x=200 and x=400), we can simplify
the math and change the coordinates of the window to be 0 to 3, so the
vertical lines are at x=1 and x=2. This is what the setCoords() method
does. It also flips the y axis, so the y coordinate increases from the
bottom of the window to the top.
Here’s what the new code looks like:
gw = GraphWin("tic-tac-toe game", width, height)
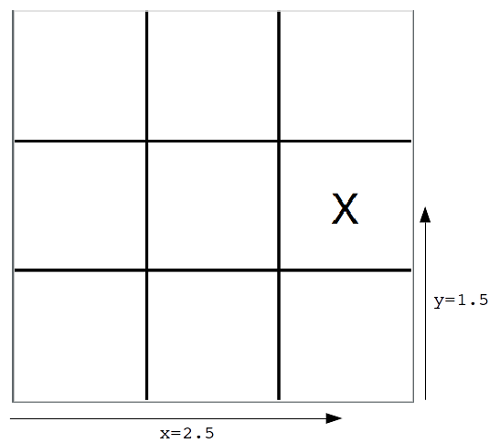
gw.setCoords(0,0,3,3)And here’s what that does to the window coordinates:

If you run the above tictactoe.py code again, now the drawLines(gw)
call correctly draws the first vertical line at x=1.
clone()
We can create points for the second vertical line, just as we did for
the first one, or we can just copy (clone) the first line and move it
over by 1 in the x direction. Here’s how clone() and move() are
used:
    L1 = Line(p1,p2)   # first vertical line at x=1
    L1.setWidth(3)
    L1.draw(gw)
    L2 = L1.clone()    # make a copy
    L2.move(1,0)       # move it 1 in the x direction, 0 in y
    L2.draw(gw)        # draw the second line
Using clone() copies everything: the position, the color, and the
line width.
Can you add to drawLines() to draw the horizontal lines?
user input/tic-tac-toe
Once we have the board drawn, it’s time to get clicks from the user and put Xs and Os on the board.
Let’s start with just getting 3 clicks and seeing where the user clicked (not what we ultimately want, but good for testing).
Back in main() let’s add a for loop to get the clicks:
    gw = GraphWin("tic-tac-toe game", width, height)
    drawLines(gw)
    for i in range(3):
       click = gw.getMouse()
       print(click)
If you run that, you should see the Point() objects (printed to the
terminal) that are created with each
click. Notice also that they have x and y coordinates, which we can use
to figure out which square the user clicked.
For example, if the user’s click is this:
Point(2.37, 1.59)
That means they clicked in the middle row (y=1.59), in the last column (x=2.37).
But we don’t want to put a mark (an X or an O) exactly where the user clicks. Instead, we want to make a mark in the center of the square they clicked. For the above click, we want to do something like this (put an X in the square in the middle row (y=1.5), in the far right column (x=2.5)).
So we need to change the x,y coordinates of the click into the x,y coordinates of the center of the square they clicked.
Here are three click points, all in the same square as the example above. Can you see how they are all similar? How can we get from those x,y coordinates to x=2.5,y=1.5?
Point(2.30, 1.69)
Point(2.82, 1.92)
Point(2.11, 1.06)
The answer: truncate and add 0.5, and you should get the x,y coordinates of the square that was clicked.
getX() and getY()
So here’s the code to get a click from the user, pull out the x,y
coordinates of the click point, truncate them (using int()), and then
add 0.5 to get the square’s center point:
    for i in range(3):
       click = gw.getMouse()
       cx = click.getX()
       cy = click.getY()
       center = Point(cx+0.5, cy+0.5)
       print(center)
The above uses the getX() and getY() methods to pull out the x,y
coordinates from the click point.
Text objects
And instead of just printing the center point, we want to put some text
there. We can do this by creating a Text() object:
    for i in range(3):
       click = gw.getMouse()
       cx = click.getX()
       cy = click.getY()
       center = Point(cx+0.5, cy+0.5)
       t = Text(center, "X")
       t.setSize(36)
       t.draw(gw)
The above should get 3 mouse clicks from the user, and whichever square they click, put a large "X" in the center of that square. Try it to make sure it works, then see if you can make it alternate Xs and Os (first click is an X, next an O, etc).
Friday
The goal for today is to animate a circle bouncing around inside the graphics window (bouncing off the "walls").
colors
So far we’ve just been using simple colors, like "red", "yellow", and
"green". The
Zelle
graphics library includes a color_rgb() function that allows us more
control over the colors. Here’s a quick example of using color_rgb():
mygreen = color_rgb(50,205,50)
p = Point(10,20)
c = Circle(p, 50)
c.setFill(mygreen)
The color_rgb() uses three integer arguments, one for the amount of
red, one for the amount of green, and one for blue. Each amount is an
integer from 0-255, where 0 means none, and 255 means "as much as
possible". So, for example, white would be color_rgb(255,255,255), and
black would be color_rgb(0,0,0), and the green above would have some
red and blue (50), but more green (205).
getKey() vs checkKey()
Both of these methods look for a key press, but getKey() pauses the
whole program, waiting for a key press. This is not what we want during
an animation, where things are moving, and we don’t want to pause the
animation. Using checkKey() we can check if a key has been pressed,
and do something if it has. However, if a key has not been pressed, the
program just keeps going.
Here’s a simple while loop that, if a key has been pressed, prints out
what key was pressed. Also, if the 'q' key was pressed, it quits the
program:
done = False
while not done:
  key = gw.checkKey()
  if key != None:
    print(key)
  if key == "q":
    done = True
We’re using the boolean flag variable done to control the loop. The
flag is only set to True if the 'q' key is pressed, so that’s the only
way to end the loop.
Also, checkKey() returns None if no key was pressed (it checks for
key presses many times per second). So if the key variable is not
None, we must have received a key press, so we print it.
If you try the above code you’ll see printouts for any keys you press. Here’s what I see in the terminal when I press these keys: z w Enter Esc Space q
z
w
Return
Escape
space
q
animation
We can use the loop above to animate an object. Inside the loop we will
simply move() an object a very small amount (eg, x=1). This will move
the object to the right in our graphics window:
p = Point(100,200)
c = Circle(p, 50)
c.draw(gw)

done = False
while not done:
  key = gw.checkKey()
  if key != None:
    print(key)
  if key == "q":
    done = True
  c.move(1,0)
If you run the above, the circle will quickly move off to the right. In fact, it moves so fast it may be hard to see. If we slow down the program, the animation looks better (smoother).
Python has a sleep() function in the time library we can use. Adding
a sleep(0.01) call in the loop will pause the program for 0.01
seconds, making the animation much slower.
from time import sleep
...

p = Point(100,200)
c = Circle(p, 50)
c.draw(gw)

done = False
while not done:
  key = gw.checkKey()
  if key != None:
    print(key)
  if key == "q":
    done = True
  c.move(1,0)
  sleep(0.01)
bouncing off the walls
Finally, instead of just moving a circle to the right, we would like to
turn it around when it gets to the right side of the graphics window.
We can use the circle methods getCenter() and getRadius() to figure
out the position of the circle (since it is moving all the time), then
change it’s velocity when it "hits" the right wall.
from time import sleep
...

width = 600
height = 400
gw = GraphWin("animation", width, height)
p = Point(100,200)
c = Circle(p, 50)
c.draw(gw)
vx = 1       # use a variable for velocity in x direction

done = False
while not done:
  key = gw.checkKey()
  if key != None:
    print(key)
  if key == "q":
    done = True
  c.move(vx,0)
  center = c.getCenter()
  radius = c.getRadius()
  cx = center.getX()
  # decide if we should switch direction at right wall
  if cx+radius > width:
    vx = -1*vx
  sleep(0.01)
Add to the above the ability to change direction when we hit the left wall.