CS21 Lab 6: Graphics, Using Objects
Due Sunday, March 22, before midnight
|
Remote access with graphics
If you’ve previously set up your laptop to be able to work on code remotely, please note that the standard setup does not support graphical windows. This means that while you will still be able to edit your files remotely, you will not be able to run and test your code since you will not be able to see any graphical window your program creates. |
Goals
The goals for this lab assignment are:
-
Practice with object-oriented programming, creating and using objects
-
Become more comfortable using dot notation to call methods of objects
-
Learn how to draw graphics in python
-
Write code to interact with the mouse
As you write programs, use good programming practices:
-
Use a comment at the top of the file to describe the purpose of the program (see example).
-
All programs should have a
main()function (see example). -
Use variable names that describe the contents of the variables.
-
Write your programs incrementally and test them as you go. This is really crucial to success: don’t write lots of code and then test it all at once! Write a little code, make sure it works, then add some more and test it again.
-
Don’t assume that if your program passes the sample tests we provide that it is completely correct. Come up with your own test cases and verify that the program is producing the right output on them.
-
Avoid writing any lines of code that exceed 80 columns.
-
Always work in a terminal window that is 80 characters wide (resize it to be this wide)
-
In
vscode, at the bottom right in the window, there is an indication of both the line and the column of the cursor.
-
Function Comments
All functions should include a comment explaining their purpose, parameters, return value, and describe any side effects. Please see our function example page if you are confused about writing function comments.
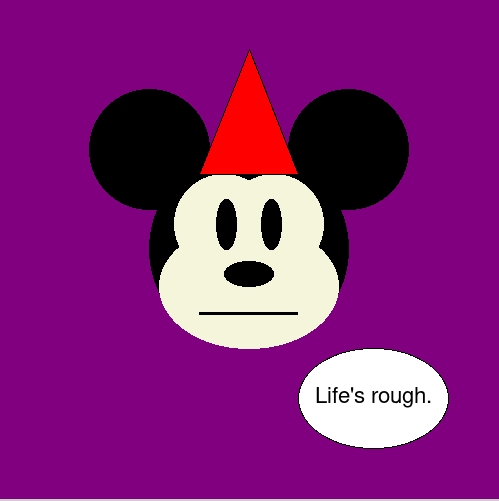
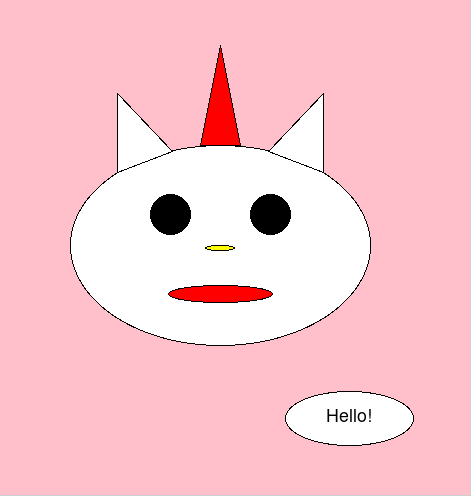
1. Draw a Face
In face.py you will write a program that draws a face. Your face can
be that of a human, an animal, a cartoon, a fantasy creature, or something similar.
This is an opportunity to have some fun with the graphics library.
Note: Do not spend too much time on this, as you should make sure you have time to finish the next program, SwatDraw. The next part will take more time, so you should try to get started on that early; you can always come back to this later if you want to add more to your face drawing.
1.1. Requirements
|
The code you submit for labs is expected to follow good style practices, and to meet one of the course standards, you’ll need to demonstrate good style on six or more of the lab assignments across the semester. To meet the good style expectations, you should:
In addition, you’ll need to demonstrate good top-down design practices on two or more lab assignments across the semester. To meet the top-down design expectations, you should:
|
Your program should have the following features:
-
Draw a face with at least 5 different features in addition to the main head shape. Some features include: eyes, nose, mouth, ears, hair, beard, antenna, horns, or teeth.
-
Your face should use at least 3 different shapes, and 3 different colors (background color counts).
-
The first mouse click should have your character say something (in text). Please keep the message friendly.
-
The second mouse click should exit your program (i.e. make sure that your program does not exit before the user clicks the mouse).
1.2. Example Output
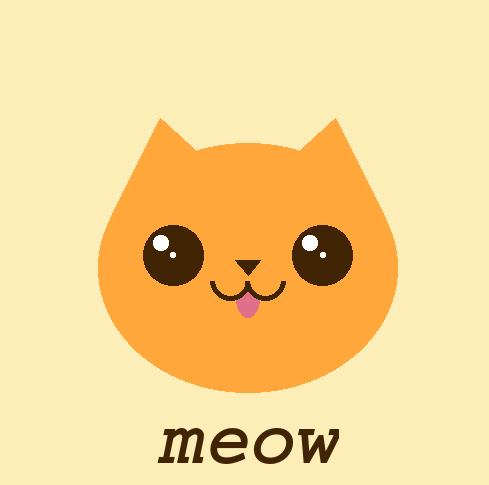
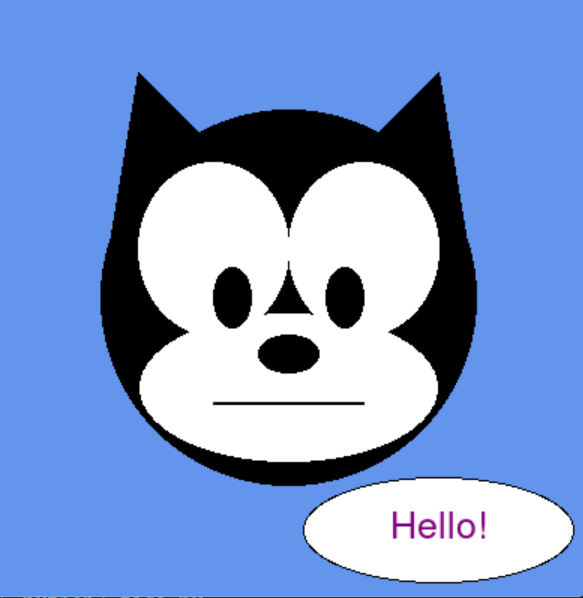
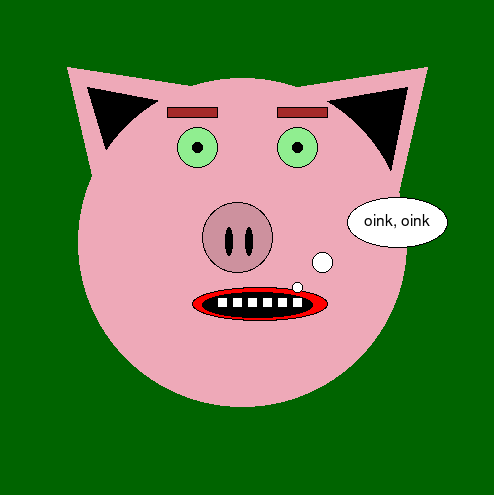
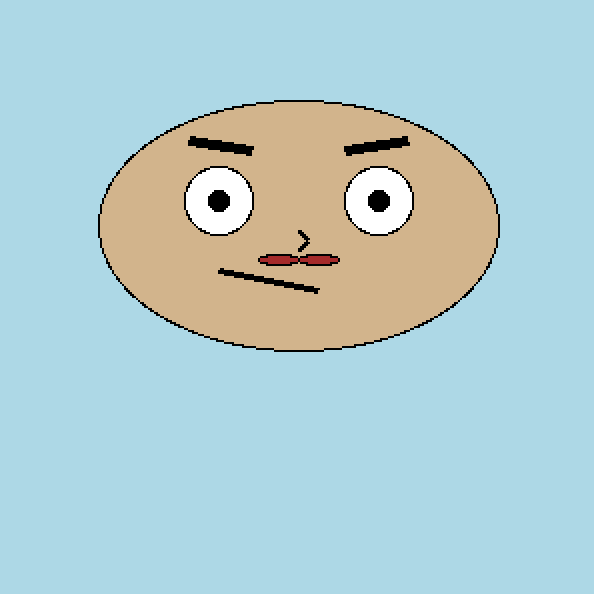
Here are some example faces drawn by some past CS21 students, CS21 ninjas, and CS21 staff:
$ python3 face.py

1.3. Hints/Tips
-
You need to run graphics library programs from CS machines (not remotely connected).
-
Refer to the in-class programs for examples of how to use the graphics library and some different methods of some of the classes.
-
Make use of the Zelle Graphics Reference, and other references off the course Schedule, to find methods that might be useful for setting the color and position of different objects.
-
If you are reproducing two or more identical features, for example you have two eyes that are drawn from the same shapes of the same sizes, remember you can use the
clonemethod to make a copy of a shape object and themovemethod to move a shape to a new location. -
The
getMousemethod of aWindowobject waits for a mouse click. -
Remember that the order in which you draw objects that overlap changes the final outcome of what is ultimately drawn.
2. SwatDraw
2.1. Overview
We will create the "SwatDraw" drawing program in the file swatdraw.py. The
following sections will walk you through creating this program; in the end, the
program should do the following:
-
Create and display a graphics window to the user.
-
Wait for the user to press one of the following keys:
p,c,r, orq, and do one of the following, depending on the key pressed:-
If the user presses
r, the program will select a random color to use as the "active color" to use for all shapes drawn moving forward. -
If the user presses
c: Allow the user to draw a circle by clicking in two locations. The first click selects the center of the circle, and the second click will be a point on the boundary of the circle. The fill color should be set to the current "active color". -
If the user presses
p: Allow the user to draw a polygon by repeatedly clicking to indicate the vertices of the polygon. The fill color should be set to the current "active color". -
If the user presses
q: The program quits.
-
Do not attempt to implement this program from the above description alone. The following sections will describe each of these functions in more detail.
2.2. Setup
The starter code in swatdraw.py creates the graphics window for you. You are
free to change the dimensions of the window if you like, and to set a different
background color.
Note that the starter code includes a call to the method
win.getKey(). This will cause the program to wait
until you press a key on the keyboard (similarly to getMouse()). The window
will not close until a key is pressed.
2.3. The distance(p1, p2) function
First, define a function distance(p1, p2) which takes two parameters, p1 and
p2, both objects of type Point. The function should compute the distance
between these two points and return this distance.
The distance between two points can be computed using the Euclidean formula: The distance between \((x_1,y_1)\) and \((x_2,y_2)\) is given by \(\sqrt{(x_1-x_2)^2 + (y_1-y_2)^2}\).
2.3.1. Testing the distance function in main
It’s always a good idea to test your code as you write it, even if you don’t
think it’s necessary. Write some code in main to test your new distance
function. You can define your own Point objects and pass them to the function,
e.g.:
# Add this code to main for testing
test_p1 = Point(0, 100)
test_p2 = Point(0, 200)
test_dist = distance(test_p1, test_p2) # Should be 100.0
print("The distance between points test_p1 and test_p2 is: %f" % test_dist)
You should then try out a few different points and make sure your distance function is working properly. This function will be important for several different parts of our code later (yay for functions and code reuse!) so it’s important to make sure it works correctly now. You can also try slightly more complex test code, where the user can click to choose two points to compute the distance between:
def main():
    width = 800
    height = 600
    win = GraphWin("SwatDraw", width, height)

    test_p1 = win.getMouse()
    test_p2 = win.getMouse()
    test_dist = distance(test_p1, test_p2)

    print("The distance between (%f, %f) and (%f, %f) is: %f" %
        (test_p1.getX(), test_p1.getY(),
        test_p2.getX(), test_p2.getY(), test_dist))
Then, you can test your distance function interactively by clicking in the window. You should of course look at the coordinates and the distance in the printed output and make sure that the result is correct.
Once you’re confident your distance function is working properly, you can move
on to the next step.
2.4. Creating Circles: create_circle(win, col)
We will now write a function that allows the user to click to draw a circle.
Define the function create_circle(win, col) that takes two parameters, a
GraphWin object win and a color col. The function should do the following
things:
-
Wait for the user to click once inside the graphics window. Save the location of the mouse click to use as the center of the circle.
-
Wait for the user to click again. This second click will be a point on the outside of the circle. This will help determine the radius of the new circle, which will be the distance between this point and the first mouse click.
-
Create the circle whose center is the given by the location of the first mouse click and radius given by the distance between the two mouse clicks. Set the fill color of the circle to
col. Draw the circle to the windowwin. -
Return the created
Circleobject.
Note that determining the radius involves computing the distance between the two mouse clicks. You should use your distance function to do this.
2.4.1. Testing create_circle(win, col)
Modify your main function to test your new create_circle function. For example:
def main():
    width = 800
    height = 600
    win = GraphWin("Drawing Program", width, height)

    create_circle(win, "blue")
Once you’re confident that your create_circle function works well, you can
move on to creating polygons.
2.5. Creating Polygons
To create polygons, we’ll first write a function to draw a single point. We’ll then use that function to draw the vertices of the polygon as the user clicks.
2.5.1. The draw_vertex(win, pt, col) function
First, define the function draw_vertex(win, pt, col) which will be used to
draw a single vertex of the polygon. It takes three parameters: a GraphWin
object win, the Point object pt specifying the point where the vertex
should be, and col, the color of the point. The function should then create,
draw, and return a Circle object whose center is located at Point. Use a
value of 6 for the radius of the circle. The circle’s fill color should be set
to col.
As always, you should then modify your main function to test draw_vertex,
e.g.:
# In main, after creating the GraphWin object:
pt = win.getMouse()
vertex_circ = draw_vertex(win, pt, "green")

print("draw_vertex returned: %s" % vertex_circ)
2.5.2. The inside_circle(pt, circ) function
Next, we will define the function inside_circle(pt, circ) which takes two
parameters: a Point object and a Circle object, and returns a boolean True
or False indicating whether the Point is inside the Circle.
You can check if a point is inside a circle by checking whether the distance between the point and the center’s circle is less than or equal to the circle’s radius.
Note: This function should use the the distance function you wrote earlier.
Once you’ve implemented this function, test it in main. One way to do this is to
create a Circle object, then call win.getMouse() to get a mouse click, and
check whether the click is inside the circle.
2.5.3. The create_polygon(win, col) function
Now we will write the function to create a polygon, using the
Polygon class. This function will take two
parameters, the GraphWin object and a color. It will then allow the user to
repeatedly click to specify vertices of the polygon, ending when they click
inside the first point. Specifically, here is what your function should do:
-
Wait for the user to click once inside the window. The location of this mouse click determines the first vertex of the polygon. Save this point to a list, which will be the list of vertices for the polygon. Also, call
draw_vertexto draw this point, using any color you like (you may find it helpful to use a color that is notcol). (Hint: you will also want to save theCircleobject returned bydraw_vertexto another variable, as it will be useful later).
-
Next, repeat the following:
-
Get another mouse click from the user. If this click is inside the circle drawn for the first vertex, stop. Note: You should use the
inside_circlefunction you defined earlier for this. -
Otherwise, use the location of this click to draw a new point using
draw_vertex. You should usecol(the parameter) for the color. Also add this point to the existing list of vertices.
-
-
Once the user has clicked inside the first vertex, use the list of vertices to create a new
Polygonobject. Note that thePolygonconstructor takes a list ofPointobjects as an argument. Set the fill color of thePolygontocol. -
Draw the new
Polygonto the graphics window (win) and return it.
Polygon constructor and getMouse()Note that the |
2.6. The rand_color function
Define a function rand_color() that takes no parameters and returns a random
color. To do this, create a list of several of your favorite colors. Include at
least six colors. Then, use the choice function to select a random color from
the list. Note that this requires from random import choice at the top of your
program (the starter code should already include this).
You may find the colorPicker helpful for this: you can run python3 -m
colorPicker from the terminal to get a window showing many different colors.
Clicking on a color in the color picker will print out the name of the color in
the terminal, and you can use these names in your list.
2.6.1. Testing rand_color
It will be hard to test this function before the other parts are written, so
you’re encouraged to try to implement those first. You may want to add some code
to your main to call your rand_color() and print the return value, to make
sure that your function is returning a different random color each time.
However, it will be easiest to tell that it’s working after you’ve incorporated
the main loop (in the next section, below), and can see shapes being drawn with
new colors.
2.7. Putting It All Together: The Main Loop
Now, we will put everything together. We will create a loop that will repeatedly wait for the user to press a key, and then take the appropriate action based on the key they pressed.
2.7.1. The getKey() function
The graphics library has a getKey() method (for GraphWin objects) that works
similarly to getMouse(); instead of waiting for a mouse click, it waits for a
key press (from the keyboard).
The getKey() method returns a string representing the key that was pressed. To
see how this works, and to see what string is the method returns for a given
key, you can try calling getKey() from main and printing the return value.
For example:
def main():
    width = 800
    height = 600
    win = GraphWin("SwatDraw", width, height)

    action = win.getKey()
    print(action)
If you run this and press q for example, you will see that it prints out q.
The function simply returns a str, so you can compare it as you would any
string.
2.8. The main loop
Once you’re comfortable with how getKey() works, you can try to write your
main function. It should do the following:
-
Create the
GraphWinobject (this should already be inmainfrom the starter code) -
Set an initial color as the current color. This is the color you will use when drawing all shapes, but could change later (by the
"r"option below). -
Repeatedly wait for the user to press a key, and then perform one of the following actions depending on the key pressed:
-
"r"(for "random color"): If the user pressed"r", callrand_colorto get a random color, and change the current color to this new color. -
"c"(for "circle"): If the user pressed"c", usecreate_circleto allow the user to draw a circle on the screen. -
"p"(for "polygon"): If the user pressed"p", usecreate_polygonto allow the user to draw a polygon on the screen. -
"q"(for "quit"): If the user pressed"q", exit the program.
-
You should add print statements in each case indicating when an action is started and when it has ended, so you know when your program is expecting a mouse click and when is is expecting a key press, and so you can see which option was selected..
Make sure you test your program thoroughly. Note that, if you implement
everything correctly, pressing a key before finishing the current action should
have no effect. For example, if you press p, you will need to complete drawing
the polygon (by clicking inside the first vertex) before you can choose another
action. This includes choosing option q to quit.
2.9. Video Demonstration
We have created a short video to show what your program should do: https://youtu.be/4wb1t5lluuU. In order to view the video, you will need to be signed in with your Swarthmore account.
The video shows:
-
Pressing
pto draw a Polygon, followed by clicking on three points. Once the first vertex (shown in green) is clicked again, it finishes the polygon action and draws a triangle. The triangle has a light green fill. -
Pressing
cto draw a Circle, followed by clicking two points. The circle is created after the second click. The circle is also light green. -
Pressing
rto select a new random color. Notice that nothing changes color yet; we will see the new color in the shape drawn by the next action we perform. -
Pressing
cagain to draw another circle. After clicking twice, the circle is created and drawn, this time in the new color (blue). -
Pressing
pagain to create another Polygon. This polygon has five points (vertices), and has the same color as the previous circle. -
Pressing
conce more to draw another circle. -
Pressing
qto quit the program.
2.10. Optional (Not Required) Extensions
-
Add more actions. For example,
bto change the background color. Get creative -
Add a visual indicator for the current action. For example, you could add a
Textobject in the window to show the "Waiting for a Key Press", "Drawing a Circle", "Drawing a Polygon", add a shape that changes color based on the chosen action, etc. Get creative!
2.11. Requirements
|
The code you submit for labs is expected to follow good style practices, and to meet one of the course standards, you’ll need to demonstrate good style on six or more of the lab assignments across the semester. To meet the good style expectations, you should:
In addition, you’ll need to demonstrate good top-down design practices on two or more lab assignments across the semester. To meet the top-down design expectations, you should:
|
-
Your program must define the functions
distance,inside_circle,rand_color,draw_vertex,create_circle, andcreate_polygonas described above. -
Your program should have a main loop that allows the user to press a key to perform a different drawing action.
-
When drawing a polygon (option
p), a small circle should be drawn for each mouse click -
When drawing a polygon, the final polygon should have one vertex for each of the points where the user clicked.
-
When drawing a polygon, the user should be able to repeatedly click to add vertices to the polygon, stopping when the user clicks inside the first vertex
-
When drawing a circle (option
c), the program should get two mouse clicks from the user -
When drawing a circle, the circle should be centered at the first mouse click, and the radius should be determined by the distance between the two mouse clicks
-
When drawing a circle or polygon, the color used should be the determined by the most recent call to
rand_color(the most recent time the user selected optionr) -
The
create_circleandinside_circlefunctions should both calldistance. -
The
create_polygonfunction should callinside_circleanddraw_vertex. -
Your program should quit when the user selects option
q
Answer the Questionnaire
After each lab, please complete the short Google Forms questionnaire. Please select the right lab number (Lab 06) from the dropdown menu on the first question.
Once you’re done with that, you should run handin21 again.
Submitting lab assignments
Remember to run handin21 to turn in your lab files! You may run handin21
as many times as you want. Each time it will turn in any new work. We
recommend running handin21 after you complete each program or after you
complete significant work on any one program.
Logging out
When you’re done working in the lab, you should log out of the computer you’re using.
First quit any applications you are running, including your vscode editor, the
browser and the terminal. Then click on the logout icon
( or
or  ) and
choose "log out".
) and
choose "log out".
If you plan to leave the lab for just a few minutes, you do not need to log
out. It is, however, a good idea to lock your machine while you are gone. You
can lock your screen by clicking on the lock  icon.
PLEASE do not leave a session locked for a long period of time. Power may go
out, someone might reboot the machine, etc. You don’t want to lose any work!
icon.
PLEASE do not leave a session locked for a long period of time. Power may go
out, someone might reboot the machine, etc. You don’t want to lose any work!