CS21 Lab 9: Recursion
-
Due Sunday, May 1, before midnight
Goals
-
Use recursion to solve problems
-
Become more comfortable using objects and their methods
-
Use Turtle graphics to draw shapes
1. Recursive functions
Requirements for Part 1
-
Write recursive solutions for each of the functions below. You should not have any
forloops orwhileloops in your solutions to any of the questions. -
Your
mainfunction must test each of your functions on multiple test cases. You should test on each of the examples provided and you should write at least two more on your own. You can test your functions either by printing out the function you are calling (and verifying the answers are correct by visual inspection) or by using assert (and having python check your answers for you). Here is an example of both test methods:
# using print and then visually inspecting the output
lst = [2, 8]
result = contains_even(lst)
print("contains_even(%s) = %s" % (lst, result))

# using assert and having python check your answers
assert contains_even(lst) == True
1.1. Contains an negative number
Write a function called contains_negative that takes a list of integers as its only
parameter and returns True if the list contains a negative. Otherwise, this function returns False.
Put this function, along with the tests in main, in the file called recursion.py.
contains_negative([1, 2, -3, 5, -8]) == True
contains_negative([-2, -8]) == True
contains_negative([1, 3, 5]) == False
1.2. Summing the positive numbers in a list
Write a function called sum_positive that takes a list of integers as its only
parameter and returns the sum of all of the positive numbers in the list.
Add this function, along with the tests in main, to the recursion.py file that you started in the previous question.
sum_positive([1, 2, -3, 5, -8]) == 8
sum_positive([-2, -8]) == 0
sum_positive([1, 3, 5]) == 9
1.3. Duplicate
Write a recursive function called duplicate that takes a string, s, and a non-negative integer, n, as parameters and returns a string where the string s has been duplicated n times.
Note: Your solution must be recursive. Do not use string multiplication to solve this.
Put this function in the file called recursion.py.
In your main function, add the following tests plus at least two more tests of your own.
duplicate("oink", 2) == "oinkoink"
duplicate("go", 3) == "gogogo"
duplicate("", 50) == ""
2. Introduction to Turtle graphics
Requirements for Part 2
-
Read and understand the file
toby.pyshown below and included in your lab directory. -
Follow the guided example in the file
shapes.pyto produce a final picture that is similar in spirit to the picture shown at the end of section 2.2. -
You should not be using recursion in this part of the lab.
2.1. Turtles
This section of the lab is a tutorial on using Turtle graphics. It is called Turtle graphics because you are supposed to imagine that a turtle is walking on a beach dragging its tail as it walks. When the turtle is done walking, you can see the image it drew with its tail.
In your cs21/labs/09 directory is a file called toby.py. The contents of this file are shown below. Read through the file and all of the comments so you can understand how the Turtle graphics library works.
from svgturtle import Turtle

def main():
    # Create a Turtle named "toby". When you create a new Turtle,
    # it always starts out a position x=0, y=0 facing east.
    toby = Turtle()

    # Turn toby so that it is facing north. A Turtle can also
    # face to the .east(), .south(), and .west().
    toby.north()

    # Draw a square on the screen.
    # In the square drawn below, each side has length 100.
    for i in range(4):
        # Walk forward 100 steps. A Turtle can also walk .back(<steps>)
        toby.forward(100)
        # Turn right 90 degrees. A Turtle can also turn .left(<degrees>)
        toby.right(90)

    # When a Turtle is created, its tail is in the sand, drawing lines.
    # A Turtle can lift their tail .up() so that it does not draw, then
    # put their tail back .down() to start drawing again.

    # Below, toby lifts up its tail, moves to x=150, y=175, then puts
    # its tail back down again.
    toby.up()
    toby.move(150, 175)
    toby.down()

    # A Turtle can swing its tail out to draw a circle around them.
    # Below, toby draws a circle with radius 50.
    toby.circle(50)

    # When the Turtle is done drawing, it saves its image on a web page and
    # prints the web address out so you can copy/paste it into your browser.
    toby.write('toby.html')

main()
Before you continue, be sure you have read through the code above. Once you’ve done that, go to the terminal and run the code. Copy and paste the web page printed to the screen into your web browser and you should see this:

Hint: All of the methods you will need to use in this lab are demonstrated or commented on in toby.py. While working on your lab, it may be helpful to refer back to this code.
2.2. Draw some squares
In your cs21/labs/09 directory is a file called shapes.py. In that
file is a function that takes a Turtle and a float as parameters
and draws a square of the specified size. You can run the code
provided and view the result in your web browser. The current version
of the program draws a small square.
Follow the steps written for you in the shapes.py file. There are
three "TODO" items included in that file. After you have completed all
of the steps, you will end up with an image that contains a total of 6
squares. Here is an example of an image that you might get:

2.3. Draw another shape
Add to your shapes.py file a function that draws some shape other than a square or a circle. Like the square function, it should take a Turtle and a float as parameters. Your shape can be something simple like triangle or pentagon, or it can be something fancy like a star, a house, a zig-zag line, or a stick figure. Test this function by adding code to to shapes.py file to draw 5 of your shapes at any random locations and random sizes you want. If you don’t know where to start, copy the square() function and just try adding some random lines or turns first. You can then play around and see what happens until
you decide what shape you’d like to draw.
Here’s a sample random image you might expect to get:

3. Using recursion with Turtles
In this next part of the lab, we will use recursion and Turtle graphics to draw some interesting shapes.
Requirements for Part 3
-
Write recursive solutions for each of the questions below. You should not have any
forloops orwhileloops in your solutions to any of these questions. -
Your
mainfunction must test each of your functions on multiple test cases. You can only test your functions by running the code and visually verifying that the correct images are displayed (one image per file).
3.1. Bullseye
In the file bullseye.py, write a recursive function bullseye(turtle, radius) that takes two parameters:
-
turtle: the turtle to draw with -
radius: the radius of the bullseye
The bullseye will be drawn using a recursive algorithm:
-
If the radius of the bullseye is less than or equal to 5, the bullseye is just a circle of the specified radius
-
Otherwise, the bullseye is formed of two elements:
-
a circle with the specified radius
-
a bullseye with a radius of
radius - 10
-
Here’s what you should get if you call bullseye(myrtle, 100), assuming your Turtle is named myrtle.

3.2. Koch curve
Next, we will draw a fractal called the "Koch curve". Different levels of the Koch curve are shown below:
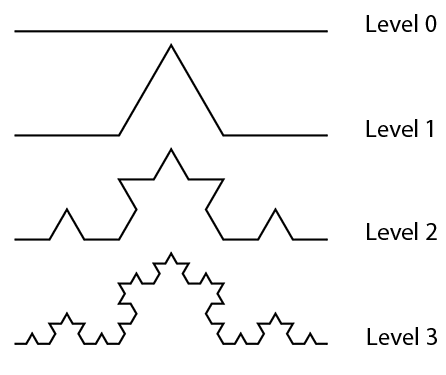
(The above image is just for demonstration purposes. Your program will only draw one Koch curve and won’t have words printed next to it.)
In the file koch.py, write a recursive function koch(turtle,
length, level) that takes three parameters:
-
turtle: the turtle to draw with -
length: the length of the Koch curve (float) -
level: the level of the curve (int)
The Koch curve is recursively defined:
-
If the
levelof the Koch curve is 0, move the turtle forward by the specifiedlength. -
Otherwise, a Koch curve is formed by four Koch curves as follows:
-
draw a Koch curve with side length
length/3with levellevel-1 -
turn 60 degrees to the left
-
draw a Koch curve with side length
length/3with levellevel-1 -
turn 120 degrees to the right
-
draw a Koch curve with side length
length/3with levellevel-1 -
turn 60 degrees to the left
-
draw a Koch curve with side length
length/3with levellevel-1
-
Here’s what you should get if you call koch(yertle, 300, 5), assuming your Turtle is named yertle.

There are lots of fun extra challenges you can try out once you get the Koch curve drawn. See the Extra Challenges section at the end for some ideas!
4. This section blank
There was a typo in Questions-09.txt so this is just a made up section to fix that typo.
5. Questions-09.txt
The program shown here will be used to answer the questions in this week’s Questions-09.txt. There is nothing to code in this section. It is included in the lab writeup to make it easier for you to read it. You are welcome to copy/paste this into emacs and run it.
The program is an implementation of binary search that uses recursion. Notice that in this implementation, we pass the values of low and high into the binary_search function. Read through the code below and then answer the questions underneath the code.
def binary_search(item, lst, low, high):
    """
    Purpose: Perform binary search on a list
    Parameters:
      - item, an item to search for in the list
      - lst, a list of items of the same type as the item
      - low, the lowest index in the list where the item could be
      - high, the highest index in the list where the item could be
    Return: the index of the item in the list or -1 if the list
      does not contain the item
    """
    if low > high:
        return -1

    mid = (low + high) // 2
    if lst[mid] == item:
        return mid
    elif lst[mid] < item:
        return binary_search(item, lst, mid+1, high)
    else:
        return binary_search(item, lst, low, mid-1)

def main():
    lst = [1, 3, 6, 8, 9, 12, 14]
    item = 9
    result = binary_search(item, lst, 0, len(lst)-1)
    if result == -1:
        print(item, "not found")
    else:
        print(item, "found at position", result)

main()
These questions should be answered in the Questions-09.txt file.
-
What is the return type of the
binary_searchfunction? -
What is/are the base cases in the
binary_searchfunction? -
What is/are the recursive cases in the
binary_searchfunction? -
How many times would the function
binary_searchbe called if you ran the code?
6. Extra Challenges
If you’re going to implement these, copy your koch.py file:
cp koch.py extra.py
On the Wikipedia page for Koch Snowflakes, there are a number of other cool variations on the Koch curve that you can make with relatively few changes to your code.
-
Koch snowflake: for each side: draw a Koch curve, turn right 360/sides degrees
-
Koch anti-snowflake: who says you have to turn right?
-
Cesàro fractal: like the Koch curve but switching out 60 degrees (and 120 == 60*2) for a different angle.
-
Cesàro anti-snowflake: four Cesàro fractals as the sides of a square
-
Quadratic type 1 curve: like the Koch curve but with five segments instead of four
-
Quadratic type 2 curve (Minkowski sausage): another variant of the Koch curve with five segments
-
Minkowski Island: four Minkowski sausages as the sides of square
You can also implement the Lévy C curve which has an algorithm similar to the Koch curve:
-
If the
levelof the curve is 0, move the turtle forward by the specifiedlength. -
Otherwise, the curve is formed as follows:
-
turn 45 degrees to the left
-
draw a Lévy C curve with side length
length/sqrt(2)with levellevel-1 -
turn 90 degrees to the right
-
draw a Lévy C curve with side length
length/sqrt(2)with levellevel-1 -
turn 45 degrees to the left
-
You can also try to make up your own variants of these curves to see what interesting fractals you can make!
7. Answer the Questionnaire
Please edit the Questions-09.txt file in your cs21/labs/09 directory
and answer the questions in that file.
Once you’re done with that, run handin21 again.
Turning in your labs….
Remember to run handin21 to turn in your lab files!
You may run handin21 as many times as you want. Each time it will
turn in any new work. We recommend running handin21 after
you complete each program or after you complete significant
work on any one program.