CS21 Lab 6: graphics
Due Saturday, March 7, before midnight
Goals
The goals for this lab assignment are to:
-
create and manipulate multiple graphic objects
-
use dot notation to perform actions on objects
-
write and use functions that have objects as parameters
-
incrementally implement and test functions
Function Comments
All functions should have a top-level comment. Please see the function example page.
Tips for this lab
In this lab you will be creating your own library for making pointillist images. Pointillism is a style of art where pictures are formed out of many tiny dots of color. But instead of small specks of color, we will be using larger blobs of color, so our technique will be known as blobillism.
You will be working with three different files:
-
blobillism.py: will contain all of the functions you need to create blobillist images -
testBlob.py: imports the fileblobillism.pyallowing you to incrementally test each new function as you add it -
mainBlob.py: imports the fileblobillism.pyand will contain themainprogram that controls the overall application
All three of these files (including the testing file) will be graded.
You will likely need to consult the documentation for the graphics library as you work on this lab. So you may want to keep this page open in your web browser as you work.
1. Blobillist Art
You will use the graphics library to create a blobillist canvas for your own works of art. You will use the mouse to indicate where blobs of color should be placed. You will create buttons that allow you to control aspects of the blobs, including their color and size. You will show an example blob so that you can adjust it with the buttons before placing it. And, you will create a button allowing you to quit the application at any time.
Watch the following video to see how your final program should ultimately operate.
This may seem a bit daunting at first, but you will build up this program in a series of small incremental steps.
1.1. Making circles
In the file called blobillism.py, write a function called
makeCircle that takes the following parameters and both draws the
circle in the window and returns a Circle object as described.
Type |
Description |
GraphWin |
the graphics window |
Point |
the center point for the circle |
int |
the radius of the circle |
string |
the color |
1.1.1. Time to test
Open the file called testBlob.py. Notice that it imports your
blobillism.py program at the top. It is using your program like a
library.
Use the main program to test your function. Create a GraphWin of
size 500 by 500. Next use the setCoords method on the window to move
the origin of the graphics window to the lower-left corner.
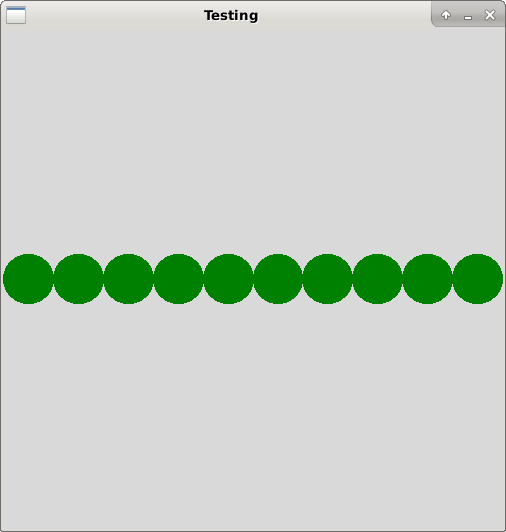
Use a for loop that calls the makeCircle function ten times to
create green circles in a horizontal line across the center of the
window. Make sure that your circles don’t overlap one another.
Remember to use the GraphWin object’s getMouse() method at the
very end of your program so that the window will stay open until you
click the mouse.
Your testBlob.py program should produce the following output:
Once you are convinced that your makeCircle function is working
correctly, you can move on.
1.2. Creating text buttons
As you saw in the video above, we want to create some buttons that are
labeled with text. We will represent each button as a Rectangle object.
For now, we will simply draw the button. Later we’ll see how to
recognize when the button has been pressed.
In blobillism.py, write a function called makeTextButton that
takes the following parameters and creates, draws, and returns a
Rectangle object as described.
Type |
Description |
GraphWin |
the graphics window |
int |
x coord of LL corner of button |
int |
y coord of LL corner of button |
int |
x coord of UR corner of button |
int |
x coord of UR corner of button |
string |
label to include inside button |
All text buttons should have black fill. You’ll also need to create a
Text box at the center of the rectangle to hold the button’s
label. All labels should be colored white.
1.2.1. Time to test
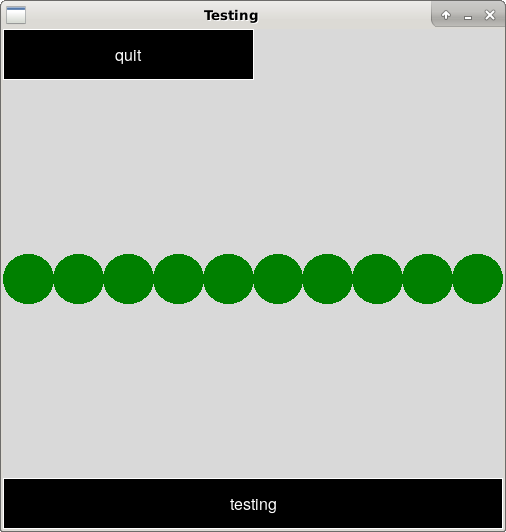
In testBlob.py, call your makeTextButton function to create and save a
button that fills the bottom of your graphics window with the label
"testing". Make and save another smaller button that is half as
wide as the window and is located in the UL corner of the window. It
should have the label "quit".
Your testBlob.py program should produce the following output:
When you have successfully debugged this function you can move on.
1.3. Creating color buttons
We also need to create unlabeled colored buttons to represent the
palette for our blobillism art. Again, we will represent these
buttons as Rectangle objects.
In blobillism.py, write a function called makeColorButton that
takes the following parameters and creates, draws, and returns a
Rectangle object as described.
Type |
Description |
GraphWin |
the graphics window |
int |
x coord of LL corner of button |
int |
y coord of LL corner of button |
int |
x coord of UR corner of button |
int |
x coord of UR corner of button |
string |
the color of the button |
1.3.1. Time to test
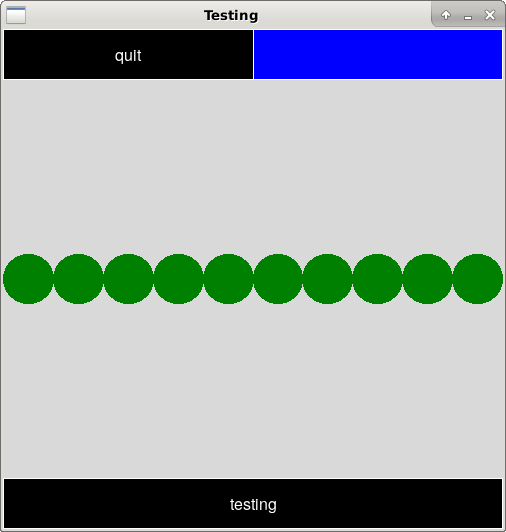
In testBlob.py, call your makeColorButton function to create and
save a blue button that is located right next to the quit button you
made previously.
Your testBlob.py program should produce the following output:
Once you are satisfied with your tests, move on to the next function.
1.4. Recognizing button clicks
So far we’ve simply created rectangles, either with a label or with a color, but they are just passive. Now we will write the code that we need for these rectangles to behave like buttons. A button must be able to recognize when a user has clicked on it with the mouse.
In blobillism.py, write a boolean function called clickInButton
that takes the following parameters and returns True when the
given point is within the boundary of the button’s rectangle.
Otherwise it returns False.
Type |
Description |
Point |
a point to test |
Rectangle |
a rectangle representing a button |
Remember that you can use the Rectangle methods getP1() and
getP2() to get the two corner points from a rectangle. And then you
can use the Point methods getX() and getY() to get the
X and Y coordinates of each point.
1.4.1. Time to test
In testBlob.py, implement a flag-based while loop to that uses the
clickInButton function you just wrote to check for mouse clicks
within your buttons. Here is a pseudocode algorithm:
done = False
while not done
   point = get a mouse click
   if point is in blue button
      print "blue pressed"
   elif point is in testing button
      print "testing pressed"
   elif point is in quit button
      print "quit pressed"
      done = True
   else
      print "clicked somewhere else..."
Notice that this loop will continue executing until the user clicks on
a point within the quit button, then the flag is set to True causing
the while loop to end.
Here’s a video showing how your testBlob.py program should work:
Once this final function is working correctly you are ready to put it all together to create the final product!
1.5. Putting it all together
In the file mainBlob.py, you can now create the main program so
that it behaves like the video example given at the start of the lab.
Go back and re-watch this video.
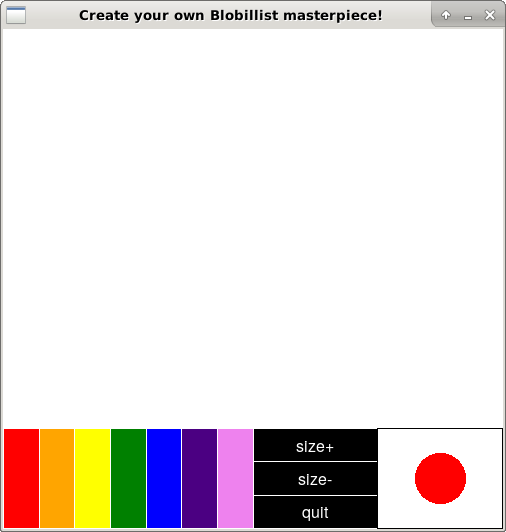
| Notice in this video that the graphics window is split into two main parts: the control section at the bottom of the window, and the active drawing section everywhere else. |
The mainBlob.py file will contain a lot of the elements you’ve
already created in the testBlob.py file.
Below are the requirements for your final product. Just as you did when creating your functions, you should work incrementally toward satisfying these requirements. Implement a little bit at a time, test your changes, debug any problems you find, and repeat.
Requirements:
-
Layout
-
Use a
GraphWinwith square dimensions (500 x 500 is recommended). You’re welcome to set the background color to anything you prefer. -
The height of the control section of the window should be one-fifth of the total height of the window.
-
You must have three different color choices for blobs, but you are free to select your own colors.
-
The color buttons should fill half of the width of the control section of the window.
-
The other half of the control section of the window should be divided equally into two sections:
-
The left section should contain three stacked text buttons for increasing or decreasing the blob size and for quitting.
-
The right section should be an example blob showing the current color and size that have been selected.
-
-
-
Button behavior
-
Any time a color button is pressed, the example blob’s fill color should be reset.
-
Any time a size button is pressed, the example blob should be undrawn and replaced with a new example blob of the correct size. It is crucial that you undraw the old example, so that you can see the new example!
-
The blob’s radius should change by 5 each time.
-
However, the radius must be constrained. The minimum radius is 5 and the maximum will be based on the the available space in the control section of the window.
-
-
Any time the quit button is pressed the program should end immediately.
-
-
Making blobs
-
Any time the mouse is clicked in the active drawing section of the window, a blob (just like the example blob) should be drawn centered at that point.
-
The only exception to the previous requirement is that a blob should never cover any portion of the control section of the window. So mouse clicks that are too close to the control section should be ignored.
-
2. Extra Challenge
This part is optional and does not affect your grade. Only attempt this after completing the rest of your lab. It is simply an extra challenge, if you want to try it.
Having only three colors available is somewhat limiting. Try extending
the palette of colors as shown in the example below. To do this
efficiently, we recommend using two lists. One list would hold the
color names in the order you want them to appear. Then you would use
this color list to incrementally build a button list containing a
button for each color in the original list. Finally, in the while
loop of the main program, you can use a for loop to test whether any
of these color buttons have been pressed.
3. Answer the Questionnaire
Each lab will have a short questionnaire at the end. Please edit
the Questions-06.txt file in your cs21/labs/06 directory
and answer the questions in that file.
Once you’re done with that, run handin21 again.
Turning in your labs….
Remember to run handin21 to turn in your lab files!
You may run handin21 as many times as you want. Each time it will
turn in any new work. We recommend running handin21 after
you complete each program or after you complete significant
work on any one program.