CS21 Lab 6: Graphics, Using Objects
Due Saturday, October 25, before midnight
Goals
The goals for this lab assignment are:
-
Practice with object-oriented programming, creating and using objects
-
Become more comfortable using dot notation to call methods of objects
-
Learn how to draw graphics in python
-
Write code to interact with the mouse
As you write programs, use good programming practices:
-
Use a comment at the top of the file to describe the purpose of the program (see example).
-
All programs should have a
main()function (see example). -
Use variable names that describe the contents of the variables.
-
Write your programs incrementally and test them as you go. This is really crucial to success: don’t write lots of code and then test it all at once! Write a little code, make sure it works, then add some more and test it again.
-
Don’t assume that if your program passes the sample tests we provide that it is completely correct. Come up with your own test cases and verify that the program is producing the right output on them.
-
Avoid writing any lines of code that exceed 80 columns.
-
Always work in a terminal window that is 80 characters wide (resize it to be this wide)
-
In
vscode, at the bottom right in the window, there is an indication of both the line and the column of the cursor.
-
Function Comments
All functions should include a comment explaining their purpose, parameters, return value, and describe any side effects. Please see our function example page if you are confused about writing function comments.
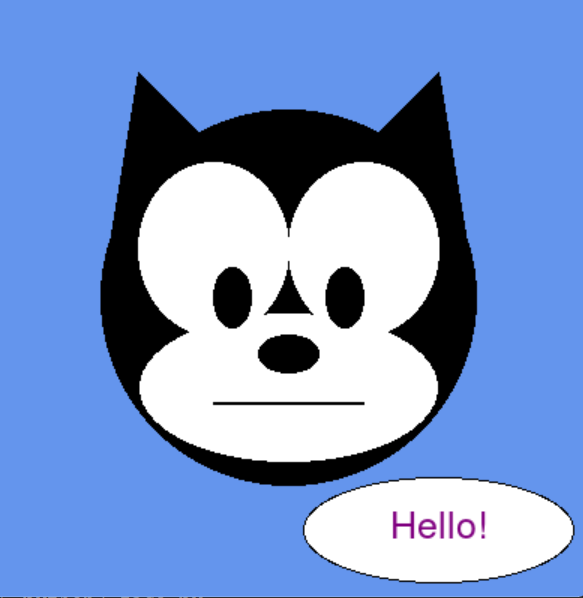
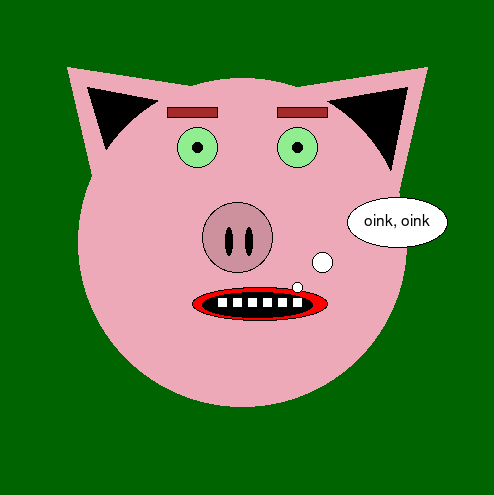
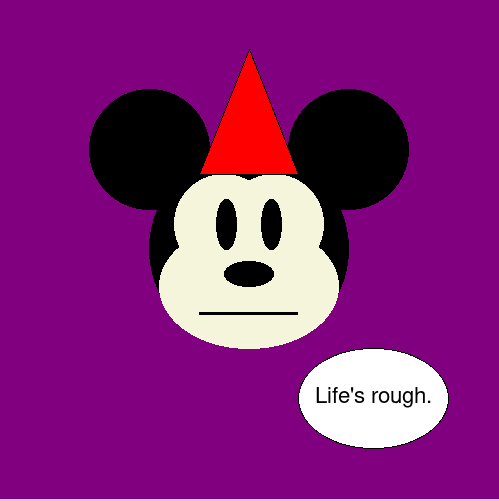
1. Draw a Face
In face.py you will write a program that draws a face. Your face can
be that of a human, an animal, a cartoon, a fantasy creature, or something similar.
This is an opportunity to have some fun with the graphics library.
1.1. Requirements
|
The code you submit for labs is expected to follow good style practices, and to meet one of the course standards, you’ll need to demonstrate good style on six or more of the lab assignments across the semester. To meet the good style expectations, you should:
In addition, you’ll need to demonstrate good top-down design practices on two or more lab assignments across the semester. To meet the top-down design expectations, you should:
|
Your program should have the following features:
-
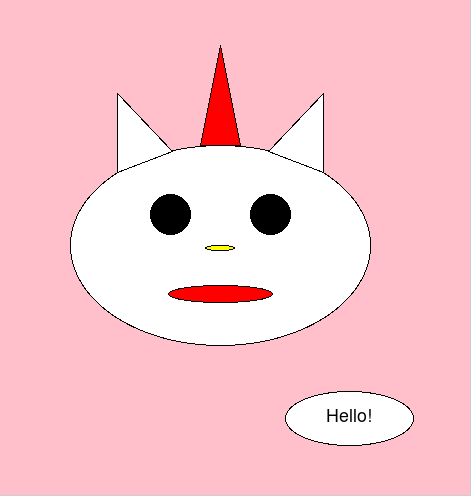
Draw a face with at least 5 different features in addition to the main head shape. Some features include: eyes, nose, mouth, ears, hair, beard, antenna, horns, or teeth.
-
Your face should use at least 3 different shapes, and 3 different colors (background color counts).
-
The first mouse click should have your character say something (in text). Please keep the message friendly.
-
The second mouse click should exit your program (i.e. make sure that your program does not exit before the user clicks the mouse).
1.2. Example Output
Here are some example faces drawn by some past CS21 students, CS21 ninjas, and CS21 staff:
$ python3 face.py


1.3. Hints/Tips
-
You need to run graphics library programs from CS machines (not remotely connected).
-
Refer to the in-class programs for examples of how to use the graphics library and some different methods of some of the classes.
-
Make use of the Zelle Graphics Reference, and other references off the course Schedule, to find methods that might be useful for setting the color and position of different objects.
-
If you are reproducing two or more identical features, for example you have two eyes that are drawn from the same shapes of the same sizes, remember you can use the
clonemethod to make a copy of a shape object and themovemethod to move a shape to a new location. -
The
getMousemethod of aWindowobject waits for a mouse click. -
Remember that the order in which you draw objects that overlap changes the final outcome of what is ultimately drawn.
2. A Random Drawing
2.1. Overview
You will use some randomness to create an image made up of many small dots. The position of the dots will be determined by a random process described below. We will walk through each of these steps in more detail, but at a high level, what your program will do is the following:
-
Draw a red rectangle at the bottom of the screen, filling the entire width. Clicking this button will close the window and end the program.
-
Draw a small circle somewhere at the top of the screen. Clicking this circle will change the color used to draw dots to be a new, random color.
-
Wait for the user to click in three places on the screen. The three points they click will define a triangle, which your program will draw.
-
Repeatedly draw single `Point`s inside the triangle, using the random process we describe below. This will continue until the red rectangle is clicked.
2.2. Setup
The starter code in random_dots.py uses
win.setCoords to change the
default coordinates of the graphics window to be from (0,0) in the lower left
corner to (100,100) in the upper right corner.
Here is a visual representation system of the coordinate system used after
calling win.setCoords in this way: [source]
  ------------------------
  |(0,100)      (100,100)|            horizontal axis is X
  |                      |            vertical axis is Y
  |                      |
  |                      |            lower lefthand corner is origin (0,0)
  |                      |
  |                      |            lower righthand corner is (100, 0)
  |                      |
  |                      |            the pixel in the center is (50, 50)
Y |(0,0)          (100,0)|
  ------------------------
  X
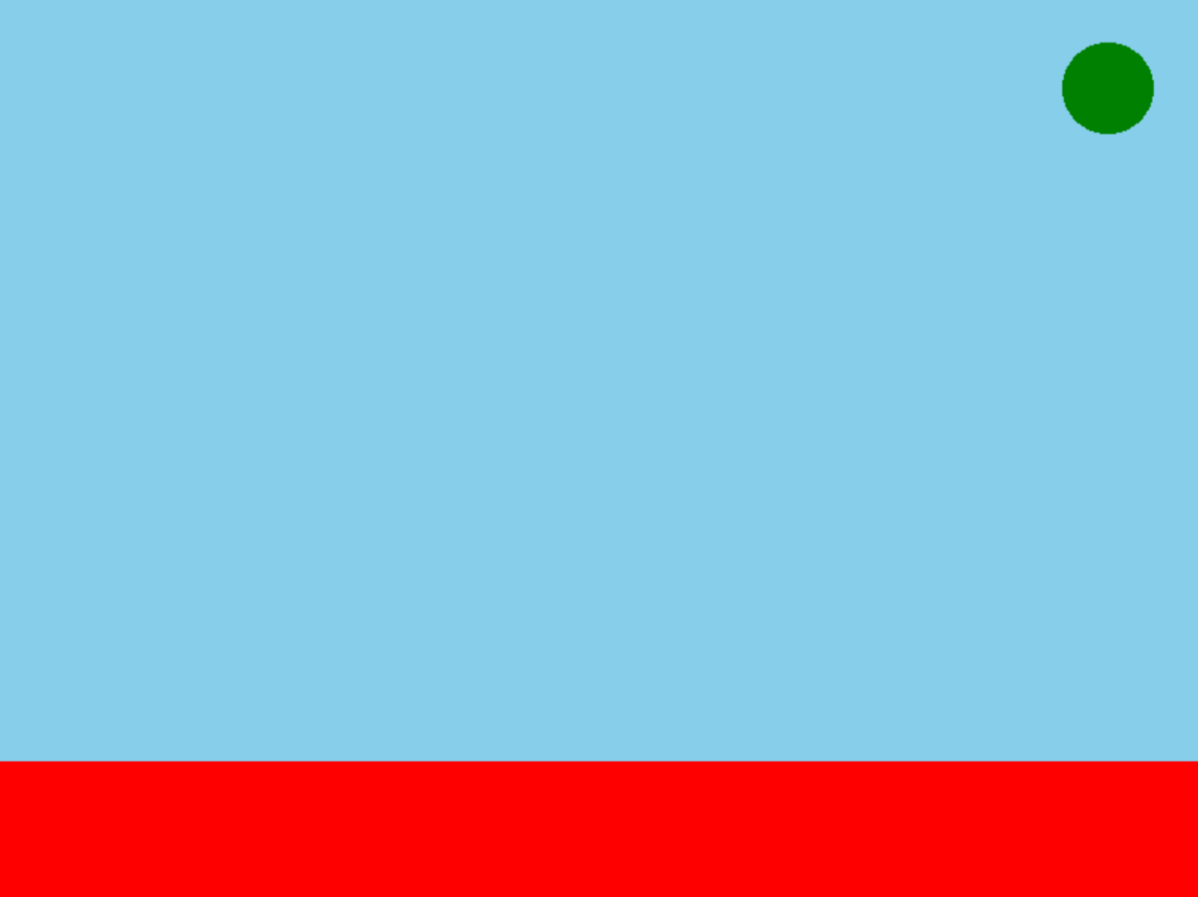
The first thing you should do is set a background color for the window. You can use any color you like. Next, we will add a large rectangle to the bottom that takes up the whole width of the screen:
2.2.1. make_bottom_rect(win)
This function takes in the window object (win) and should do the following:
-
Create and draw a rectangle at the bottom of the window, filling the entire width. To do this, recall that you need to use the
Rectangleconstructor, which takes two points. In order to make it cover the whole width, your first point will need an x-coordinate of 0, while the second should have an x-coordinate of 100 (see the diagram above). -
Color the rectangle in some reddish color of your choice.
-
Return the rectangle object created
Adding the rectangle to main
Next, add code to your main function to call the make_bottom_rect function.
You will want to save the rectangle object returned by the function in a new
variable, which will be helpful later when handling mouse clicks, to determine
whether the click was inside this rectangle.
2.2.2. make_circle(win)
Next, we will write a function make_circle that draws a small circle somewhere
at the top of the screen. This function should take in the window object win.
Color the circle with a color of your choosing. Draw the circle to the window
and return the circle object.
Add to your main function a call to make_circle so that your main now sets
up the drawing window, and draws both the rectangle and circle. As with the
rectangle, you should save the returned Circle object in a variable to use later.
Here is an example of what your program may look like at this point:
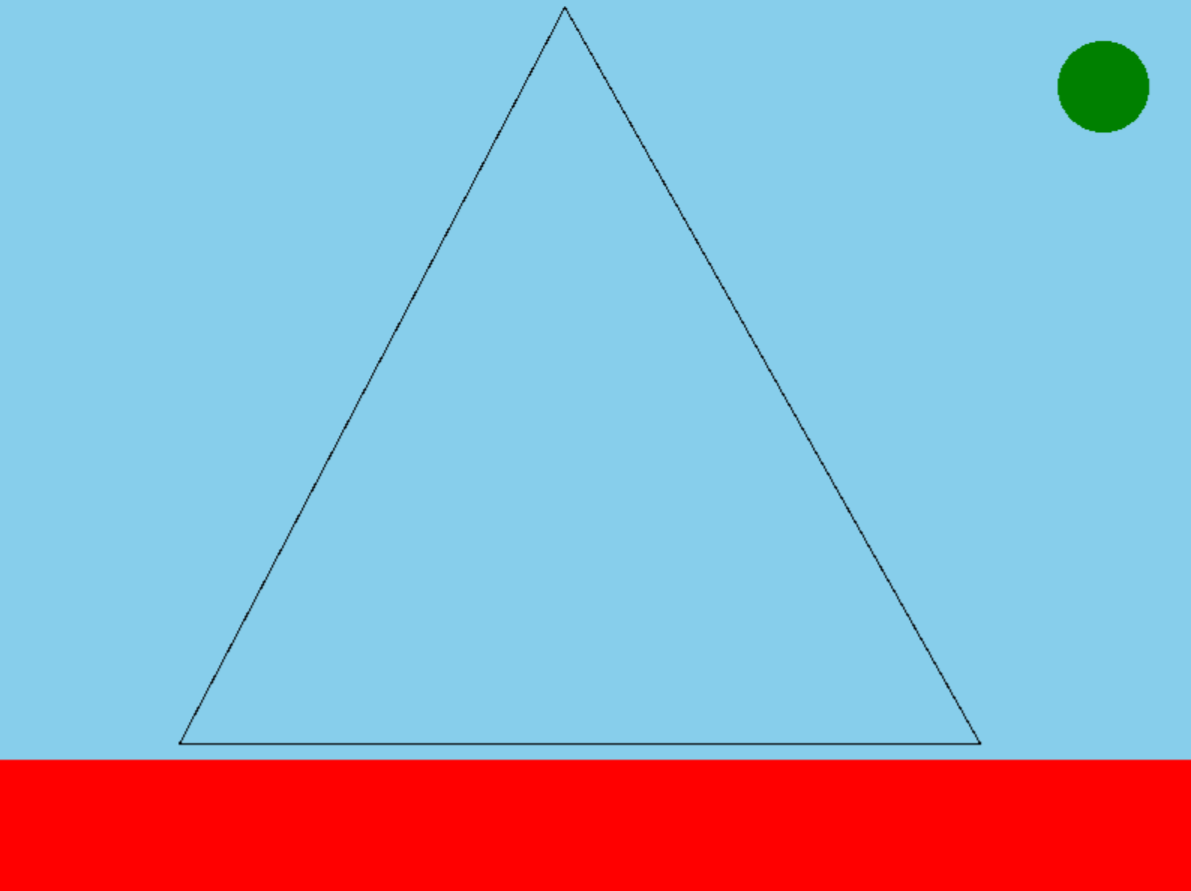
2.2.3. make_triangle(win)
Next, we will write a function make_triangle that takes in the window object
win, and does the following:
-
Use
win.getMouse()to wait for the user to click inside the window three times. The coordinates of the three clicks will give us three points, \(p_1\), \(p_2\) , and \(p_3\). -
Create and draw a triangle whose vertices are the points \(p_1\), \(p_2\) , and \(p_3\) (i.e., the points where the user clicked). You can do this by creating a
Polygonobject, e.g.,Polygon([p1, p2, p3]). -
Return the created triangle object
Next, call this function in main. At this point, your main function should
set up the drawing window, draw the rectangle on the bottom of the screen and
circle at the top, and then wait for the user to click on three points before
drawing a triangle using those three points.
Here is an example of what your program may look like after it’s run and the user has clicked in three places:
2.3. Drawing Random Dots
Here we give a high-level overview of our dot-drawing process. Suppose \(p_1\), \(p_2\), and \(p_3\) are the points used in defining the triangle in make_triangle (that is, where the user clicked). You can get a list of these three points by calling the getPoints() method on the triangle object that was returned by make_triangle. The process we will use for drawing points is the following:
-
Pick any one of the points \(p_1\), \(p_2\), or \(p_3\) to start. Call this
curr_point. -
Next, randomly choose any one of the points \(p_1\), \(p_2\), or \(p_3\), and draw a new point halfway between
curr_pointand the chosen point. -
Keep repeating the above step, each time picking a new point randomly among \(p_1\), \(p_2\), or \(p_3\), drawing a new point halfway between this and the previously drawn point.
To accomplish this, we will first define a function midpoint to help.
2.3.1. The function midpoint(p1, p2)
This function takes two Point objects p1 and p2, and returns a new point exactly halfway between the two.
The x-coordinate of this midpoint is the average of the x-coordinates of p1 and p2; similarly, the y-coordinate can be calculated as the average of
the y-coordinates of p1 and p2.
Testing midpoint
It might be helpful to test your midpoint function now before moving on to the
next step. In the midpoint_test.py function, there is a test_midpoint()
function that allows you to test your code. Place your definition of midpoint
here, and then when you run this program, you can click in two places in the
window and the code will draw both point you clicked as well as the "midpoint"
returned by the midpoint function.
Once your midpoint function is working well, we can move on to the full point drawing process.
2.3.2. The Point Drawing Process
In your main function, after drawing the rectangle, circle, and triangle, you should add code to do the following:
-
Initialize a point (say,
curr_point) to any one of the points \(p_1\), \(p_2\), or \(p_3\) (remember that these are what we are calling the three vertices of the triangle) -
In a loop:
-
Randomly choose one of \(p_1\), \(p_2\), or \(p_3\). Recall that you can get these three points (as a list) by calling the
getPoints()method on your triangle, and you can choose a random value from a list using thechoicefunction from therandomlibrary. For example:from random import choice # this should already be in the starter code tri_points = my_triangle.getPoints() # assuming my_triangle is defined random_point = choice(tri_points) -
Use your
midpointfunction to get the midpoint (as aPointobject) between the randomly selected point andcurr_point. For example,new_point = midpoint(curr_point, random_point) -
Draw the new point on the window (you can call the
drawmethod on aPointobject) -
Set
curr_pointto be this newly drawn point.
-
Your program should continue drawing points until the user clicks inside the red
rectangle at the bottom of the screen. To do this, you will want to use the
win.checkMouse() method. This
method will return a Point if the user has clicked the mouse, and returns
None otherwise; unlike the getMouse() method, it _does not wait_ for the
user to click the mouse; it simply returns None if the user hasn’t clicked.
Here is an example of some code that will execute the # do something code
until the user clicks inside the window:
user_clicked = False
while not user_clicked:
    # do something
    click = win.checkMouse()
    if click:
        print("User clicked at (%f, %f)" % (click.getX(), click.getY()))
        user_clicked = True
You will need to add the logic to check whether the mouse click was inside the
red rectangle before exiting. To do this, you just need to check whether the
y-coordinate of the mouse click is less than the y-coordinate of the top of the
rectangle. If you need to, you can get this y-coordinate by first getting the
appropriate point from the rectangle (e.g., with the getP1() method), and then
calling the getY() method on this point.
2.3.3. Example Outputs
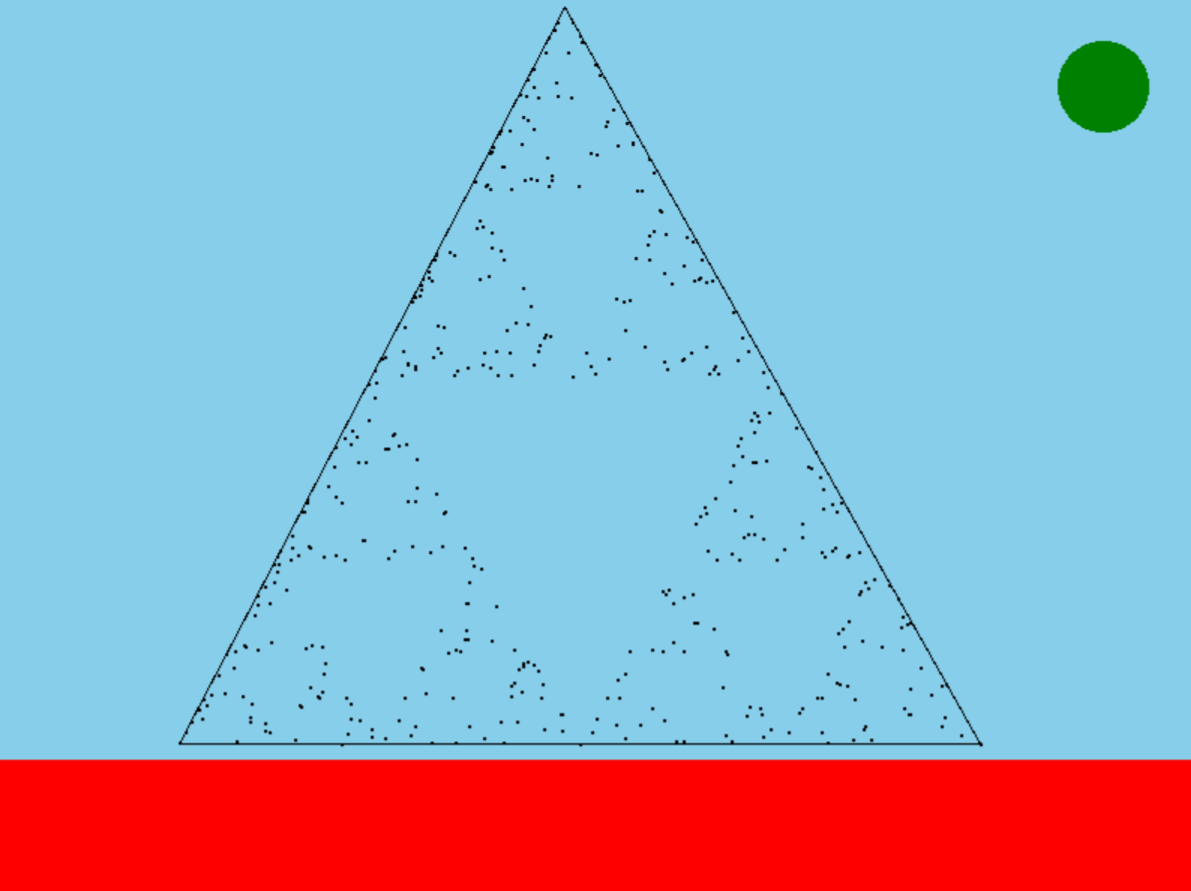
If everything is working so far, your program should draw dots in seemingly random places inside the triangle:

After drawing a few more dots, it may look like this, with a pattern starting to emerge:
2.3.4. Generating Random Colors
Next, we will add functionality for changing colors. To do this, write a
function rand_color(), which should take no parameters, and generate and
return a random color. To do this, you can use the randrange function from the
random package. Recall from lab 4 that randrange(n) will return a random
integer between 0 and n-1, inclusive. You will also want to make use of the
color_rgb(r, g, b) function, which returns a color specified by the three
given values (each in the range 0…255), which represent the amount of red,
green, and blue in the color. See the
reference on colors for more.
2.4. Clicking the circle
Whenever the user clicks the circle at the top of the screen, your program should do the following:
-
Call
rand_color()to get a new random color -
Change the outline of the triangle to be this color
-
Set all newly drawn points to have this color. You do not need to change the color of any points that have already been drawn, only draw new points in this color. You may want to store the "current color" in a variable that you can pass to the
setOutlinemethod when creating and drawing new points
In order to detect whether the user clicked inside the circle, you will want to
compute the distance \(d\) from the click to the center of the circle; if
this distance is less than the radius of the circle, the click is inside the
circle. The distance \(d\) between two points \(p_1\) and \(p_2\) is
given by the formula \(d=\sqrt{(p_1.\!x-p_2.\!x)^2+(p_1.\!y-p_2.\!y)^2}\).
The starter code contains a function distance(p1, p2) which calculates this
for you. You may find it helpful to also define a function, such as
inside_circle, for this.
Here is an example of what the drawing window may look like shortly after clicking the circle (notice the triangle has changed to red, and a few red dots have appeared, but older dots haven’t changed color):

A little bit longer after clicking the circle, we may see more red dots:
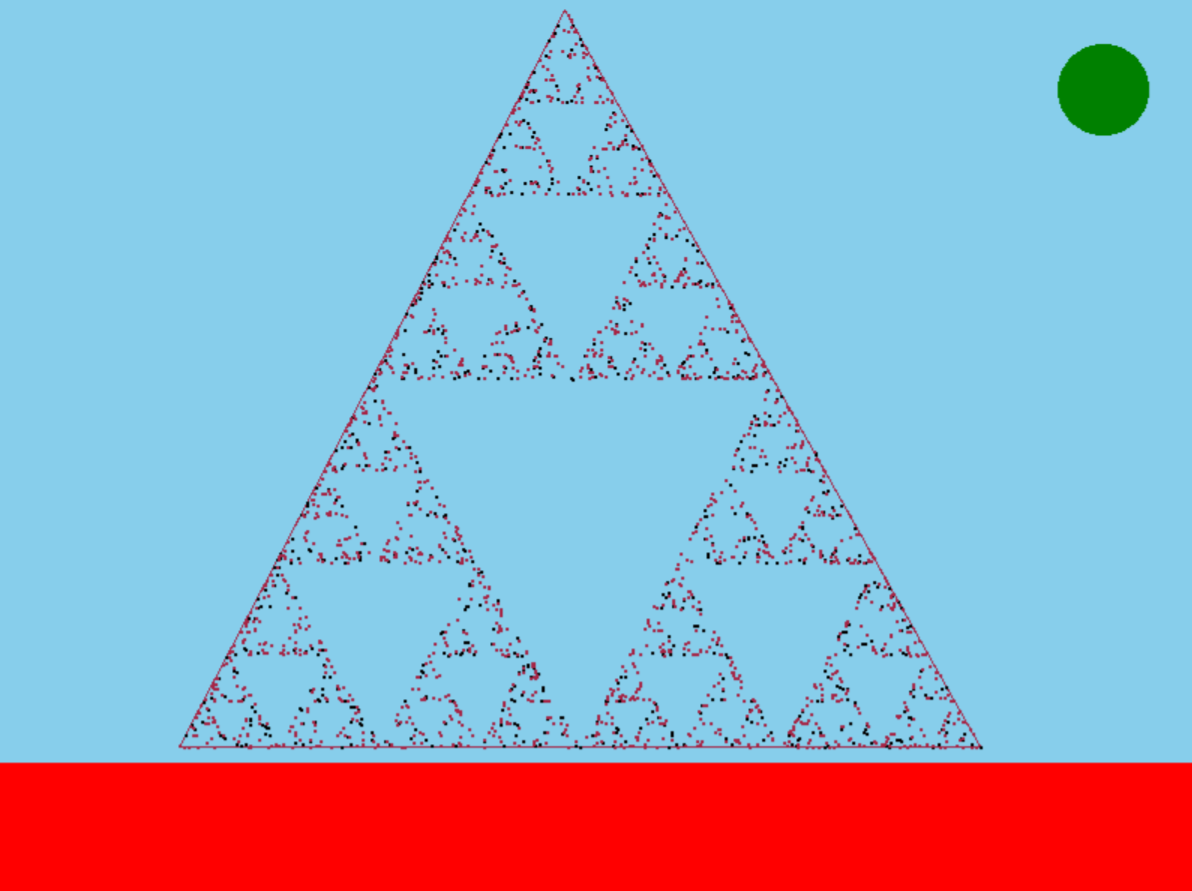
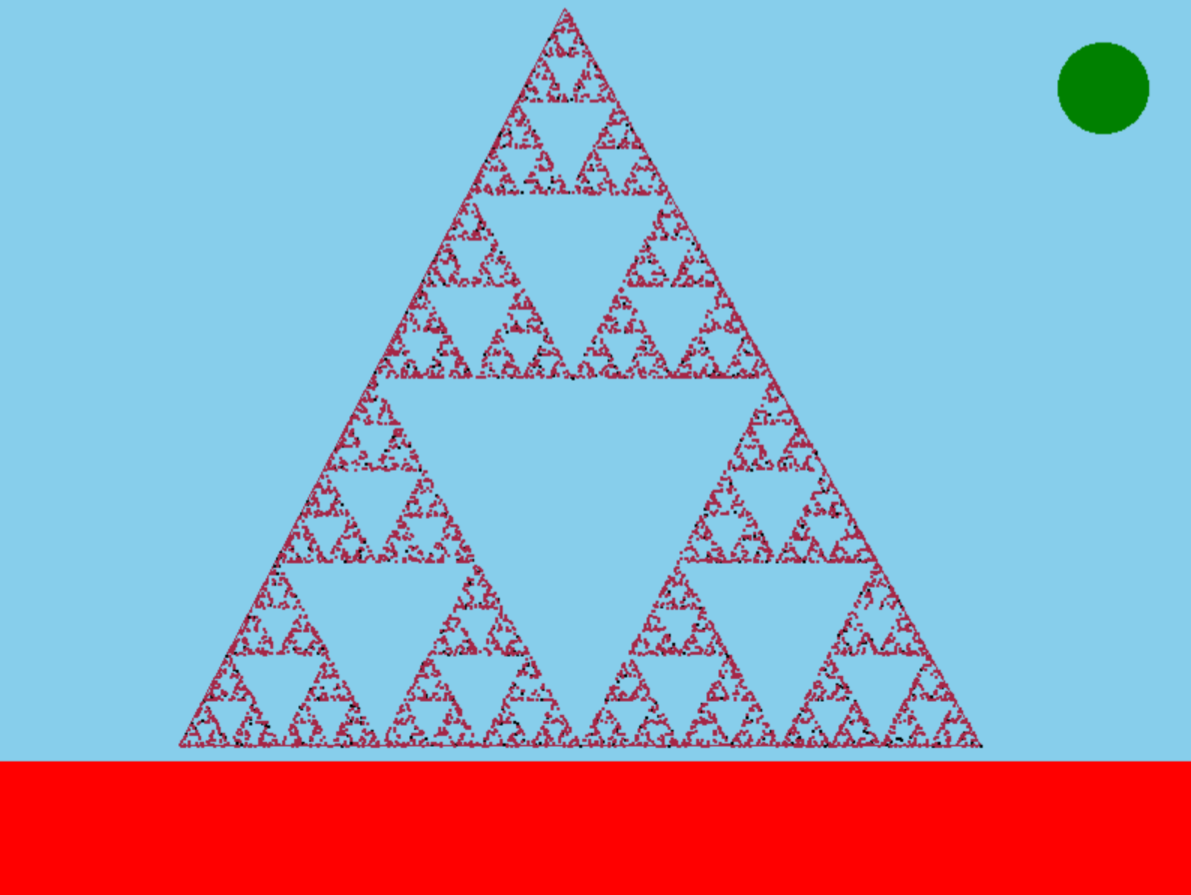
After a while, most of the older dots have been covered by the new (red) dots, and a more clear pattern is emerging:
2.5. The Final Program
Your main function should now be doing the following:
-
Set up the graphics window, and set the background color
-
Call
make_bottom_rectto make a rectangular area at the top of the screen -
Call
make_circleto make a circular "button" at the top of the screen -
Call
make_triangleto get three points, \(p_1\), \(p_2\), and \(p_3\), from the user’s mouse clicks, then creates and draws a triangle with these three points as vertices -
Set a "current color" to use for the triangle’s outline (you can use
setOutline), and that will be used for drawing the dots. -
Pick a vertex of the triangle (one of \(p_1\), \(p_2\), or \(p_3\)) to initialize the "current point"
-
Have a main loop doing the following:
-
Randomly choose a point among \(p_1\), \(p_2\), or \(p_3\) (i.e., the vertices of the triangle)
-
Get a new
Pointthat is halfway between the "current point" and the randomly chosen vertex (use yourmidpointfunction to get this) -
Draw this new point in the "current color"
-
Set the "current point" to be this new point
-
Check for a mouse click:
-
If the mouse click is inside the rectangle, exit the loop
-
Otherwise, if the mouse click is inside the circle, change the "current color" to a new random color (use
rand_colorto get this color), and change the color of the triangle’s outline to this new color
-
-
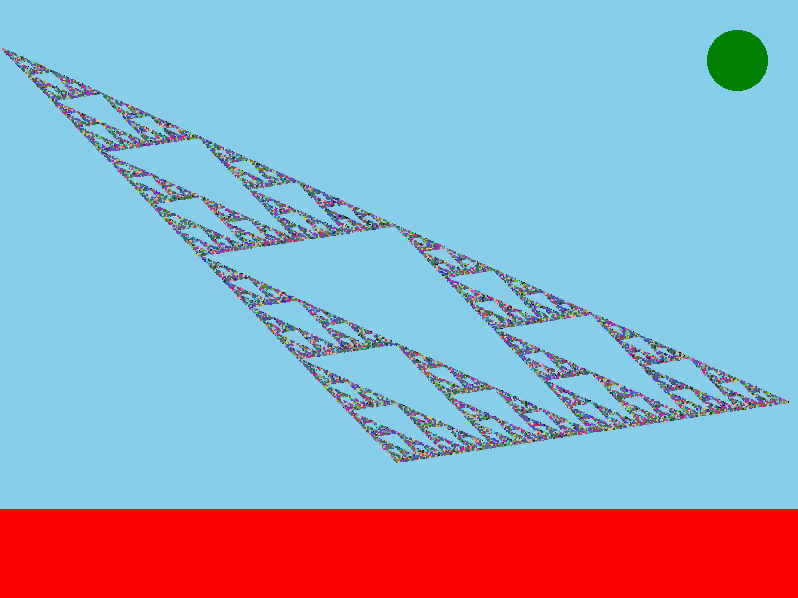
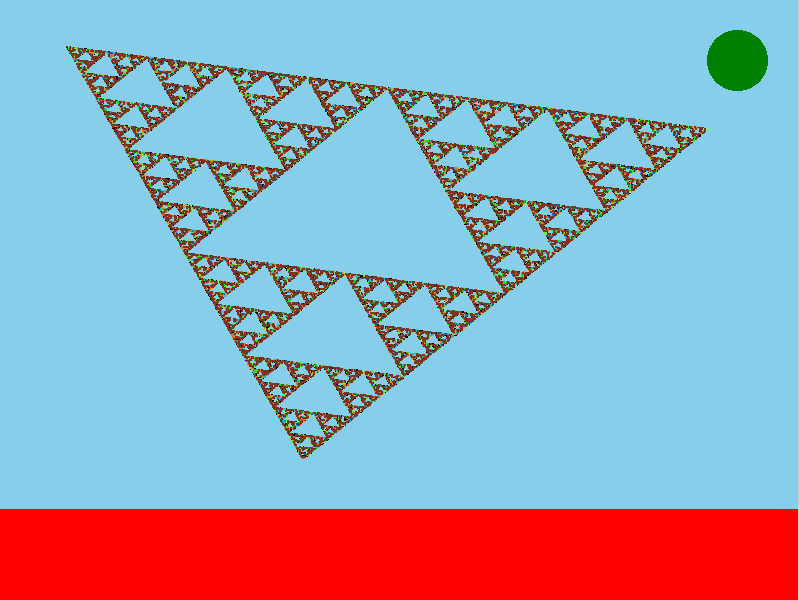
If your program is working correctly, you should see a pattern similar to the one in the screenshots above, regardless of where you click for the initial three points of the triangle. Here are a few more examples of the program running, with different initial triangles and where the circle has been clicked quite a few times, creating many differently colored dots:
2.5.1. About this pattern
It may seem surprising, and even somewhat remarkable, that our very random process appears to always produce this very regular pattern, regardless of where we choose the points of our initial triangle to be.
You do not need to know this, but for the curious: the pattern that emerges from this process is called the Sierpinski triangle, which is a kind of fractal. If you enjoyed seeing this pattern emerge, you may also enjoy reading more about it at the linked article.
2.6. Hints
-
If you want to slow down the drawing of the points a little, you can use the
sleepfunction from thetimepackage (already imported in the starter code). Callingsleep(1)will sleep for 1 second;sleep(0.001)will sleep for one millisecond.
2.7. Requirements
|
The code you submit for labs is expected to follow good style practices, and to meet one of the course standards, you’ll need to demonstrate good style on six or more of the lab assignments across the semester. To meet the good style expectations, you should:
In addition, you’ll need to demonstrate good top-down design practices on two or more lab assignments across the semester. To meet the top-down design expectations, you should:
|
-
Your program must exit when the user clicks the rectangle
-
Your program must draw a triangle when the user clicks three times inside the window, using the three click locations as the triangle’s points
-
Your program must draw points as described
-
The color used for new points must change to a randomly generated color when the circle is clicked
-
Your program must define the functions:
make_bottom_rect,make_circle,make_triangle,midpoint, andrand_color, as specified
3. (Optional) Extra challenges
-
You can add extra click functions, such as changing the background color to a random one if the user clicks anywhere outside the circle or rectangle
-
Add support for other shapes: add a prompt to ask the user for the number of points, then wait for that many clicks and use all of them to define a polygon. See if any other shapes produce interesting patterns.
-
Try changing the "points" from dots to tiny shapes, such as drawing a tiny triangle at each point.
Answer the Questionnaire
After each lab, please complete the short Google Forms questionnaire. Please select the right lab number (Lab 06) from the dropdown menu on the first question.
Once you’re done with that, you should run handin21 again.
Submitting lab assignments
Remember to run handin21 to turn in your lab files! You may run handin21
as many times as you want. Each time it will turn in any new work. We
recommend running handin21 after you complete each program or after you
complete significant work on any one program.
Logging out
When you’re done working in the lab, you should log out of the computer you’re using.
First quit any applications you are running, including your vscode editor, the browser and the
terminal. Then click on the logout icon ( or
or
 ) and choose "log out".
If you plan to leave the lab for just a few minutes, you do not need to log
out. It is, however, a good idea to lock your machine while you are gone. You
can lock your screen by clicking on the lock  icon.
PLEASE do not leave a session locked for a long period of time. Power may go
out, someone might reboot the machine, etc. You don’t want to lose any work!
icon.
PLEASE do not leave a session locked for a long period of time. Power may go
out, someone might reboot the machine, etc. You don’t want to lose any work!