CS21 Lab 6: Graphics, Using Objects
Due Saturday, October 23, by midnight
Programming Tips
As you write your first programs, start using good programming practices now:
-
Use a comment at the top of the file to describe the purpose of the program (see example).
-
All programs should have a
main()function (see example). -
Use variable names that describe the contents of the variables.
-
Write your programs incrementally and test them as you go. This is really crucial to success: don’t write lots of code and then test it all at once! Write a little code, make sure it works, then add some more and test it again.
-
Don’t assume that if your program passes the sample tests we provide that it is completely correct. Come up with your own test cases and verify that the program is producing the right output on them.
-
Avoid writing any lines of code that exceed 80 columns.
-
Atom shows the column number in the lower left and draws a vertical line down the editing window at 80 characters.
-
In
emacs, at the bottom, center of the window, there is an indication of both the line and the column of the cursor.
-
Are your files in the correct place?
Make sure all programs are saved to your cs21/labs/06 directory! Files
outside that directory will not be graded.
$ update21
$ cd ~/cs21/labs/06
$ pwd
/home/username/cs21/labs/06
$ ls
Questions-06.txt
(should see your program files here)
Goals
The goals for this lab assignment are:
-
object-oriented programming (OOP)
-
dot notation
-
intro to graphics
-
OOP using the graphics library
1. Draw an Animal Face
In the file drawFace.py, write a program that draws an animal face using the graphics library. Below are two examples of animal faces drawn by previous CS21 students:
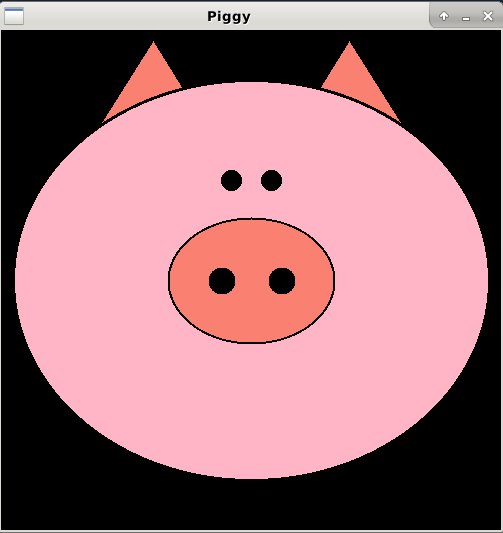
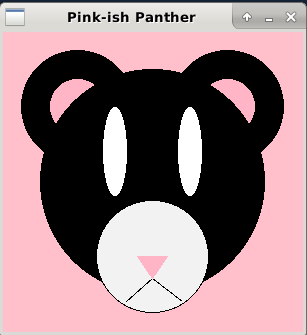
Here are more details on this part of the lab assignment:
-
The faces should be centered in the graphics window and largely fill the space.
-
Your program should keep the face on the screen until the user clicks the mouse. Then, the gaphics window should close and your program should end.
-
You should base the positions and sizes of the facial features based on coordinates where (0,0) is the lower left corner and (100,100) is the upper right.
-
use the setCoords() method to set these coordinates. (https://www.cs.swarthmore.edu/courses/CS21/F21/docs/graphics.html#_graphwin)
-
Your face should draw correctly in different-sized windows. Be sure to test this. You can assume the window will always be square.
-
Use several different colors.
-
Use several different shapes.
**Note:** For symmetrical shapes like eyes or ears, you can use the
  `clone` method to make a copy of the original shape.  Then, draw
  the cloned shape in the window and move it to the desired
  location.
Have fun! Your image does not have to be of the highest artistic quality.
2. Springtime Flowers
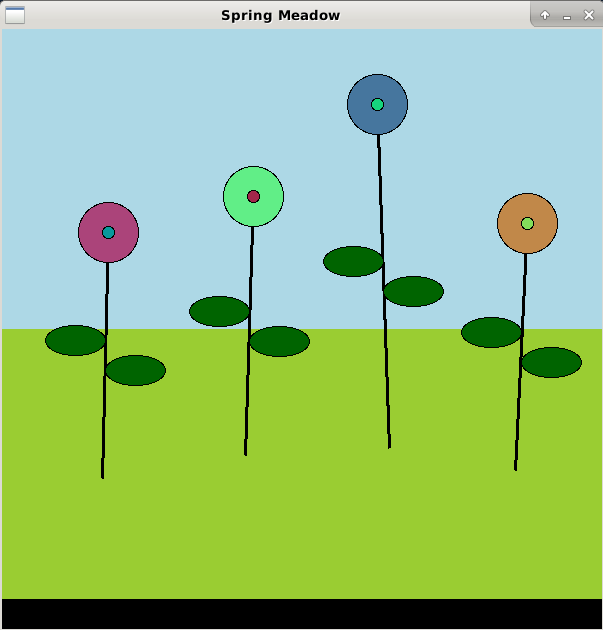
“If Winter comes, can Spring be far behind” - Percy Bysshe Shelley. We will create an interactive program to make a meadow of unique flowers. Using mouse clicks, your program will allow the user to specify the location and height of as many flowers as they’d like. When they are done making flowers they can quit the program by clicking on the black border at the bottom of the window.
Open the program drawFlowers.py and work incrementally toward drawing a picture like the one above.
-
Begin by importing the graphics library after your opening comment and before the main function. In the main function create a graphics window and set the background of the window to a sky-like color. Also use the
getMouse()method of the window to wait until the user clicks before ending the program. Test your program. -
Create a function
makeGrass(window)that takes the graphics window and makes a rectangle that is half the size of the window, is located in the bottom half of the window, and is colored green. Call the function in the main function to test that it works. -
Create a function
makeBorder(window)that takes the graphics window and makes a rectangle that is 5% of the window’s height, is colored black and is positioned at the very bottom of the window. Call the function in the main function to test that it works. -
Add a while loop to the main function so that it continues to accept mouse clicks until the user clicks in the black border area. You’ll know this has happened when the y-component of the clicked point is greater than 95% of the window’s height. Test that this works.
-
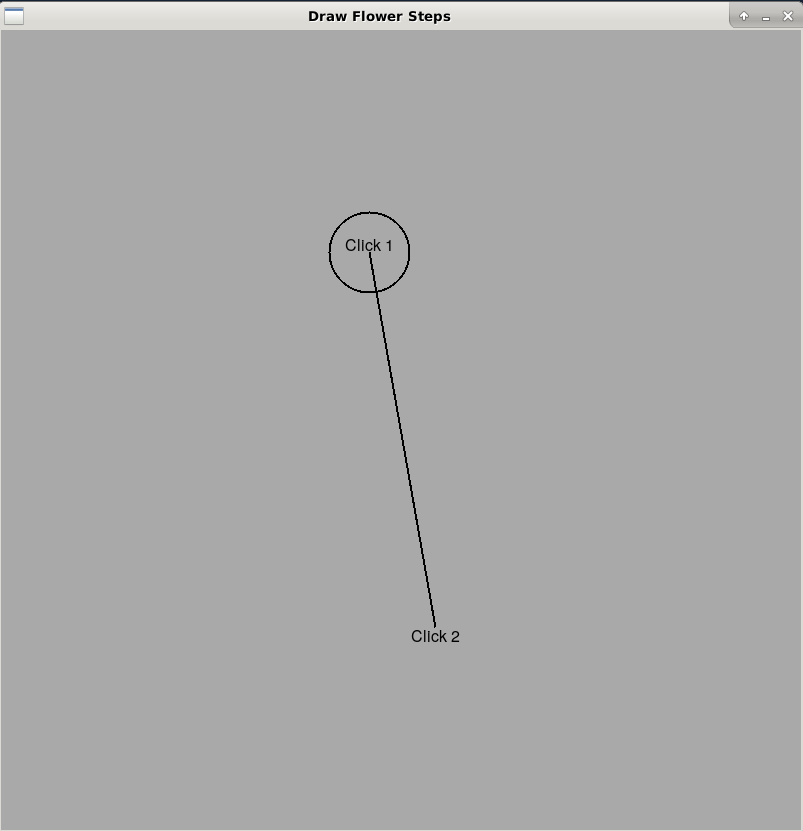
Create a function
makeFlower(window, click1)that takes the graphics window and a point generated from a mouse click. This point represents the location of the center of the blossom of the flower (click 1in the picture below). This function should draw a circle to represent the blossom that has a radius which is 5% of the window’s width. This function should then get a second mouse click (click 2in the picture below), representing the end of the stem. It should draw a line betweenclick1andclick2. Don’t worry about adding colors now, just be sure you can make this skeleton of a flower first. Call this function inside the main function’s loop.
-
Edit your
makeFlower(…)function to make the blossom of the flower a random color. Add a smaller inner circle to the flower that is also a random color. Make the stem thicker and add color if you’d like. Test your program to check that you are getting random colors each time. -
The graphics library layers objects in the order they are drawn. While drawing the flower, we want the user to see the blossom of the flower appear as soon as they do the first click, so we need to draw this first. Then when we want the stem to appear as soon as they make the second click. Thus the stem will be drawn on top of the blossom, which doesn’t look good. To make our flower look nicer, after we’ve drawn the stem, we can call
redraw()on the blossom. Test the program after this change. -
Edit your
makeFlower(…)function to add the leaves. Use the getCenter() method to find the center point of the stem. Make two symmetrical Oval objects, one above the center point, and one below. Ovals are defined by a bounding rectangle based on two points. Each of your leaves will use the stem’s center point as one of these points. For the left leaf, create another point that is above and to the left of the stem’s center point. For the right leaf, create another point that is below and to the right of the stem’s center point. Test that your program creates the leaves correctly. -
Once you’ve completed these steps, your program should be drawing a lovely meadow of flowers.
3. Answer the questionnaire
Each lab will have a short questionnaire at the end. Please edit
the Questions-06.txt file in your cs21/labs/06 directory
and answer the questions in that file.
Once you’re done with that, run handin21 again.
4. Extending drawFlower() — optional
This is an optional extra challenge. This part does not affect your grade so please only attempt this after completing the rest of your lab. It is simply an extra challenge, if you want to try it.
There are many possible ways of extending your Springtime Flower program. In a new file extendedFlowers.py try adding one of the following features:
1) Make a new function called makeBigLittleFlower() which is like drawFlower() but that draws flowers that are not only randomized in color, but also in the diameter of their blossom and center (within a range you specify).
2) Make a new function called makeCloudyFlower() which is like drawFlower(), but replaces unrooted flowers with clouds. In other words, if the second click to draw a flower is in the blue region, makeCloudyFlower undraws the blossom and center, and replaces them with a cloud.
3) Make a new function called makeDistantFlower() which is like drawFlower() but that uses the color_rgb(red, green, blue) function to specify colors such that flowers are darker if rooted closer to the top (or back) of the green field, and lighter if they are rooted closer to the bottom (or front). This will mean changing the color of the blossom and center between undrawing and redrawing.
4) Make a new function called makeCustomFlower() that draws flowers in a way you specify. Be creative and have fun!
Turning in your labs…
Remember to run handin21 to turn in your lab files! You may run handin21
as many times as you want. Each time it will turn in any new work. We
recommend running handin21 after you complete each program or after you
complete significant work on any one program.
Logging out
When you’re done working in the lab, you should log out of the computer you’re
using. First quit any applications you are running, like the browser and the
terminal. Then click on the logout icon ( or
or
 ) and choose "log out".
If you plan to leave the lab for just a few minutes, you do not need to log
out. It is, however, a good idea to lock your machine while you are gone. You
can lock your screen by clicking on the lock  icon.
PLEASE do not leave a session locked for a long period of time. Power may go
out, someone might reboot the machine, etc. You don’t want to lose any work!
icon.
PLEASE do not leave a session locked for a long period of time. Power may go
out, someone might reboot the machine, etc. You don’t want to lose any work!