/local that only you and your partner
can access. Even though you can only run qemu on the machine on which
you are assigned (since it is the only one, and should be the only one, with
your qemu machine in /local), you can ssh into your CS lab
machine from any other lab machine and run qemu remotely.
For example, if the PC's name is cream, then you would type the following to connect (-X enables X forwarding, use -Y if ssh'ing from MAC-OSX):
% ssh -X cream
The -X option enables X forwarding in a secure way.
cs45. The password for both root and cs45
is swatcs.45.
Next, only one of you or your partner should do the following (you and your partner are sharing the same qemu files and kernel source, so it is up to you to coordinate changes that you make to it):
% ssh -X my_pc
/local that you and your
partner will share.
For example, if my working_dir is named tia_n_pal:
    % mkdir /local/tia_n_pal
    % chmod 700 /local/tia_n_pal
/scratch/vm into your
/local/working_dir subdirectory
    % cp /scratch/vm/linux-2.6.32.44.tar.bz2  /local/tia_n_pal/.
    % cp /scratch/vm/qemu/cs45f11_debian.img   /local/tia_n_pal/.
  % easyfacl.py
    Enter a space separated list of users: newhall pal
    Enter a pathname (relative or full): /local/tia_n_pal
    ...
A note about copying files into directories with acls (vs. creating files in the directory): on directories with acls if you create a new file or directory in the acl directory the default acls apply to the new file or directory (this is great). If, however, you copy an existing file into a directory with acls, the acls do not apply to the copied file (this is unfortunate). There are two things you can do to set acls on a file you copy into the acl directory:
  cd /local/me_and_pal/.
  cp ~/private/cs45/foo   .
  setfacl -m user:yourname:rwx,user:your_pals_username:rwx foo
  cd /local/me_and_pal/.
  touch foo                   # creates foo with acls set!
  cp ~/private/cs45/foo  .
See Safe File Sharing for Group Projects for more information on setting, listing, and removing ACLs, and easyfacl.py for more information on easyfacl.py)
note: we do not do back-ups of /local, so I suggest you create a bare git repository in one of your home directories. Each of you can then clone a copy of it in a private subdirectory of your home directory, and clone a copy into /local/you_and_pal/. Periodically, add, commit, and push the linux kernel files you change, and other files you create for testing lab project code. Make sure to include in your repository only the linux source and header files that you modify for the current lab assignment, and not the entire linux kernel source tree. These are the files that you will submit for each lab assignment.
% ssh -X cream
   $ sudo tunctl -b -u your_user_name
   $ sudo /sbin/ifconfig tap0 172.20.0.1

   # I'd do:
   $ sudo tunctl -b -u newhall
   $ sudo /sbin/ifconfig tap0 172.20.0.1

   ## to see results (you should see an entry for tap0):
   $ ifconfig -a
If you run /sbin/ifconfig -a in another window, you will see that the tap0 entry now has been assigned IP 172.20.0.1
If you have problems with the tap network you can turn it off and try the above steps again. To turn it off:
$ sudo tunctl -d tap0The first time you run sudo, you will see warning message and you will be asked to enter your password.
    $ cd /local/you_n_partner/

    # start qemu in graphics mode
    $  qemu-system-x86_64  -m 256 -net nic -net tap,ifname=tap0,script=no -hda cs45f11_debian.img

    # -nographic starts qemu without graphics mode
    $  qemu-system-x86_64  -nographic -m 256 -net nic -net tap,ifname=tap0,script=no -hda cs45f11_debian.img
This starts qemu which will begin the boot process bringing up the
grub menu from which you can select a kernel to boot.
Initially, the default kernel is 2.6.32.44-cs45start.
For most cs45 assignments you will add and boot your own version
of the kernel, but always leave this one as an option.
You can also run qemu in graphics mode (run without the -nographics flag). In graphics mode a window pops up and you can move around in it using:
CNTRL-ALT frees your cursor from the QEMU window
CNTRL-ALT-1 gives you your booted kernel's prompt
CNTRL-ALT-2 gives you the qemu prompt (you will likely
only use this when you quit qemu)
SHIFT-PageUp to scroll up in the qemu terminal window
SHIFT-PageDown to scroll up in the qemu terminal window
The qemu image is set up with two accounts, one for root
and one for user cs45. The password for both
the root and cs45 accounts is swatcs.45.
You can change any of your
passwords, by running the passwd command.
You can also add new users to the system using the adduser command.
sync; sync; shutdown -h now
sync; sync; halt
sync; sync; reboot
If you are running in non-graphics mode, then from another window logged into my_pc type "pkill qemu" to send qemu a SIGKILL signal.
% sudo tunctl -d tap0If you forget to turn off the tap interface, either you or your partner can run this command to turn it off before re-starting it next time you run qemu.
These steps only need to be done once:
$ cp /scratch/vm/linux-2.6.32.44.tar.bz2 /local/you_n_partner/.
 $ cd /local/you_n_partner
 $ tar xjf linux-2.6.32.44.tar.bz2
 $ cd linux-2.6.32.44
 $ cp /scratch/vm/etc/config-FAST-2.6.32.44 .config
 $ make menuconfig 	# just choose Exit with the arrow keys
    # NOTE: make-kpkg clean wipes out everything that has been compiled before.
    #       For the very first build you need to do this step, but for subsequent
    #       builds you may want to not do it, and only if package builds are failing in
    #       odd ways try doing a make-kpkg clean to re-build
    #       everything from scratch ("from scratch" takes ~10 minutes)
    #
    $ cd /local/you_n_partner/linux-2.6.32.44
    $ fakeroot make-kpkg clean

    #
    # NOTE: change "whatever" after --append-to-version to something more
    #       meaningful to you.  for example, I might append -lab2 to my
    #       kernel version with my lab 2 solution
    #       (this build will take several minutes)
    #
    $  fakeroot make-kpkg --revision=1.0 --append-to-version -whatever kernel_image

    #
    # if you add new kernel header files, or change existing ones, you need
    # to build a kernel headers package too that contains your changed files:
    #
    $ fakeroot make-kpkg --revision=1.0 --append-to-version -whatever kernel_image kernel_headers

    make-kpkg creates files named:
    ------------------------------
      ../linux-image-2.6.32.44-whatever_1.0_amd64.deb
      ../linux-headers-2.6.32.44-whatever_1.0_amd64.deb
    % cd /local/you_n_partner/linux-2.6.32.44
    #
    # to re-build the kernel image
    #
    $ make bzImage

    this builds the kernel image in:
    --------------------------------
    /local/you_n_partner/linux-2.6.32.44/arch/x86_64/boot/bzImage
If this fails you can try some of the following and then
type 'make bzImage` again...or try build option 1
    # you don't always need to do this, but if you have changed include files
    # things don't seem to be getting built correctly do:
    $ make clean

    # do this only if you have added or removed #includes from existing
    # source or header files (you need to rebuild the dependencies in
    # this case):
    $ make dep
Two ways to install and boot your kernel
Which one you choose depends on which option you used to build it.
    # (a) from your CS machine, copy your kernel packages to your qemu machine:
    #
    $ scp linux-image-2.6.32.44-whatever_1.0_i386.deb root@172.20.0.2:.

    (note the first time you scp or ssh you will get RSA key finger print message, just type in yes and continue)

    # copy over kernel headers package:
    #
    $ scp linux-headers-2.6.32.44-whatever_1.0_i386.deb root@172.20.0.2:.


    # (b) Now, as root on your qemu machine install the packages:
    #     from root's home directory (or wherever you scp the files)
    $ ssh root@172.20.0.2
    $ dpkg -i linux-image-2.6.32.44-whatever_1.0_i386.deb

         there will by some "Hmmm..," warnings about symbolic links
         and missing /lib/modules/version/source it is deleting
         this is okay

    $ dpkg -i linux-headers-2.6.32.44-whatever_1.0_i386.deb

    # (c) reboot your qemu machine and choose your -whatever kernel
    #     from the grub menu
    #
    %  sync; sync; reboot


    # (d) verify that the new version of your kernel rebooted
    #
    $ uname -a
    Linux debian-amd64 2.6.32.44-whatever #1 Tue Sep 13 13:29:14 EDT 2011 x86_64 GNU/Linux


    # note: If this is a re-install of a kernel package that you
    # have already installed (i.e. the same -whatever flag as an
    # installed kernel package), you need to first remove the
    # old package(s), before you do the dpkg -i of the new ones:

    % dpkg -r linux-image-2.6.32.44-whatever

    # You can use the -I option to dpkg to list info about the package file,
    # including its name (used in the -r option)
    # (a) from your CS machine copy bzImage to your qemu machine
    # from /local/your_user_name/linux-2.6.32.44-lab2/arch/x86_64/boot/
    #
    % scp bzImage root@172.20.0.2:.

    # (b) on your qemu machine replace your old image with the new one:
    #
    %  mv /root/bzImage /boot/vmlinuz-2.6.32.44-whatever

    # (c) then update the grub loader
    #   it should find your version of the kernel /boot/vmlinuz-2.6.32.44-whatever
    #
    %  update-grub

    # (c) reboot your qemu machine and choose your -whatever kernel
    #     from the grub menu
    #
    %  sync; sync; reboot
Important Note about Modifying Kernel Source Files:
As you make changes to kernel source and header files, you should copy over
these changed files somewhere into your home directory.
You may want to
use a git repository to manage revisions to these files. We do periodic
backups of /home directories but do not backup
/local on the CS Lab machines (i.e. your changes to files in
/local/me_n_pal/linux-2.6.32.44/ are not backed up).
By copying over your kernel files that you modify somewhere in your /home, you
can take advantage of our file backup system to recover lost changes
you make to these files (see
Retrieving Lost Files).
Only copy kernel source and header files that
you actually modify into your home directory (don't copy all of the
kernel source into your home directory, as you will run out of disk space
if you do, and you can always grab a new copy of the kernel source from the
CS45 starting point).
Additionally, you can attach gdb to the kernel executable if you run qemu with the -s option (-s is shorthand for -gdb tcp::1234).
To use gdb, use the '-s' command line option to qemu:
% qemu-system-x86_64 -s <the rest of the qemu command depending on how you run it>qemu will wait for gdb to attach to the vmlinux process:
(qemu) Waiting gdb connection on port 1234In another window, start gdb on the vmlinux executable (from the linux-2.6.32.44 subdirectory):
% gdb vmlinuxset the architecture to match qemu's:
% set architecture i386:x86-64then, connect to qemu:
(gdb) target remote localhost:1234to let qemu continue execution:
(gdb) contYou can use CNTL-C to interrupt the kernel and get back the gdb prompt
you can set breakpoints in your system calls:
(gdb) break sys_getcurrenttimesee the GDB Guide for more information on using gdb.
If there is a mismatch between the target architecture and the architecture on which you are running gdb, you can set specify the target's architecture by doing this:
(gdb) set architecture i386:x86-64
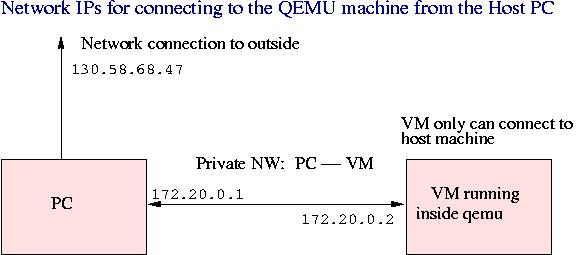
Because we do not have X installed on the qemu VM, you will likely want to ssh into your qemu VM from the machine on which you are running qemu. This is a useful way to work as it allows you to have multiple windows logged into your qemu machine, and you can leave the main qemu console for seeing printk output while working in other windows.
From the PC you can remotely log into your qemu machine using ssh (you can log in as root or as some other user account you created on your qemu machine):
% ssh some_qemu_usr@172.20.0.2
You can copy files to/from your PC from/to the qemu machine using scp:
# copy file foo.c from the PC to qemu machine in some_qemu_usr's proj2 subdirectory:
% scp foo.c some_qemu_usr@172.20.0.2:/home/qemu_usr/proj2/.

# copy foo.c from qemu machine to your private cs45 subdirectory on CS machines
% scp foo.c your_usr_name@172.20.0.1:/home/your_usr_name/cs45/.
After booting Linux on qemu, you can run /sbin/ifconfig from
within the qemu window to get your VM's IP addresses.
For example:
% /sbin/ifconfig

eth0      Link encap:Ethernet  HWaddr 52:54:00:12:34:56
          inet addr:172.20.0.2  Bcast:172.20.0.255  Mask:255.255.255.0
          UP BROADCAST RUNNING MULTICAST  MTU:1500  Metric:1
          RX packets:3765 errors:0 dropped:0 overruns:0 frame:0
          TX packets:1980 errors:0 dropped:0 overruns:0 carrier:0
          collisions:0 txqueuelen:1000
          RX bytes:5556513 (5.2 MiB)  TX bytes:155055 (151.4 KiB)
          Interrupt:9 Base address:0xc100

lo        Link encap:Local Loopback
          inet addr:127.0.0.1  Mask:255.0.0.0
          UP LOOPBACK RUNNING  MTU:16436  Metric:1
          RX packets:12 errors:0 dropped:0 overruns:0 frame:0
          TX packets:12 errors:0 dropped:0 overruns:0 carrier:0
          collisions:0 txqueuelen:0
The eth0 entry contains the IP address of your qemu
machine: inet addr:172.20.0.2 (you use this IP to
connect from the PC to your qemu machine).
Similarly, on the PC running qemu, you can run /sbin/ifconfig. For example:
% /sbin/ifconfig -a

eth0      Link encap:Ethernet  HWaddr 00:07:E9:62:68:A5
          inet addr:130.58.68.47  Bcast:130.58.68.255  Mask:255.255.255.0
          UP BROADCAST RUNNING MULTICAST  MTU:1500  Metric:1
          RX packets:1869144 errors:0 dropped:0 overruns:0 frame:0
          TX packets:802064 errors:0 dropped:0 overruns:0 carrier:0
          collisions:0 txqueuelen:1000
          RX bytes:2469282803 (2.2 GiB)  TX bytes:171113790 (163.1 MiB)
          Base address:0xdf40 Memory:fcfe0000-fd000000

lo        Link encap:Local Loopback
          inet addr:127.0.0.1  Mask:255.0.0.0
          UP LOOPBACK RUNNING  MTU:16436  Metric:1
          RX packets:52765 errors:0 dropped:0 overruns:0 frame:0
          TX packets:52765 errors:0 dropped:0 overruns:0 carrier:0
          collisions:0 txqueuelen:0
          RX bytes:34671242 (33.0 MiB)  TX bytes:34671242 (33.0 MiB)

tun0      Link encap:Ethernet  HWaddr 00:FF:D8:62:ED:EB
          inet addr:172.20.0.1  Bcast:172.20.255.255  Mask:255.255.0.0
          UP BROADCAST RUNNING MULTICAST  MTU:1500  Metric:1
          RX packets:2004 errors:0 dropped:0 overruns:0 frame:0
          TX packets:3794 errors:0 dropped:0 overruns:0 carrier:0
          collisions:0 txqueuelen:1000
          RX bytes:159434 (155.6 KiB)  TX bytes:5560520 (5.3 MiB)
On the PC, the entry tun0 gives the private qemu network IP
for the PC (172.20.0.1 in this example). The qemu machine
can ssh or scp to the PC using this IP.
Remember: you can only connect to your qemu machine from the PC on which you are running qemu.
Check /boot/grub/menu.lst to see if there is and entry for your kernel, it will appear after the default options, for example:
   ...
   ## ## End Default Options ##

   title           Debian GNU/Linux, kernel 2.6.32.44-whatever
   root            (hd0,0)
   kernel          /boot/vmlinuz-2.6.32.44-whatever root=/dev/hda1 ro ide1=noprobe ide2=n
   oprobe ide3=noprobe ide4=noprobe ide5=noprobe console=tty0 console=ttyS0,9600
   savedefault
If no entry for your kernel exits, run update-grub, and check that an entry for your new kernel is added (if not, you didn't install the package correctly).
If there is an entry for your kernel but it isn't the first entry, then change the value of default to the number of your entry. For example, if my kernel is the fourth one listed, I'd set default to 3:
   ## default num
   # Set the default entry to the entry number NUM. Numbering starts from 0, and
   # the entry number 0 is the default if the command is not used.
   #
   default         3
then, sync; sync; reboot and your kernel version should boot